Android中闪屏实现方法小结(普通闪屏、倒计时闪屏、倒计时+动画闪屏)
更新时间:2017年01月03日 15:55:13 作者:songyi160
这篇文章主要介绍了Android中闪屏实现方法小结(普通闪屏、倒计时闪屏、倒计时+动画闪屏),非常不错,代码简单易懂,需要的朋友可以参考下
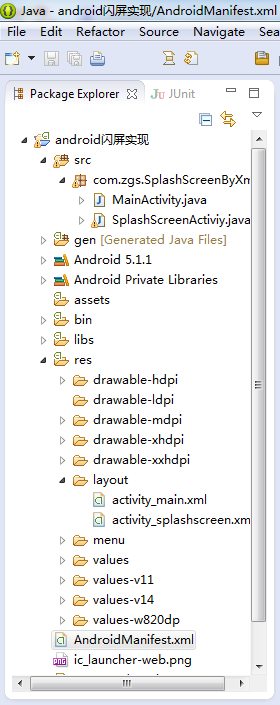
一、项目目录结构

二、activity_main.xml代码
<RelativeLayout xmlns:android="http://schemas.android.com/apk/res/android"
  xmlns:tools="http://schemas.android.com/tools"
  android:layout_width="match_parent"
  android:layout_height="match_parent"
  android:paddingBottom="@dimen/activity_vertical_margin"
  android:paddingLeft="@dimen/activity_horizontal_margin"
  android:paddingRight="@dimen/activity_horizontal_margin"
  android:paddingTop="@dimen/activity_vertical_margin"
  tools:context="com.zgs.SplashScreenByXml.MainActivity" >
  <TextView
    android:layout_width="wrap_content"
    android:layout_height="wrap_content"
    android:text="主页面" />
</RelativeLayout>
三、activity_splashscreen.xml代码
<?xml version="1.0" encoding="utf-8"?>
<LinearLayout xmlns:android="http://schemas.android.com/apk/res/android"
  android:layout_width="match_parent"
  android:layout_height="match_parent"
  android:background="@drawable/splash"
  android:orientation="vertical"
  android:id="@+id/ll_splashActivity">
  <TextView
    android:id="@+id/tv_countDown"
    android:layout_width="wrap_content"
    android:layout_height="wrap_content"
    android:layout_gravity="end"
    android:layout_marginEnd="20dp"
    android:layout_marginTop="20dp"
    android:textColor="@android:color/white"
    android:textSize="20sp" />
</LinearLayout>
四、SplashScreenActiviy.java代码
package com.zgs.SplashScreenByXml;
import android.app.Activity;
import android.content.Intent;
import android.os.Bundle;
import android.os.CountDownTimer;
import android.os.Handler;
import android.view.View;
import android.view.Window;
import android.view.WindowManager;
import android.view.animation.Animation;
import android.view.animation.Animation.AnimationListener;
import android.view.animation.TranslateAnimation;
import android.widget.LinearLayout;
import android.widget.TextView;
import com.zgs.CommonlySplashScreen.R;
public class SplashScreenActiviy extends Activity {
  private TextView tv_countDown;
  private LinearLayout ll_splashActivity;
  @Override
  protected void onCreate(Bundle savedInstanceState) {
    super.onCreate(savedInstanceState);
    // 通过下面两行代码也可实现全屏无标题栏显示activity
    // getWindow().setFlags(WindowManager.LayoutParams.FLAG_FULLSCREEN, WindowManager.LayoutParams.FLAG_FULLSCREEN);
    // this.requestWindowFeature(Window.FEATURE_NO_TITLE);
    setContentView(R.layout.activity_splashscreen);
    tv_countDown = (TextView) findViewById(R.id.tv_countDown);
    ll_splashActivity = (LinearLayout) findViewById(R.id.ll_splashActivity);
    /********************************************************************************
     *
     * 普通闪屏实现方式
     *
     * ******************************************************************************/
    /*new Handler().postDelayed(new Runnable() {
      @Override
      public void run() {
        Intent intent = new Intent(getApplicationContext(), MainActivity.class);
        startActivity(intent);
        finish();
      }
    }, 1000*4);*/
    /********************************************************************************
     *
     * 倒计时闪屏实现方式
     *
     * ******************************************************************************/
    /*MyCountDownTimer mc = new MyCountDownTimer(4000, 1000);
    mc.start();
    new Handler().postDelayed(new Runnable() {
      @Override
      public void run() {
        Intent intent = new Intent(getApplicationContext(), MainActivity.class);
        startActivity(intent);
        finish();
      }
    }, 1000*4);*/
    /********************************************************************************
     *
     * 倒计时+动画闪屏实现方式
     *
     * ******************************************************************************/
    MyCountDownTimer mc = new MyCountDownTimer(4000, 1000);
    mc.start();
    new Handler().postDelayed(new Runnable() {
      @Override
      public void run() {
        //左移动画
        TranslateAnimation ta = new TranslateAnimation(Animation.RELATIVE_TO_PARENT, 0, Animation.RELATIVE_TO_PARENT, -1, Animation.RELATIVE_TO_PARENT, 0, Animation.RELATIVE_TO_PARENT, 0);
        ta.setDuration(2000); //设置动画执行的时间
        ta.setFillAfter(true);//当动画结束后 动画停留在结束位置,然后等启动主界面后将其销毁
        ll_splashActivity.startAnimation(ta);
        ta.setAnimationListener(new AnimationListener() {
          @Override
          public void onAnimationStart(Animation arg0) {
          }
          @Override
          public void onAnimationRepeat(Animation arg0) {
          }
          @Override
          public void onAnimationEnd(Animation arg0) {
            Intent intent = new Intent(getApplicationContext(), MainActivity.class);
            startActivity(intent);
            finish();
          }
        });
      }
    }, 1000*4);
  }
  class MyCountDownTimer extends CountDownTimer {
    //millisInFuture:倒计时的总数,单位毫秒
    //例如 millisInFuture=1000;表示1秒
    //countDownInterval:表示间隔多少毫秒,调用一次onTick方法()
    //例如: countDownInterval =1000;表示每1000毫秒调用一次onTick()
    public MyCountDownTimer(long millisInFuture, long countDownInterval) {
      super(millisInFuture, countDownInterval);
    }
    public void onFinish() {
      tv_countDown.setText("开始跳转……");
    }
    public void onTick(long millisUntilFinished) {
      tv_countDown.setText("倒计时(" + millisUntilFinished / 1000 + ")");
    }
  }
}
五、MainActivity.java代码
package com.zgs.SplashScreenByXml;
import android.app.Activity;
import android.os.Bundle;
import com.zgs.CommonlySplashScreen.R;
public class MainActivity extends Activity {
  @Override
  protected void onCreate(Bundle savedInstanceState) {
    super.onCreate(savedInstanceState);
    setContentView(R.layout.activity_main);
    //为了让闪屏结束后更自然的过度到主界面,去除主界面的启动动画,将下面函数的第一个参数设为0即可
    overridePendingTransition(0, 0);
  }
}
六、操作演示

以上所述是小编给大家介绍的Android中闪屏实现方法小结(普通闪屏、倒计时闪屏、倒计时+动画闪屏),希望对大家有所帮助,如果大家有任何疑问请给我留言,小编会及时回复大家的。在此也非常感谢大家对脚本之家网站的支持!
相关文章

Android studio报错:The emulator process for AVD (xxx) was kill
这篇文章主要介绍了Android studio报错:The emulator process for AVD (xxx) was killed,文中通过示例代码介绍的非常详细,对大家的学习或者工作具有一定的参考学习价值,需要的朋友们下面随着小编来一起学习学习吧2020-12-12
Android程序开发之UIScrollerView里有两个tableView
这篇文章主要介绍了UIScrollerView里有两个tableView 的相关资料,需要的朋友可以参考下2016-04-04
Kotlin之自定义 Live Templates详解(模板代码)
这篇文章主要介绍了Kotlin之自定义 Live Templates详解(模板代码),具有很好的参考价值,希望对大家有所帮助。一起跟随小编过来看看吧2020-03-03


最新评论