Android如何设置圆角图片
更新时间:2021年04月22日 14:42:13 作者:小花猫cat
这篇文章主要为大家详细介绍了Android如何设置圆角图片,文中示例代码介绍的非常详细,具有一定的参考价值,感兴趣的小伙伴们可以参考一下
在开发过程中有时需要将图片显示成圆角图片,一般我们可以通过在xml中设置drawable shape即可,但今天我给出另一种方法,用java代码动态去设置圆角,顺便做个简单的笔记。
主要原理是使用系统自带api:
RoundedBitmapDrawableFactory
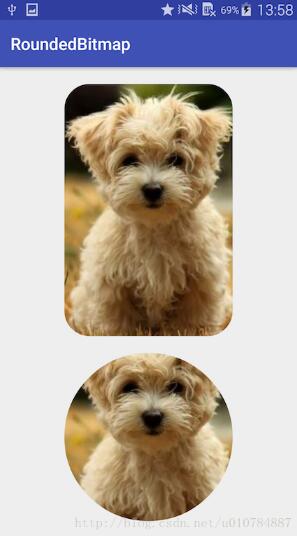
先上效果图:

由于比较简单,直接给出实现方式:
public class MainActivity extends AppCompatActivity {

 private ImageView mImgRectRound;
 private ImageView mImgRound;

 @Override
 protected void onCreate(Bundle savedInstanceState) {
  super.onCreate(savedInstanceState);
  setContentView(R.layout.activity_main);
  mImgRectRound = (ImageView) findViewById(R.id.img_rect_rounded);
  mImgRound = (ImageView) findViewById(R.id.img_rounded);
  rectRoundBitmap();
  roundBitmap();
 }

 private void rectRoundBitmap(){
  //得到资源文件的BitMap
  Bitmap image= BitmapFactory.decodeResource(getResources(),R.drawable.dog);
  //创建RoundedBitmapDrawable对象
  RoundedBitmapDrawable roundImg =RoundedBitmapDrawableFactory.create(getResources(),image);
  //抗锯齿
  roundImg.setAntiAlias(true);
  //设置圆角半径
  roundImg.setCornerRadius(30);
  //设置显示图片
  mImgRectRound.setImageDrawable(roundImg);
 }

 private void roundBitmap(){
  //如果是圆的时候,我们应该把bitmap图片进行剪切成正方形, 然后再设置圆角半径为正方形边长的一半即可
  Bitmap image = BitmapFactory.decodeResource(getResources(), R.drawable.dog);
  Bitmap bitmap = null;
  //将长方形图片裁剪成正方形图片
  if (image.getWidth() == image.getHeight()) {
   bitmap = Bitmap.createBitmap(image, image.getWidth() / 2 - image.getHeight() / 2, 0, image.getHeight(), image.getHeight());
  } else {
   bitmap = Bitmap.createBitmap(image, 0, image.getHeight() / 2 - image.getWidth() / 2, image.getWidth(), image.getWidth());
  }
  RoundedBitmapDrawable roundedBitmapDrawable = RoundedBitmapDrawableFactory.create(getResources(), bitmap);
  //圆角半径为正方形边长的一半
  roundedBitmapDrawable.setCornerRadius(bitmap.getWidth() / 2);
  //抗锯齿
  roundedBitmapDrawable.setAntiAlias(true);
  mImgRound.setImageDrawable(roundedBitmapDrawable);
 }
}
布局文件:
<?xml version="1.0" encoding="utf-8"?>
<LinearLayout xmlns:android="http://schemas.android.com/apk/res/android"
 xmlns:tools="http://schemas.android.com/tools"
 android:id="@+id/activity_main"
 android:layout_width="match_parent"
 android:layout_height="match_parent"
 android:orientation="vertical"
 tools:context="com.cjl.roundedbitmap.MainActivity">

 <ImageView
  android:id="@+id/img_rect_rounded"
  android:layout_width="200dp"
  android:layout_height="300dp"
  android:layout_marginTop="20dp"
  android:layout_gravity="center_horizontal"/>

 <ImageView
  android:id="@+id/img_rounded"
  android:layout_marginTop="20dp"
  android:layout_width="200dp"
  android:layout_height="200dp"
  android:layout_gravity="center_horizontal"/>
</LinearLayout>
如有问题,欢迎指正,谢谢。
以上就是本文的全部内容,希望对大家的学习有所帮助,也希望大家多多支持脚本之家。
相关文章

Android自定义ImageView实现点击两张图片切换效果
这篇文章主要为大家详细介绍了Android自定义ImageView实现点击两张图片切换效果,文中示例代码介绍的非常详细,具有一定的参考价值,感兴趣的小伙伴们可以参考一下2017-12-12
Android使用setCustomTitle()方法自定义对话框标题
Android有自带的对话框标题,但是不太美观,如果要给弹出的对话框设置一个自定义的标题,使用AlertDialog.Builder的setCustomTitle()方法非常方便,接下来通过本文给大家介绍Android使用setCustomTitle()方法自定义对话框标题,感兴趣的朋友一起学习吧2016-02-02


最新评论