react native带索引的城市列表组件的实例代码
更新时间:2017年08月08日 09:25:57 作者:code_xzh
本篇文章主要介绍了react-native城市列表组件的实例代码,小编觉得挺不错的,现在分享给大家,也给大家做个参考。一起跟随小编过来看看吧
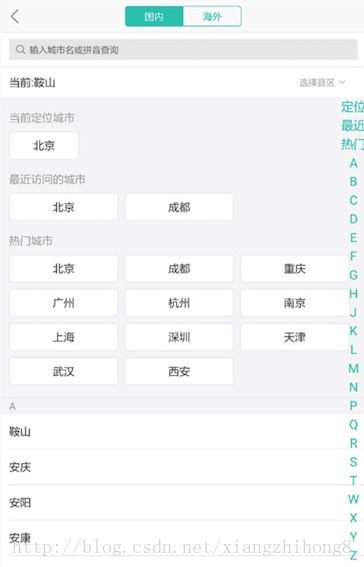
城市列表选择是很多app共有的功能,比如典型的美图app。那么对于React Native怎么实现呢?

要实现上面的效果,首先需要对界面的组成简单分析,界面的数据主要由当前城市,历史访问城市和热门城市组成,所以我们在提供Json数据的时候就需要将数据分为至少3部分。
const ALL_CITY_LIST = DATA_JSON.allCityList;
const HOT_CITY_LIST = DATA_JSON.hotCityList;
const LAST_VISIT_CITY_LIST = DATA_JSON.lastVisitCityList;
而要实现字母索引功能,我们需要自定义一个控件,实现和数据的绑定关系,自定义组件代码如下:
CityIndexListView.js
'use strict';
import React, {Component} from 'react';
import {
  StyleSheet,
  View,
  Text,
  TouchableOpacity,
  ListView,
  Dimensions,
} from 'react-native';

import Toast, {DURATION} from './ToastUtil'

const SECTIONHEIGHT = 30;
const ROWHEIGHT = 40;
const ROWHEIGHT_BOX = 40;
var totalheight = []; //每个字母对应的城市和字母的总高度

const {width, height} = Dimensions.get('window');

var that;

const key_now = '当前';
const key_last_visit = '最近';
const key_hot = '热门';

export default class CityIndexListView extends Component {

  constructor(props) {
    super(props);

    var getSectionData = (dataBlob, sectionID) => {
      return sectionID;
    };
    var getRowData = (dataBlob, sectionID, rowID) => {
      return dataBlob[sectionID][rowID];
    };

    let ALL_CITY_LIST = this.props.allCityList;
    let CURRENT_CITY_LIST = this.props.nowCityList;
    let LAST_VISIT_CITY_LIST = this.props.lastVisitCityList;
    let HOT_CITY_LIST = this.props.hotCityList;

    let letterList = this._getSortLetters(ALL_CITY_LIST);

    let dataBlob = {};
    dataBlob[key_now] = CURRENT_CITY_LIST;
    dataBlob[key_last_visit] = LAST_VISIT_CITY_LIST;
    dataBlob[key_hot] = HOT_CITY_LIST;

    ALL_CITY_LIST.map(cityJson => {
      let key = cityJson.sortLetters.toUpperCase();

      if (dataBlob[key]) {
        let subList = dataBlob[key];
        subList.push(cityJson);
      } else {
        let subList = [];
        subList.push(cityJson);
        dataBlob[key] = subList;
      }
    });

    let sectionIDs = Object.keys(dataBlob);
    let rowIDs = sectionIDs.map(sectionID => {
      let thisRow = [];
      let count = dataBlob[sectionID].length;
      for (let ii = 0; ii < count; ii++) {
        thisRow.push(ii);
      }

      let eachheight = SECTIONHEIGHT + ROWHEIGHT * thisRow.length;
      if (sectionID === key_hot || sectionID === key_now || sectionID === key_last_visit) {
        let rowNum = (thisRow.length % 3 === 0)
          ? (thisRow.length / 3)
          : parseInt(thisRow.length / 3) + 1;

        console.log('sectionIDs===>' + sectionIDs + ", rowNum=====>" + rowNum);

        eachheight = SECTIONHEIGHT + ROWHEIGHT_BOX * rowNum;
      }

      totalheight.push(eachheight);

      return thisRow;
    });


    let ds = new ListView.DataSource({
      getRowData: getRowData,
      getSectionHeaderData: getSectionData,
      rowHasChanged: (row1, row2) => row1 !== row2,
      sectionHeaderHasChanged: (s1, s2) => s1 !== s2
    });

    this.state = {
      dataSource: ds.cloneWithRowsAndSections(dataBlob, sectionIDs, rowIDs),
      letters: sectionIDs
    };

    that = this;
  }

  _getSortLetters(dataList) {
    let list = [];

    for (let j = 0; j < dataList.length; j++) {
      let sortLetters = dataList[j].sortLetters.toUpperCase();

      let exist = false;
      for (let xx = 0; xx < list.length; xx++) {
        if (list[xx] === sortLetters) {
          exist = true;
        }
        if (exist) {
          break;
        }
      }
      if (!exist) {
        list.push(sortLetters);
      }
    }

    return list;
  }

  _cityNameClick(cityJson) {
    // alert('选择了城市====》' + cityJson.id + '#####' + cityJson.name);
    this.props.onSelectCity(cityJson);
  }

  _scrollTo(index, letter) {
    this.refs.toast.close();
    let position = 0;
    for (let i = 0; i < index; i++) {
      position += totalheight[i]
    }
    this._listView.scrollTo({y: position});
    this.refs.toast.show(letter, DURATION.LENGTH_SHORT);
  }

  _renderRightLetters(letter, index) {
    return (
      <TouchableOpacity key={'letter_idx_' + index} activeOpacity={0.6} onPress={() => {
        this._scrollTo(index, letter)
      }}>
        <View style={styles.letter}>
          <Text style={styles.letterText}>{letter}</Text>
        </View>
      </TouchableOpacity>
    );
  }

  _renderListBox(cityJson, rowId) {
    return (
      <TouchableOpacity key={'list_item_' + cityJson.id} style={styles.rowViewBox} onPress={() => {
        that._cityNameClick(cityJson)
      }}>
        <View style={styles.rowdataBox}>
          <Text style={styles.rowDataTextBox}>{cityJson.name}</Text>
        </View>
      </TouchableOpacity>
    );
  }

  _renderListRow(cityJson, rowId) {
    console.log('rowId===>' + rowId + ", cityJson====>" + JSON.stringify(cityJson));
    if (rowId === key_now || rowId === key_hot || rowId === key_last_visit) {
      return that._renderListBox(cityJson, rowId);
    }

    return (
      <TouchableOpacity key={'list_item_' + cityJson.id} style={styles.rowView} onPress={() => {
        that._cityNameClick(cityJson)
      }}>
        <View style={styles.rowdata}>
          <Text style={styles.rowdatatext}>{cityJson.name}</Text>
        </View>
      </TouchableOpacity>
    )
  }

  _renderListSectionHeader(sectionData, sectionID) {
    return (
      <View style={styles.sectionView}>
        <Text style={styles.sectionText}>
          {sectionData}
        </Text>
      </View>
    );
  }

  render() {
    return (
      <View style={styles.container}>
        <View style={styles.listContainner}>
          <ListView ref={listView => this._listView = listView}
               contentContainerStyle={styles.contentContainer} dataSource={this.state.dataSource}
               renderRow={this._renderListRow} renderSectionHeader={this._renderListSectionHeader}
               enableEmptySections={true} initialListSize={500}/>
          <View style={styles.letters}>
            {this.state.letters.map((letter, index) => this._renderRightLetters(letter, index))}
          </View>
        </View>
        <Toast ref="toast" position='top' positionValue={200} fadeInDuration={750} fadeOutDuration={1000}
            opacity={0.8}/>
      </View>
    )
  }
}

const styles = StyleSheet.create({
  container: {
    // paddingTop: 50,
    flex: 1,
    flexDirection: 'column',
    backgroundColor: '#F4F4F4',
  },
  listContainner: {
    height: Dimensions.get('window').height,
    marginBottom: 10
  },
  contentContainer: {
    flexDirection: 'row',
    width: width,
    backgroundColor: 'white',
    justifyContent: 'flex-start',
    flexWrap: 'wrap'
  },
  letters: {
    position: 'absolute',
    height: height,
    top: 0,
    bottom: 0,
    right: 10,
    backgroundColor: 'transparent',
    // justifyContent: 'flex-start',
    // alignItems: 'flex-start'
    alignItems: 'center',
    justifyContent: 'center'
  },
  letter: {
    height: height * 4 / 100,
    width: width * 4 / 50,
    justifyContent: 'center',
    alignItems: 'center'
  },
  letterText: {
    textAlign: 'center',
    fontSize: height * 1.1 / 50,
    color: '#e75404'
  },
  sectionView: {
    paddingTop: 5,
    paddingBottom: 5,
    height: 30,
    paddingLeft: 10,
    width: width,
    backgroundColor: '#F4F4F4'
  },
  sectionText: {
    color: '#e75404',
    fontWeight: 'bold'
  },
  rowView: {
    height: ROWHEIGHT,
    paddingLeft: 10,
    paddingRight: 10,
    borderBottomColor: '#F4F4F4',
    borderBottomWidth: 0.5
  },
  rowdata: {
    paddingTop: 10,
    paddingBottom: 2
  },

  rowdatatext: {
    color: 'gray',
    width: width
  },

  rowViewBox: {
    height: ROWHEIGHT_BOX,
    width: (width - 30) / 3,
    flexDirection: 'row',
    backgroundColor: '#ffffff'
  },
  rowdataBox: {
    borderWidth: 1,
    borderColor: '#DBDBDB',
    marginTop: 5,
    marginBottom: 5,
    paddingBottom: 2,
    marginLeft: 10,
    marginRight: 10,
    flex: 1,
    justifyContent: 'center',
    alignItems: 'center'
  },
  rowDataTextBox: {
    marginTop: 5,
    flex: 1,
    height: 20
  }

});
然后在头部还需要实现一个搜索框。
SearchBox.js
'use strict';
import React, {Component} from 'react';
import {
  View,
  TextInput,
  StyleSheet,
  Platform,
} from 'react-native';

export default class SearchBox extends Component {
  constructor(props) {
    super(props);
    this.state = {
      value: ''
    };

  }

  onEndEditingKeyword(vv) {
    console.log(vv);
  }

  onChanegeTextKeyword(vv) {
    console.log('onChanegeTextKeyword', vv);

    this.setState({value: vv});
    this.props.onChanegeTextKeyword(vv);
  }

  render() {
    return (
      <View style={styles.container}>
        <View style={styles.inputBox}>
          <View style={styles.inputIcon}>
          </View>
          <TextInput ref="keyword" autoCapitalize="none" value={this.props.keyword}
                onChangeText={this.onChanegeTextKeyword.bind(this)} returnKeyType="search" maxLength={20}
                style={styles.inputText} underlineColorAndroid="transparent"
                placeholder={'输入城市名或拼音查询'}/>
        </View>
      </View>
    )
  }
}

const styles = StyleSheet.create({
  container: {
    marginTop: 5,
    marginBottom: 5,
    backgroundColor: '#ffffff',
    flexDirection: 'row',
    height: Platform.OS === 'ios'
      ? 35
      : 45,
    borderBottomWidth: StyleSheet.hairlineWidth,
    borderBottomColor: '#cdcdcd',
    paddingBottom: 5
  },
  inputBox: {
    height: Platform.OS === 'ios'
      ? 30
      : 40,
    marginLeft: 5,
    marginRight: 5,
    flex: 1,
    flexDirection: 'row',
    backgroundColor: '#E6E7E8'
  },
  inputIcon: {
    margin: Platform.OS === 'ios'
      ? 5
      : 10
  },
  inputText: {
    alignSelf: 'flex-end',
    marginTop: Platform.OS === 'ios'
      ? 0
      : 0,
    flex: 1,
    height: Platform.OS === 'ios'
      ? 30
      : 40,
    marginLeft: 2,
    marginRight: 5,
    fontSize: 12,
    lineHeight: 30,
    textAlignVertical: 'bottom',
    textDecorationLine: 'none'
  }
});
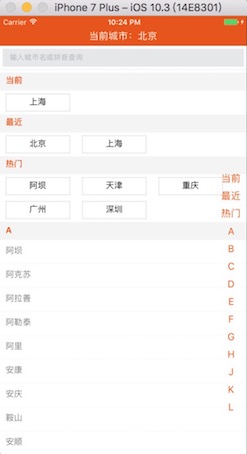
最终效果:


最后是界面的绘制,这里就不多说了,大家可以下载源码自行查看。源码地址:react-native-city_jb51.rar
以上就是本文的全部内容,希望对大家的学习有所帮助,也希望大家多多支持脚本之家。
相关文章

react事件对象无法获取offsetLeft,offsetTop,X,Y等元素问题及解决
这篇文章主要介绍了react事件对象无法获取offsetLeft,offsetTop,X,Y等元素问题及解决方案,具有很好的参考价值,希望对大家有所帮助。2022-08-08


最新评论