Android中使用Kotlin实现一个简单的登录界面
Kotlin 是一种在 Java 虚拟机上运行的静态类型编程语言,被称之为 Android 世界的Swift,由 JetBrains 设计开发并开源。
Kotlin 可以编译成Java字节码,也可以编译成 JavaScript,方便在没有 JVM 的设备上运行。
在Google I/O 2017中,Google 宣布 Kotlin 成为 Android 官方开发语言。
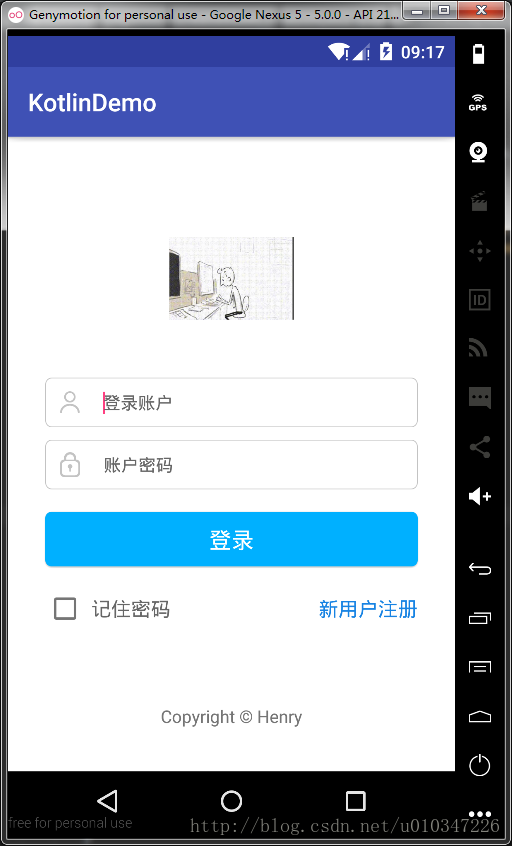
刚接触Kotlin的第一天,仿照QQ的登录界面,先写一个简单的登录界面,虽然笔者用的不是很熟,还在慢慢摸索,但是Kotlin是真的很简洁,笔者的实现效果如下:

登录界面代码如下:
class LoginActivity : AppCompatActivity(), View.OnClickListener {
  override fun onCreate(savedInstanceState: Bundle?) {
    super.onCreate(savedInstanceState)
    //setContentView(R.layout.activity_login)
    LoginUi().setContentView(this@LoginActivity)
  }
  lateinit var et_account: EditText
  lateinit var et_password: EditText
  inner class LoginUi : AnkoComponent<LoginActivity> {
    override fun createView(ui: AnkoContext<LoginActivity>) = with(ui) {
      verticalLayout {
        backgroundColor = context.resources.getColor(android.R.color.white)
        gravity = Gravity.CENTER_HORIZONTAL
        imageView(R.drawable.touxiang).lparams {
          width = dip(100)
          height = dip(100)
          topMargin = dip(64)
        }
        linearLayout {
          gravity = Gravity.CENTER_VERTICAL
          orientation = HORIZONTAL
          backgroundResource = R.drawable.bg_frame_corner
          imageView {
            image = resources.getDrawable(R.mipmap.ic_username)
          }.lparams(width = wrapContent, height = wrapContent) {
            leftMargin = dip(12)
            rightMargin = dip(15)
          }
          et_account = editText {
            hint = "登录账户"
            hintTextColor = Color.parseColor("#666666")
            textSize = 14f
            background = null
          }.lparams {
            topMargin = dip(5)
          }
        }.lparams(width = dip(300), height = dip(40)) {
          topMargin = dip(30)
        }
        linearLayout {
          gravity = Gravity.CENTER_VERTICAL
          orientation = HORIZONTAL
          backgroundResource = R.drawable.bg_frame_corner
          imageView {
            image = resources.getDrawable(R.mipmap.ic_password)
          }.lparams(width = wrapContent, height = wrapContent) {
            leftMargin = dip(12)
            rightMargin = dip(15)
          }
          et_password = editText {
            hint = "账户密码"
            hintTextColor = Color.parseColor("#666666")
            textSize = 14f
            background = null
          }.lparams {
            topMargin = dip(5)
          }
        }.lparams {
          width = dip(300)
          height = dip(40)
          topMargin = dip(10)
        }
        button("登录") {
          gravity = Gravity.CENTER
          background = resources.getDrawable(R.drawable.bg_login_btn)
          textColor = Color.parseColor("#ffffff")
          textSize = 18f
          onClick {
            if (et_account.text.toString().isNotEmpty() && et_password.text.toString().isNotEmpty())
              startActivity<MainActivity>() else toast("请输入账户或者密码")
          }
        }.lparams(width = dip(300), height = dip(44)) {
          topMargin = dip(18)
        }
        linearLayout {
          orientation = HORIZONTAL
          gravity = Gravity.CENTER_VERTICAL
          checkBox("记住密码") {
            textColor = Color.parseColor("#666666")
            textSize = 16f
            leftPadding = dip(5)
          }
          textView("新用户注册") {
            textColor = Color.parseColor("#1783e3")
            gravity = Gravity.RIGHT
            textSize = 16f
          }.lparams(width = matchParent)
        }.lparams(width = dip(300)) {
          topMargin = dip(18)
        }
        textView("Copyright © Henry") {
          textSize = 14f
          gravity = Gravity.CENTER or Gravity.BOTTOM
        }.lparams {
          bottomMargin = dip(35)
          weight = 1f
        }
      }
    }
  }
  override fun onClick(v: View) {
    when (v.id) {
    }
  }
}
实现出来的效果和我们设置布局文件所实现的效果一样,但是相比使用布局文件来说,使用Kotlin将会更加的简洁明了,省去了定义变量和查找布局文件的操作,大大解放了我们程序员;
下面的代码所示是笔者使用布局文件实现的布局效果,和上面的效果一样,但是会复杂很多,大家可以自己自己体会一下;
<?xml version="1.0" encoding="utf-8"?>
<LinearLayout xmlns:android="http://schemas.android.com/apk/res/android"
  android:layout_width="match_parent"
  android:layout_height="match_parent"
  android:layout_gravity="center_horizontal"
  android:background="#ffffff"
  android:orientation="vertical"
  android:padding="40dp">
  <de.hdodenhof.circleimageview.CircleImageView
    xmlns:app="http://schemas.android.com/apk/res-auto"
    android:id="@+id/profile_image"
    android:layout_width="96dp"
    android:layout_height="96dp"
    android:layout_gravity="center_horizontal"
    android:src="@drawable/touxiang"
    app:civ_border_color="#FF000000"
    app:civ_border_width="2dp" />
  <LinearLayout
    android:id="@+id/lin_count"
    android:layout_width="300dp"
    android:layout_height="40dp"
    android:layout_marginTop="45dp"
    android:background="@drawable/bg_frame_corner"
    android:gravity="center_vertical"
    android:orientation="horizontal">
    <ImageView
      android:layout_width="wrap_content"
      android:layout_height="25dp"
      android:layout_marginLeft="12dp"
      android:layout_marginRight="15dp"
      android:src="@drawable/count" />
    <EditText
      android:id="@+id/loginAccount"
      android:layout_width="match_parent"
      android:layout_height="wrap_content"
      android:background="@null"
      android:hint="登录账户"
      android:maxLength="11"
      android:textSize="16sp" />
  </LinearLayout>
  <LinearLayout
    android:id="@+id/lin_password"
    android:layout_width="300dp"
    android:layout_height="40dp"
    android:layout_marginTop="10dp"
    android:background="@drawable/bg_frame_corner"
    android:gravity="center_vertical"
    android:orientation="horizontal">
    <ImageView
      android:layout_width="wrap_content"
      android:layout_height="25dp"
      android:layout_marginLeft="12dp"
      android:layout_marginRight="15dp"
      android:src="@drawable/password"/>
    <EditText
      android:id="@+id/loginPassword"
      android:layout_width="match_parent"
      android:layout_height="wrap_content"
      android:background="@null"
      android:hint="账户密码"
      android:password="true"
      android:maxLength="11"
      android:textSize="16sp"/>
  </LinearLayout>
  <Button
    android:id="@+id/login_button"
    android:layout_width="300dp"
    android:layout_height="44dp"
    android:layout_gravity="center"
    android:background="@drawable/bg_login_btn"
    android:layout_marginTop="18dp"
    android:text="登录"
    android:textColor="#ffffff"
    android:textSize="18sp" />
  <LinearLayout
    android:id="@+id/lin_remember"
    android:layout_width="300dp"
    android:layout_height="wrap_content"
    android:layout_marginTop="18dp"
    android:gravity="center_vertical"
    android:orientation="horizontal">
    <CheckBox
      android:id="@+id/rem_pas_check"
      android:layout_width="wrap_content"
      android:layout_height="wrap_content"
      android:paddingLeft="5dp"
      android:text="记住密码"
      android:textColor="#666666"
      android:textSize="16sp" />
    <TextView
      android:layout_width="match_parent"
      android:layout_height="wrap_content"
      android:gravity="right"
      android:text="新用户注册"
      android:textColor="#1783e3"
      android:textSize="16sp" />
  </LinearLayout>
  <TextView
    android:layout_width="wrap_content"
    android:layout_height="wrap_content"
    android:layout_marginBottom="35dp"
    android:layout_weight="1"
    android:gravity="bottom|center"
    android:text="Copyright © Henry"
    android:textSize="14sp" />
</LinearLayout>
总结
以上所述是小编给大家介绍的Android Kotlin实现一个简单的登录界面,希望对大家有所帮助,如果大家有任何疑问请给我留言,小编会及时回复大家的。在此也非常感谢大家对脚本之家网站的支持!
相关文章

Android使用自定义View实现360手机卫士波浪球进度的效果
360卫士的波浪球进度的效果,一般最常用的方法就是画线的方式,先绘sin线或贝塞尔曲线,然后从左到右绘制竖线,然后再裁剪圆区域2018-05-05
AndroidStudio重新share代码和上传到svn新地址教程
这篇文章主要介绍了AndroidStudio重新share代码和上传到svn新地址教程,具有很好的参考价值,希望对大家有所帮助。一起跟随小编过来看看吧2020-04-04


最新评论