Android通过ViewModel保存数据实现多页面的数据共享功能
通过ViewModel实现的数据共享符合Android的MVC设计模式,将数据独立出来
实现的Demo
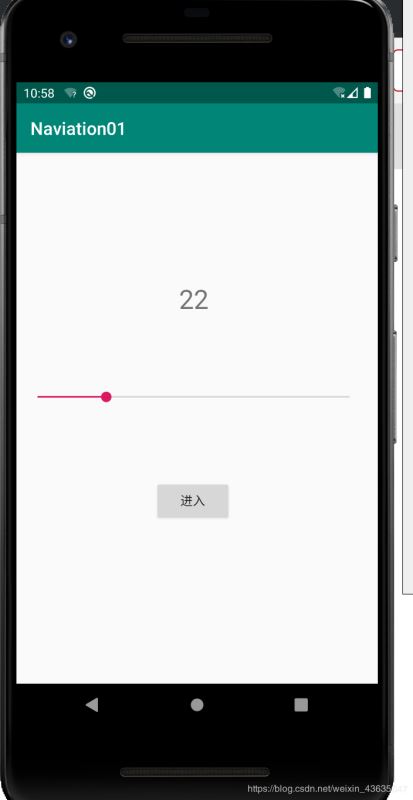
1、主页面通过SeekBar 来改变数字的值

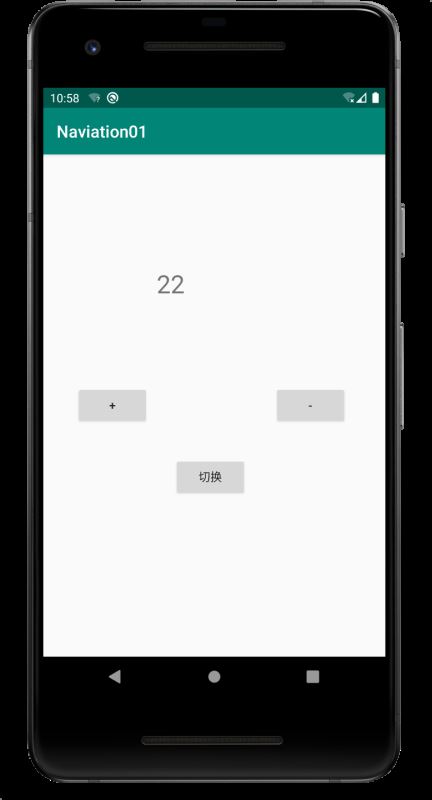
2、点击进入就进入第二个界面,但是数据还是共享的

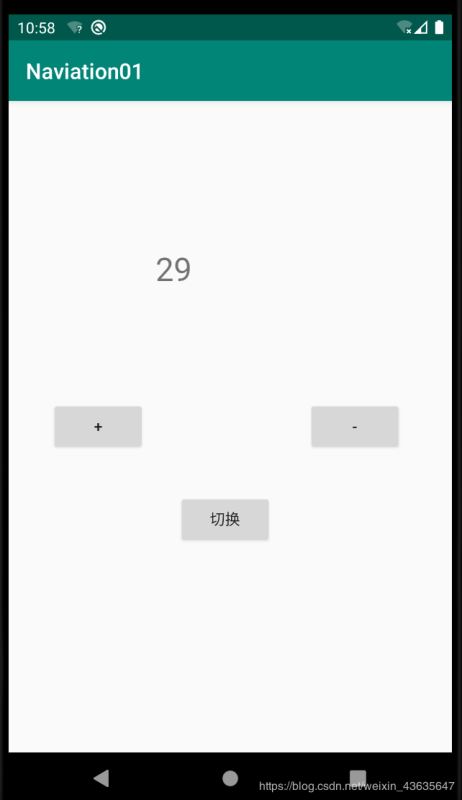
3、随便加两个数字上去,再次切换

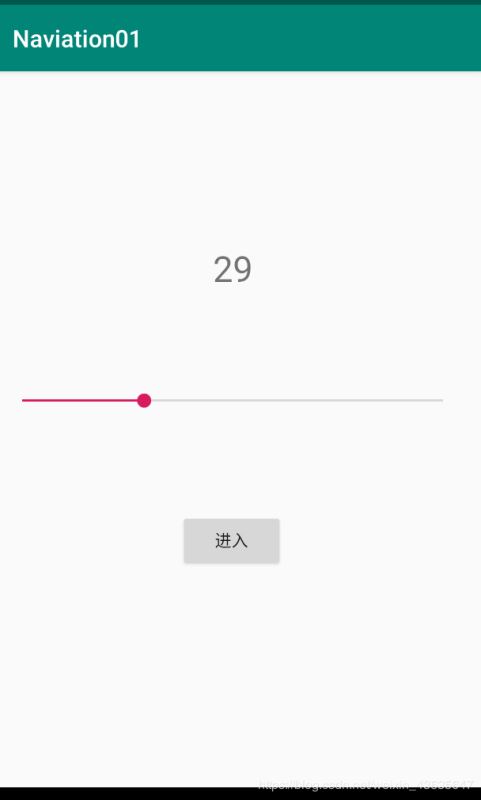
4、发现数据还是共享的

下面是具体实现步骤:
1、建立两个Fragment(使用了Binding 和 Navigation)
一点要添加Binding 和 Navigation 不然做不了
2、建立一个继承于ViewModel的类
3、分别在两个Fragment的代码中使用继承于ViewModel的那个类,就可以实现数据共享
下面是具体代码:
1、继承于ViewModel的类
package com.example.naviation01;
import androidx.lifecycle.MutableLiveData;
import androidx.lifecycle.ViewModel;
public class MyViewMode extends ViewModel {
  private MutableLiveData<Integer> number;
  public MutableLiveData<Integer> getNumber(){
    if(this.number == null){
      this.number = new MutableLiveData<>();
      this.number.setValue(0);
    }
    return this.number;
  }
  public void add(int x){
    this.number.setValue(this.number.getValue()+x);
    if(this.number.getValue() < 0){
      this.number.setValue(0);
    }
  }
}
2、Fragment 主页
package com.example.naviation01;
import android.os.Bundle;
import androidx.databinding.DataBindingUtil;
import androidx.fragment.app.Fragment;
import androidx.fragment.app.FragmentController;
import androidx.lifecycle.ViewModel;
import androidx.lifecycle.ViewModelProvider;
import androidx.lifecycle.ViewModelProviders;
import androidx.navigation.NavController;
import androidx.navigation.Navigation;
import android.view.LayoutInflater;
import android.view.View;
import android.view.ViewGroup;
import android.widget.SeekBar;
import com.example.naviation01.databinding.FragmentHomeBinding;
/**
 * A simple {@link Fragment} subclass.
 */
public class HomeFragment extends Fragment {
  public HomeFragment() {
    // Required empty public constructor
  }
  @Override
  public View onCreateView(LayoutInflater inflater, ViewGroup container,
               Bundle savedInstanceState) {
    // Inflate the layout for this fragment
    final MyViewMode myViewMode;
    myViewMode = ViewModelProviders.of(getActivity()).get(MyViewMode.class);
    FragmentHomeBinding binding;
    binding = DataBindingUtil.inflate(inflater,R.layout.fragment_home,container,false);
    binding.setData(myViewMode);
    binding.setLifecycleOwner(getActivity());
    binding.seekBar.setProgress(myViewMode.getNumber().getValue());
    binding.seekBar.setOnSeekBarChangeListener(new SeekBar.OnSeekBarChangeListener() {
      @Override
      public void onProgressChanged(SeekBar seekBar, int progress, boolean fromUser) {
        myViewMode.getNumber().setValue(progress);
      }
      @Override
      public void onStartTrackingTouch(SeekBar seekBar) {
      }
      @Override
      public void onStopTrackingTouch(SeekBar seekBar) {
      }
    });
    binding.button.setOnClickListener(new View.OnClickListener() {
      @Override
      public void onClick(View v) {
        NavController controller = Navigation.findNavController(v);
        controller.navigate(R.id.action_homeFragment_to_detailFragment);
      }
    });
    return binding.getRoot();
    //return inflater.inflate(R.layout.fragment_home, container, false);
  }
}
xml
<?xml version="1.0" encoding="utf-8"?>
<layout xmlns:android="http://schemas.android.com/apk/res/android"
  xmlns:app="http://schemas.android.com/apk/res-auto"
  xmlns:tools="http://schemas.android.com/tools">
  <data>
    <variable
      name="data"
      type="com.example.naviation01.MyViewMode" />
  </data>
  <FrameLayout
    android:layout_width="match_parent"
    android:layout_height="match_parent"
    tools:context=".HomeFragment">
    <androidx.constraintlayout.widget.ConstraintLayout
      android:layout_width="match_parent"
      android:layout_height="match_parent">
      <TextView
        android:id="@+id/textView"
        android:layout_width="wrap_content"
        android:layout_height="wrap_content"
        android:layout_marginStart="8dp"
        android:layout_marginEnd="8dp"
        android:layout_marginBottom="8dp"
        android:text="@{String.valueOf(data.number)}"
        android:textSize="30sp"
        app:layout_constraintBottom_toBottomOf="parent"
        app:layout_constraintEnd_toEndOf="parent"
        app:layout_constraintStart_toStartOf="parent"
        app:layout_constraintTop_toTopOf="parent"
        app:layout_constraintVertical_bias="0.255" />
      <SeekBar
        android:id="@+id/seekBar"
        android:layout_width="0dp"
        android:layout_height="wrap_content"
        android:layout_marginStart="8dp"
        android:layout_marginTop="8dp"
        android:layout_marginEnd="8dp"
        android:layout_marginBottom="8dp"
        app:layout_constraintBottom_toBottomOf="parent"
        app:layout_constraintEnd_toEndOf="parent"
        app:layout_constraintHorizontal_bias="0.0"
        app:layout_constraintStart_toStartOf="parent"
        app:layout_constraintTop_toTopOf="parent"
        app:layout_constraintVertical_bias="0.456" />
      <Button
        android:id="@+id/button"
        android:layout_width="wrap_content"
        android:layout_height="wrap_content"
        android:layout_marginStart="8dp"
        android:layout_marginTop="8dp"
        android:layout_marginEnd="8dp"
        android:layout_marginBottom="8dp"
        android:text="@string/function01"
        app:layout_constraintBottom_toBottomOf="parent"
        app:layout_constraintEnd_toEndOf="parent"
        app:layout_constraintHorizontal_bias="0.498"
        app:layout_constraintStart_toStartOf="parent"
        app:layout_constraintTop_toTopOf="parent"
        app:layout_constraintVertical_bias="0.679" />
    </androidx.constraintlayout.widget.ConstraintLayout>
  </FrameLayout>
</layout>
3、Fragment 副页
package com.example.naviation01;
import android.os.Bundle;
import androidx.databinding.DataBindingUtil;
import androidx.fragment.app.Fragment;
import androidx.lifecycle.ViewModelProviders;
import androidx.navigation.NavController;
import androidx.navigation.Navigation;
import android.view.LayoutInflater;
import android.view.View;
import android.view.ViewGroup;
import com.example.naviation01.databinding.FragmentDetailBinding;
/**
 * A simple {@link Fragment} subclass.
 */
public class DetailFragment extends Fragment {
  public DetailFragment() {
    // Required empty public constructor
  }
  @Override
  public View onCreateView(LayoutInflater inflater, ViewGroup container,
               Bundle savedInstanceState) {
    // Inflate the layout for this fragment
    MyViewMode myViewMode;
    myViewMode = ViewModelProviders.of(getActivity()).get(MyViewMode.class);
    FragmentDetailBinding binding;
    binding = DataBindingUtil.inflate(inflater,R.layout.fragment_detail,container,false);
    binding.setDate(myViewMode);
    binding.setLifecycleOwner(getActivity());
    binding.button4.setOnClickListener(new View.OnClickListener() {
      @Override
      public void onClick(View v) {
        NavController controller = Navigation.findNavController(v);
        controller.navigate(R.id.action_detailFragment_to_homeFragment);
      }
    });
    return binding.getRoot();
    //return inflater.inflate(R.layout.fragment_detail, container, false);
  }
}
xml
<?xml version="1.0" encoding="utf-8"?>
<layout xmlns:android="http://schemas.android.com/apk/res/android"
  xmlns:app="http://schemas.android.com/apk/res-auto"
  xmlns:tools="http://schemas.android.com/tools">
  <data>
    <variable
      name="date"
      type="com.example.naviation01.MyViewMode" />
  </data>
  <FrameLayout
    android:layout_width="match_parent"
    android:layout_height="match_parent"
    tools:context=".DetailFragment">
    <androidx.constraintlayout.widget.ConstraintLayout
      android:layout_width="match_parent"
      android:layout_height="match_parent">
      <TextView
        android:id="@+id/textView3"
        android:layout_width="131dp"
        android:layout_height="55dp"
        android:layout_marginStart="8dp"
        android:layout_marginTop="8dp"
        android:layout_marginEnd="8dp"
        android:layout_marginBottom="8dp"
        android:text="@{String.valueOf(date.number)}"
        android:textSize="30sp"
        app:layout_constraintBottom_toBottomOf="parent"
        app:layout_constraintEnd_toEndOf="parent"
        app:layout_constraintStart_toStartOf="parent"
        app:layout_constraintTop_toTopOf="parent"
        app:layout_constraintVertical_bias="0.23" />
      <Button
        android:id="@+id/button2"
        android:layout_width="wrap_content"
        android:layout_height="wrap_content"
        android:layout_marginStart="8dp"
        android:layout_marginTop="8dp"
        android:layout_marginEnd="8dp"
        android:layout_marginBottom="8dp"
        android:text="@string/function02"
        android:onClick="@{()->date.add(1)}"
        app:layout_constraintBottom_toBottomOf="parent"
        app:layout_constraintEnd_toEndOf="parent"
        app:layout_constraintHorizontal_bias="0.104"
        app:layout_constraintStart_toStartOf="parent"
        app:layout_constraintTop_toTopOf="parent"
        app:layout_constraintVertical_bias="0.499" />
      <Button
        android:id="@+id/button3"
        android:layout_width="wrap_content"
        android:layout_height="wrap_content"
        android:layout_marginStart="8dp"
        android:layout_marginTop="8dp"
        android:layout_marginEnd="8dp"
        android:layout_marginBottom="8dp"
        android:text="@string/function03"
        android:onClick="@{()->date.add(-1)}"
        app:layout_constraintBottom_toBottomOf="parent"
        app:layout_constraintEnd_toEndOf="parent"
        app:layout_constraintHorizontal_bias="0.899"
        app:layout_constraintStart_toStartOf="parent"
        app:layout_constraintTop_toTopOf="parent"
        app:layout_constraintVertical_bias="0.499" />
      <Button
        android:id="@+id/button4"
        android:layout_width="wrap_content"
        android:layout_height="wrap_content"
        android:layout_marginStart="8dp"
        android:layout_marginTop="8dp"
        android:layout_marginEnd="8dp"
        android:layout_marginBottom="8dp"
        android:text="@string/function04"
        app:layout_constraintBottom_toBottomOf="parent"
        app:layout_constraintEnd_toEndOf="parent"
        app:layout_constraintHorizontal_bias="0.498"
        app:layout_constraintStart_toStartOf="parent"
        app:layout_constraintTop_toTopOf="parent"
        app:layout_constraintVertical_bias="0.664" />
    </androidx.constraintlayout.widget.ConstraintLayout>
  </FrameLayout>
</layout>
4、xml Main_Activity
<?xml version="1.0" encoding="utf-8"?>
<androidx.constraintlayout.widget.ConstraintLayout xmlns:android="http://schemas.android.com/apk/res/android"
  xmlns:app="http://schemas.android.com/apk/res-auto"
  xmlns:tools="http://schemas.android.com/tools"
  android:layout_width="match_parent"
  android:layout_height="match_parent"
  tools:context=".MainActivity">
  <fragment
    android:id="@+id/fragment"
    android:name="androidx.navigation.fragment.NavHostFragment"
    android:layout_width="match_parent"
    android:layout_height="match_parent"
    android:layout_marginTop="8dp"
    android:layout_marginEnd="8dp"
    android:layout_marginBottom="8dp"
    app:defaultNavHost="true"
    app:layout_constraintBottom_toBottomOf="parent"
    app:layout_constraintEnd_toEndOf="parent"
    app:layout_constraintStart_toStartOf="parent"
    app:layout_constraintTop_toTopOf="parent"
    app:navGraph="@navigation/nav_graph" />
</androidx.constraintlayout.widget.ConstraintLayout>
总结
以上所述是小编给大家介绍的Android通过ViewModel保存数据实现多页面的数据共享功能,希望对大家有所帮助,如果大家有任何疑问请给我留言,小编会及时回复大家的。在此也非常感谢大家对脚本之家网站的支持!
如果你觉得本文对你有帮助,欢迎转载,烦请注明出处,谢谢!
相关文章

Android中系统自带锁WalkLock与KeyguardLock用法实例详解
这篇文章主要介绍了Android中系统自带锁WalkLock与KeyguardLock用法,结合实例形式较为详细的分析了WalkLock与KeyguardLock的功能、作用、使用方法与相关注意事项,需要的朋友可以参考下2016-01-01
Android使用ContentResolver搜索手机通讯录的方法
这篇文章主要介绍了Android使用ContentResolver搜索手机通讯录的方法,结合实例形式分析了Android中ContentResolver操作手机通讯录的具体步骤与相关实现技巧,需要的朋友可以参考下2016-01-01
Android手机闹钟服务AlarmManagerk开发案例
这篇文章主要为大家详细介绍了Android手机闹钟服务AlarmManagerk开发案例的资料,需要的朋友可以参考下2016-05-05


最新评论