Django 自定义分页器的实现代码
为什么要实现分页?
在大部分网站中分页的功能都是必要的,尤其是在后台管理中分页更是不可或缺
分页能带给用户更好的体验,也能减轻服务器的压力
对于分页来说,有许多方法都可以实现
例如把数据全部读取出来在前端用javascript实现,但这样一次请求全部数据服务器压力很大,
还有就是在后端实现,每一次请求部分数据显示
分页需求:
1. 每页显示的多少条数据
2. 页面显示多少个页码
3. 上一页和下一页
4. 首页和尾页
效果演示:

代码实现:
分页类封装:
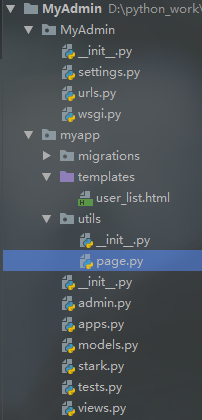
在我的app下创建一个page.py文件,进行封装,我是先在我的app下创建了一个utils文件再创建page.py

class Pagination(object):

  def __init__(self, current_page_num, all_count, request, per_page_num=10, pager_count=11):
    """
    封装分页相关数据
    :param current_page_num: 当前访问页的数字
    :param all_count:  分页数据中的数据总条数
    :param per_page_num: 每页显示的数据条数
    :param pager_count: 最多显示的页码个数
    """
    try:
      current_page_num = int(current_page_num)
    except Exception as e:
      current_page_num = 1

    if current_page_num < 1:
      current_page_num = 1

    self.current_page_num = current_page_num

    self.all_count = all_count
    self.per_page_num = per_page_num

    # 实际总页码
    all_pager, tmp = divmod(all_count, per_page_num)
    if tmp:
      all_pager += 1
    self.all_pager = all_pager

    self.pager_count = pager_count
    self.pager_count_half = int((pager_count - 1) / 2) # 5

    # 保存搜索条件
    import copy
    self.params = copy.deepcopy(request.GET) # {"a":"1","b":"2"}

  # 开始
  @property
  def start(self):
    return (self.current_page_num - 1) * self.per_page_num

  # 结束
  @property
  def end(self):
    return self.current_page_num * self.per_page_num

  # 实现
  def page_html(self):
    # 如果总页码 < 11个:
    if self.all_pager <= self.pager_count:
      pager_start = 1
      pager_end = self.all_pager + 1
    # 总页码 > 11
    else:
      # 当前页如果<=页面上最多显示11/2个页码
      if self.current_page_num <= self.pager_count_half:
        pager_start = 1
        pager_end = self.pager_count + 1
      # 当前页大于5
      else:
        # 页码翻到最后
        if (self.current_page_num + self.pager_count_half) > self.all_pager:

          pager_start = self.all_pager - self.pager_count + 1
          pager_end = self.all_pager + 1

        else:
          pager_start = self.current_page_num - self.pager_count_half
          pager_end = self.current_page_num + self.pager_count_half + 1

    page_html_list = []

    first_page = '<li><a href="?page=%s" rel="external nofollow" rel="external nofollow" rel="external nofollow" rel="external nofollow" >首页</a></li>' % (1,)
    page_html_list.append(first_page)

    if self.current_page_num <= 1:
      prev_page = '<li class="disabled"><a href="#" rel="external nofollow" rel="external nofollow" >上一页</a></li>'
    else:
      prev_page = '<li><a href="?page=%s" rel="external nofollow" rel="external nofollow" rel="external nofollow" rel="external nofollow" >上一页</a></li>' % (self.current_page_num - 1,)

    page_html_list.append(prev_page)

    # self.params=copy.deepcopy(request.GET) # {"a":"1","b":"2"}

    for i in range(pager_start, pager_end):

      self.params["page"] = i

      if i == self.current_page_num:
        temp = '<li class="active"><a href="?%s" rel="external nofollow" rel="external nofollow" >%s</a></li>' % (self.params.urlencode(), i)
      else:
        temp = '<li><a href="?%s" rel="external nofollow" rel="external nofollow" >%s</a></li>' % (self.params.urlencode(), i,)
      page_html_list.append(temp)

    if self.current_page_num >= self.all_pager:
      next_page = '<li class="disabled"><a href="#" rel="external nofollow" rel="external nofollow" >下一页</a></li>'
    else:
      next_page = '<li><a href="?page=%s" rel="external nofollow" rel="external nofollow" rel="external nofollow" rel="external nofollow" >下一页</a></li>' % (self.current_page_num + 1,)
    page_html_list.append(next_page)
    last_page = '<li><a href="?page=%s" rel="external nofollow" rel="external nofollow" rel="external nofollow" rel="external nofollow" >尾页</a></li>' % (self.all_pager,)
    page_html_list.append(last_page)

    return ''.join(page_html_list)
在视图中使用
views.py
# 首先导入包
from myapp.utils.page import Pagination
from myapp.models import User


def index(request):
  # queryset
  user_list = User.objects.all()
  # 总页数
  page_count = user_list.count()
  # 当前页
  current_page_num = request.GET.get("page")
  pagination = Pagination(current_page_num, page_count, request, per_page_num=1)
  # 处理之后的数据
  user_list = user_list[pagination.start:pagination.end]

  content = {
    "user_list": user_list,
    "pagination": pagination,
  }
  return render(request, "user_list.html", content)
页面显示
user_list.html
<!DOCTYPE html>
<html lang="en">
<head>
  <meta charset="UTF-8">
  <title>index</title>
  <link rel="stylesheet" href="https://cdn.jsdelivr.net/npm/bootstrap@3.3.7/dist/css/bootstrap.min.css" rel="external nofollow" >
</head>
<body>
<div class="container">
  <table class="table table-striped">
    <thead>
    <tr>
      <th>name</th>
    </tr>
    </thead>
    <tbody>
    {% for user in user_list %}
      <tr>
        <td>{{ user.name }}</td>
      </tr>
    {% endfor %}
    </tbody>
  </table>
  <!-- bootstrap 样式 -->
  <div class="dataTables_paginate paging_simple_numbers pull-right">
    <ul class="pagination">
      {{ pagination.page_html|safe }}
    </ul>
  </div>
</div>
</body>
</html>
以上就是本文的全部内容,希望对大家的学习有所帮助,也希望大家多多支持脚本之家。
相关文章

Python中2种常用数据可视化库Bokeh和Altair使用示例详解
本文对Python中两个常用的数据可视化库 Bokeh 和 Altair 进行了比较和探讨,通过对它们的特点、优缺点以及使用示例的详细分析,读者可以更好地了解这两个库的功能和适用场景,从而更好地选择合适的库来进行数据可视化工作,感兴趣的朋友跟随小编一起看看吧2024-04-04
Python __setattr__、 __getattr__、 __delattr__、__call__用法示例
这篇文章主要介绍了Python __setattr__、 __getattr__、 __delattr__、__call__用法示例,本文分别对这几个魔法方法做了讲解,需要的朋友可以参考下2015-03-03


最新评论