Android实现指针刻度转盘
更新时间:2020年08月17日 10:26:26 作者:cyfxiaochen
这篇文章主要为大家详细介绍了Android实现指针刻度转盘,文中示例代码介绍的非常详细,具有一定的参考价值,感兴趣的小伙伴们可以参考一下
本文实例为大家分享了Android实现指针刻度转盘的具体代码,供大家参考,具体内容如下
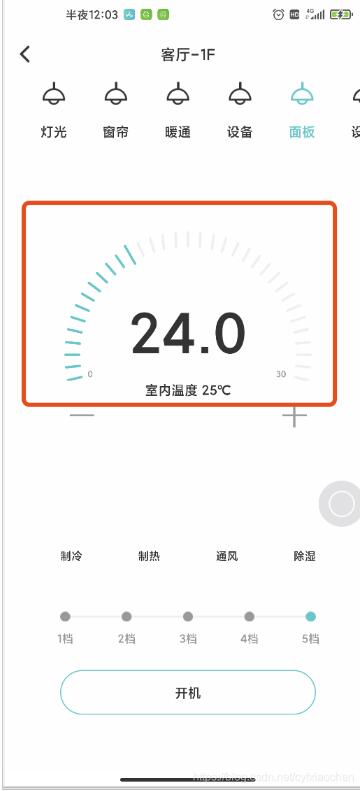
一. 先上个效果图,实现如图所示刻度转盘和2个文本的绘制,最后1个刻度绘制的比较长一些(后期会添加动画效果,未完待续…):

二. 话不多说,上代码,Timber可使用Log代替,也可根据自身需求将配置属性放到attrs.xml中去:
package com.landleaf.householdtype.widget;

import android.content.Context;
import android.graphics.Canvas;
import android.graphics.Color;
import android.graphics.Paint;
import android.util.AttributeSet;
import android.util.Log;
import android.view.View;

import androidx.annotation.Nullable;

import timber.log.Timber;

public class PanelTempCircle extends View {
 private static final String TAG = PanelTempCircle.class.getSimpleName();
 //#EFEFEF
 //#47C496
 private Paint paint = new Paint(Paint.ANTI_ALIAS_FLAG);
 //画笔宽度,线段长度,最后一条大线条的长度 比其他线段长的长度
 private int strokeWidth = 7, lineLength = 40, maxLineLength = 10;

 //绘制文本距离圆
 private int txtMargin = 10;

 //中心点坐标
 private int centerX, centerY;

 //内圆半径,外圆半径
 private int innerRadius, outRadius;

 //绘制文本
 private String leftText = "0", rightText = "30";

 //绘制文本的字体大小
 private int textSize = 25;

 //背景 or 进度条颜色
 private int colorBackground = Color.parseColor("#EFEFEF");
 private int colorProgress = Color.parseColor("#18C8C7");
 private int colorText = Color.parseColor("#999999");

 float fullAngle = 180f;
 float cutAngle = 90f;

 //每个线段相隔的宽度
 private static final int perAngle = 6;

 private int startAngle = -12;

 public PanelTempCircle(Context context) {
  super(context);
  initPaint(context, null);
 }

 public PanelTempCircle(Context context, @Nullable AttributeSet attrs) {
  super(context, attrs);
  initPaint(context, attrs);
 }

 private void initPaint(Context context, AttributeSet attrs) {
  paint.setStrokeCap(Paint.Cap.ROUND);
  paint.setTextSize(textSize);
  paint.setStrokeWidth(strokeWidth);
  paint.setTextAlign(Paint.Align.CENTER);
  paint.setColor(colorBackground);
 }

 public PanelTempCircle(Context context, @Nullable AttributeSet attrs, int defStyleAttr) {
  super(context, attrs, defStyleAttr);
  initPaint(context, attrs);
 }

 @Override
 protected void onDraw(Canvas canvas) {
  super.onDraw(canvas);
  drawCircle(startAngle, 60, canvas, paint);
 }

 private void drawCircle(float startAngle, float endAngle, Canvas canvas, Paint paint) {

  for (float i = startAngle; i <= fullAngle - startAngle; i = i + perAngle) {
   //-12.-6,0,6....180,186,192
   //得出坐标
   int startM, startN, endM, endN, startX, startY, endX, endY;
   int startPaintRadius = innerRadius;
   int endPaintRadius = outRadius;
   float currentAngle = i;
   if (i <= 0) {
    currentAngle = Math.abs(i);
   } else if (currentAngle > fullAngle) {
    currentAngle = i - fullAngle;
   }
   //当前进度=结束进度
   if (i == endAngle) {
    startPaintRadius = innerRadius - maxLineLength;
    endPaintRadius = outRadius + maxLineLength;
   }
   //起始点
   double angleSin = Math.sin(Math.PI * (Math.abs(currentAngle) / fullAngle));
   //起始点 高度 宽度
   startM = (int) (angleSin * startPaintRadius);
   startN = (int) Math.sqrt(Math.pow(startPaintRadius, 2) - Math.pow(startM, 2));
   //结束点 高度 宽度
   endM = (int) (angleSin * endPaintRadius);
   endN = (int) Math.sqrt(Math.pow(endPaintRadius, 2) - Math.pow(endM, 2));
//   Log.i(TAG, startM + "," + startN + "," + endM + "," + endN);
   //获得起始点和结束点的坐标
   if (i < 0) {
    //第三象限
    startX = centerX - startN;
    endX = centerX - endN;

    startY = centerY + startM;
    endY = centerY + endM;
   } else if (i > fullAngle) {
    //第二象限
    startX = centerX + startN;
    endX = centerX + endN;

    startY = centerY + startM;
    endY = centerY + endM;
   } else {
    if (i < cutAngle) {
     //第四象限
     startX = centerX - startN;
     endX = centerX - endN;

     startY = centerY - startM;
     endY = centerY - endM;
    } else {
     //第一象限
     startX = centerX + startN;
     endX = centerX + endN;

     startY = centerY - startM;
     endY = centerY - endM;
    }
   }
   //设置线条绘制颜色
   if (i <= endAngle) {
    paint.setColor(colorProgress);
   } else {
    paint.setColor(colorBackground);
   }
   canvas.drawLine(startX, startY, endX, endY, paint);
   //判断是否需要绘制文本
   if (i == startAngle) {
    int textWidth = getTextWidth(paint, leftText);
    paint.setColor(colorText);
    canvas.drawText(leftText, startX + textWidth + txtMargin, startY, paint);
    Timber.tag(TAG).i("绘制左侧文本:" + (startX + textWidth + txtMargin) + "," + startY);
   }
   if (i == fullAngle - startAngle) {
    int textWidth = getTextWidth(paint, rightText);
    paint.setColor(colorText);
    canvas.drawText(rightText, startX - textWidth - txtMargin, startY, paint);
    Timber.tag(TAG).i("绘制右侧文本:" + (startX - textWidth - txtMargin) + "," + startY);
   }
  }
 }

 public int getTextWidth(Paint paint, String str) {
  int iRet = 0;
  if (str != null && str.length() > 0) {
   int len = str.length();
   float[] widths = new float[len];
   paint.getTextWidths(str, widths);
   for (int j = 0; j < len; j++) {
    iRet += (int) Math.ceil(widths[j]);
   }
  }
  return iRet;
 }

 @Override
 protected void onMeasure(int widthMeasureSpec, int heightMeasureSpec) {
  super.onMeasure(widthMeasureSpec, heightMeasureSpec);
  innerRadius = (getMeasuredWidth() - lineLength * 2 - maxLineLength * 2) / 2;
  outRadius = lineLength + innerRadius;
  Timber.tag(TAG).i("内圈半径:" + innerRadius + ",外圈半径:" + outRadius);
  centerX = outRadius + maxLineLength;
  centerY = outRadius + maxLineLength;
  Timber.tag(TAG).i("中心坐标:(x=" + centerX + ",y=" + centerY + ")");

  int heightMode = MeasureSpec.getMode(heightMeasureSpec);
  if (heightMode == MeasureSpec.AT_MOST) {
   double angleSin = Math.sin(Math.PI * (Math.abs(startAngle) / fullAngle));
   int endPaintRadius = outRadius + maxLineLength;
   int height = (int) (endPaintRadius + angleSin * endPaintRadius);
   setMeasuredDimension(widthMeasureSpec, height);
  }
 }
}
三. xml中使用方式:
说明:主要申明宽度即可,高度会在代码中进行计算;
<com.landleaf.householdtype.widget.PanelTempCircle
  android:id="@+id/mptc_set_temp"
  android:layout_width="270dp"
  android:layout_height="wrap_content"
  app:layout_constraintBottom_toTopOf="@+id/tvHumidity"
  app:layout_constraintEnd_toEndOf="parent"
  app:layout_constraintStart_toStartOf="parent"
  app:layout_constraintTop_toTopOf="parent"
  app:layout_constraintVertical_bias="0.3" />
以上就是本文的全部内容,希望对大家的学习有所帮助,也希望大家多多支持脚本之家。
相关文章

Android中实现多行、水平滚动的分页的Gridview实例源码
如果单行水平滚动,可以用Horizontalscrollview实现。如果是多行水平滚动,则结合Gridview(一般是垂直滚动的)和Horizontalscrollview实现2013-06-06
Android开发之使用ExifInterface获取拍照后的图片属性
这篇文章主要介绍了Android开发之使用ExifInterface获取拍照后的图片属性,较为详细的分析了ExifInterface类操作图片的具体使用技巧,需要的朋友可以参考下2016-01-01
Android应用开发之简易、大气音乐播放器实现专辑倒影效果
这篇文章主要介绍了Android应用开发之简单、大气音乐播放器实现专辑倒影效果,对android音乐播放器感兴趣的朋友可以参考下2015-10-10


最新评论