基于SpringBoot实现上传2种方法工程代码实例
更新时间:2020年08月19日 09:28:50 作者:emdzz
这篇文章主要介绍了基于SpringBoot实现上传工程代码实例,文中通过示例代码介绍的非常详细,对大家的学习或者工作具有一定的参考学习价值,需要的朋友可以参考下
创建SpringBoot工程:

再导入所需要的依赖:
<dependency>
   <groupId>net.oschina.zcx7878</groupId>
   <artifactId>fastdfs-client-java</artifactId>
   <version>1.27.0.0</version>
  </dependency>

  <dependency>
   <groupId>org.apache.commons</groupId>
   <artifactId>commons-lang3</artifactId>
  </dependency>
创建上传业务层程序:
package cn.dzz.fastdfs.service;

import org.apache.commons.lang3.StringUtils;
import org.csource.fastdfs.*;
import org.springframework.beans.factory.annotation.Value;
import org.springframework.stereotype.Component;
import org.springframework.web.multipart.MultipartFile;

import java.util.HashMap;
import java.util.Map;

/**
 * @author DaiZhiZhou
 * @file Boot-With-FastDFS
 * @create 2020-08-13 8:55
 */

// @PropertySource()
@Component
public class UploadService {


 @Value("${fastdfs.tracker_servers}")
 private String tracker_servers;

 @Value("${fastdfs.connect_timeout_in_seconds}")
 private int connect_timeout;

 @Value("${fastdfs.network_timeout_in_seconds}")
 private int network_timeout;

 @Value("${fastdfs.charset}")
 private String charset;

 public Map<String,Object> upload(MultipartFile multipartFile) {
  if (multipartFile == null) {
   throw new RuntimeException("文件不能为空");
  }
  // 上传至fastDFS, 返回文件id
  String fileId = this.fdfsUpload(multipartFile);
  if (StringUtils.isEmpty(fileId)) {
   System.out.println("上传失败");
   throw new RuntimeException("上传失败");
  }
  Map<String, Object> map=new HashMap<>();
  map.put("code",200);
  map.put("msg","上传成功");
  map.put("fileId",fileId);
  return map;
 }


 /**
  * 上传至fastDFS
  * @param multipartFile
  * @return 文件id
  */
 private String fdfsUpload(MultipartFile multipartFile) {
  // 1. 初始化fastDFS的环境
  initFdfsConfig();
  // 2. 获取trackerClient服务
  TrackerClient trackerClient = new TrackerClient();
  try {
   TrackerServer trackerServer = trackerClient.getConnection();
   // 3. 获取storage服务
   StorageServer storeStorage = trackerClient.getStoreStorage(trackerServer);
   // 4. 获取storageClient
   StorageClient1 storageClient1 = new StorageClient1(trackerServer, storeStorage);
   // 5. 上传文件 (文件字节, 文件扩展名, )
   // 5.1 获取文件扩展名
   String originalFilename = multipartFile.getOriginalFilename();
   String extName = originalFilename.substring(originalFilename.lastIndexOf(".") + 1);
   // 5.2 上传
   String fileId = storageClient1.upload_file1(multipartFile.getBytes(), extName, null);
   return fileId;
  } catch (Exception e) {
   System.out.println(e);
   return null;
  }
 }

 /**
  * 初始化fastDFS的环境
  */
 private void initFdfsConfig() {
  try {
   ClientGlobal.initByTrackers(tracker_servers);
   ClientGlobal.setG_connect_timeout(connect_timeout);
   ClientGlobal.setG_network_timeout(network_timeout);
   ClientGlobal.setG_charset(charset);
  } catch (Exception e) {
   System.out.println(e);
  }
 }
}
创建上传控制器:
package cn.dzz.fastdfs.controller;

import cn.dzz.fastdfs.service.UploadService;
import org.springframework.beans.factory.annotation.Autowired;
import org.springframework.stereotype.Controller;
import org.springframework.web.bind.annotation.RequestMapping;
import org.springframework.web.multipart.MultipartFile;

import java.util.Map;

/**
 * @author DaiZhiZhou
 * @file Boot-With-FastDFS
 * @create 2020-08-13 8:58
 */

@RestController
@RequestMapping("upload")
public class UploadController {

 @Autowired
 private UploadService uploadService;

 /**
  * 作上传
  */
 @RequestMapping("doUpload")
 public Map<String,Object> doUpload(MultipartFile mf){
  System.out.println(mf.getOriginalFilename());
  Map<String, Object> map = uploadService.upload(mf);
  return map;
 }
}
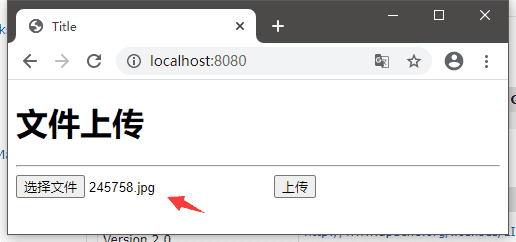
在static目录中创建index.html用于上传测试:
<!DOCTYPE html>
<html lang="en">
<head>
 <meta charset="UTF-8">
 <title>Title</title>
</head>
<body>

<h1>文件上传</h1>
<hr>
<form action="/upload/doUpload" method="post" enctype="multipart/form-data">
 <input type="file" name="mf">
 <input type="submit" value="上传">
</form>

</body>
</html>
运行SpringBoot进行测试:

测试成功:

查看文件位置也可以被访问到:

上传文件实现方式二:
更改依赖:
<!-- https://mvnrepository.com/artifact/com.github.tobato/fastdfs-client -->
  <dependency>
   <groupId>com.github.tobato</groupId>
   <artifactId>fastdfs-client</artifactId>
   <version>1.26.7</version>
  </dependency>
创建一个配置类UploadProperties
package cn.dzz.fastdfs.config;

import lombok.Data;
import org.springframework.boot.context.properties.ConfigurationProperties;
import org.springframework.stereotype.Component;

import java.util.List;

/**
 * @author DaiZhiZhou
 * @file Boot-With-FastDFS
 * @create 2020-08-13 9:10
 */

@Data
@Component
@ConfigurationProperties(prefix = "upload")
public class UploadProperties {
 private String baseUrl;
 private List<String> allowTypes;
}
更改之前的yml配置:
fdfs:
 so-timeout: 2500  # 读取时间
 connect-timeout: 600 # 连接超时时间
 thumb-image:   # 缩略图
 width: 100
 height: 100
 tracker-list:   # tracker服务配置地址列表
 - 服务器或者虚拟机IP:22122
upload:
 base-url: http://服务器或者虚拟机IP/
 allow-types:
 - image/jpeg
 - image/png
 - image/bmp
 - image/gif
编写UploadProperties.java
package cn.dzz.config;

import lombok.Data;
import org.springframework.boot.context.properties.ConfigurationProperties;

import java.util.List;

/**
 * @author DaiZhiZhou
 * @file fdfs
 * @create 2020-08-13 9:33
 */
@ConfigurationProperties(prefix = "upload")
@Data
public class UploadProperties {
 private String baseUrl;
 private List<String> allowTypes;
}
业务层:
package cn.dzz.service;

import cn.dzz.config.UploadProperties;
import com.github.tobato.fastdfs.domain.fdfs.StorePath;
import com.github.tobato.fastdfs.service.FastFileStorageClient;
import org.apache.commons.lang3.StringUtils;
import org.apache.commons.logging.Log;
import org.apache.commons.logging.LogFactory;
import org.springframework.beans.factory.annotation.Autowired;
import org.springframework.boot.context.properties.EnableConfigurationProperties;
import org.springframework.stereotype.Component;
import org.springframework.web.multipart.MultipartFile;

import javax.imageio.ImageIO;
import java.awt.image.BufferedImage;
import java.io.IOException;

/**
 * @author DaiZhiZhou
 * @file fdfs
 * @create 2020-08-13 9:34
 */

@Component
@EnableConfigurationProperties(UploadProperties.class)
public class UploadService {
 private Log log= LogFactory.getLog(UploadService.class);

 @Autowired
 private FastFileStorageClient storageClient;

 @Autowired
 private UploadProperties prop;

 public String uploadImage(MultipartFile file) {
  // 1、校验文件类型
  String contentType = file.getContentType();
  if (!prop.getAllowTypes().contains(contentType)) {
   throw new RuntimeException("文件类型不支持");
  }
  // 2、校验文件内容
  try {
   BufferedImage image = ImageIO.read(file.getInputStream());
   if (image == null || image.getWidth() == 0 || image.getHeight() == 0) {
    throw new RuntimeException("上传文件有问题");
   }
  } catch (IOException e) {
   log.error("校验文件内容失败....{}", e);
   throw new RuntimeException("校验文件内容失败"+e.getMessage());
  }

  try {
   // 3、上传到FastDFS
   // 3.1、获取扩展名
   String extension = StringUtils.substringAfterLast(file.getOriginalFilename(), ".");
   // 3.2、上传
   StorePath storePath = storageClient.uploadFile(file.getInputStream(), file.getSize(), extension, null);
   // 返回路径
   return prop.getBaseUrl() + storePath.getFullPath();
  } catch (IOException e) {
   log.error("【文件上传】上传文件失败!....{}", e);
   throw new RuntimeException("【文件上传】上传文件失败!"+e.getMessage());
  }
 }
}
控制器:
package cn.dzz.controller;

import cn.dzz.service.UploadService;
import org.springframework.beans.factory.annotation.Autowired;
import org.springframework.web.bind.annotation.RequestMapping;
import org.springframework.web.bind.annotation.RestController;
import org.springframework.web.multipart.MultipartFile;

import java.util.HashMap;
import java.util.Map;

/**
 * @author DaiZhiZhou
 * @file fdfs
 * @create 2020-08-13 9:35
 */
@RequestMapping("upload")
@RestController
public class UploadController {

 @Autowired
 private UploadService uploadService;

 @RequestMapping("doUpload")
 public Map<String,Object> doUpload(MultipartFile multipartFile) {
  System.out.println(multipartFile.getOriginalFilename());
  Map<String, Object> map = new HashMap<>();
  String filePath = uploadService.uploadImage(multipartFile);
  map.put("filePath", filePath);
  return map;
 }

}
还是一样的上传页面:
<!DOCTYPE html>
<html lang="en">
<head>
 <meta charset="UTF-8">
 <title>Title</title>
</head>
<body>

<h1>文件上传</h1>
<hr>
<form action="/upload/doUpload" method="post" enctype="multipart/form-data">
 <input type="file" name="mf">
 <input type="submit" value="上传">
</form>

</body>
</html>
运行发现空指针异常,检查发现表单名称没对上,SpringMVC就无法转换了

<input type="file" name="multipartFile">
再次测试:

访问:

以上就是本文的全部内容,希望对大家的学习有所帮助,也希望大家多多支持脚本之家。
相关文章

Java之Spring认证使用Profile配置运行环境讲解
这篇文章主要介绍了Java之Spring认证使用Profile配置运行环境讲解,本篇文章通过简要的案例,讲解了该项技术的了解与使用,以下就是详细内容,需要的朋友可以参考下2021-07-07


最新评论