基于springboot实现文件上传
更新时间:2020年11月08日 13:52:53 作者:Tyler Yue
这篇文章主要为大家详细介绍了基于springboot实现文件上传,文中示例代码介绍的非常详细,具有一定的参考价值,感兴趣的小伙伴们可以参考一下
本文实例为大家分享了基于springboot的文件上传的具体代码,供大家参考,具体内容如下
第一步:在vo包下创建上传前端响应类
import com.alibaba.druid.filter.AutoLoad;
import lombok.AllArgsConstructor;
import lombok.Data;
import lombok.NoArgsConstructor;

/**
 * 上传响应参数
 * @param <E>
 */
//以下是lombok插件注解
@Data
@AllArgsConstructor
@NoArgsConstructor
public class Resp<E> {
 //返回状态码 如 200 403
 private String code;
 //返回信息
 private String Msg;
 //也可定义为 Object body 都表示任意类型的意思
 private E body;//模板类型

 /**
  * 成功时候方法
  * @param body
  * @param <E>
  * @return
  */
 public static<E> Resp<E> success(E body){
  return new Resp<E>("200","上传成功!",body);
 }

 /**
  * 上传失败时的方法
  * @param code
  * @param msg
  * @param <E>
  * @return
  */
 public static<E> Resp<E> fail(String code,String msg){
  return new Resp<E>(code,msg,null);
 }
}
第二步:在controller层接收前端上传的文件
import com.qf.springboot_ssm_day02.service.UploadService;
import com.qf.springboot_ssm_day02.vo.Resp;
import org.springframework.beans.factory.annotation.Autowired;
import org.springframework.stereotype.Controller;
import org.springframework.web.bind.annotation.RequestMapping;
import org.springframework.web.bind.annotation.RequestMethod;
import org.springframework.web.bind.annotation.RequestParam;
import org.springframework.web.bind.annotation.ResponseBody;
import org.springframework.web.multipart.MultipartFile;

@Controller

public class uploadController {
 @Autowired
 private UploadService uploadService;
 @RequestMapping(value = "upload",method = RequestMethod.POST)
 @ResponseBody
 //返回类型根据自定义的返回类型 不一定和我一样
 public Resp<String> upload(@RequestParam("file")MultipartFile file){

  return uploadService.upload(file);
 }

}
第三步:在servcie包下建立upload接口及其实现类处理业务
import com.qf.springboot_ssm_day02.vo.Resp;
import org.springframework.web.multipart.MultipartFile;
/**
*上传业务类
*/
public interface UploadService {
 //上传接口
 Resp<String > upload(MultipartFile file);
}
import com.qf.springboot_ssm_day02.service.UploadService;
import com.qf.springboot_ssm_day02.vo.Resp;
import org.springframework.stereotype.Service;
import org.springframework.web.multipart.MultipartFile;

import java.io.File;

/**
 * 上传业务实现类
 */
@Service
public class UploadServiceImpl implements UploadService {

 @Override
 public Resp<String> upload(MultipartFile file) {
  //判断上传的文件是不是空
  if (file.isEmpty()){
   return Resp.fail("400","文件为空!");
  }
  //文件不为空的情况
  //获得原始文件名(前端传过来的文件名) 带有拓展名
  //原始文件名存在一定问题
  String OriginalFilename=file.getOriginalFilename();
  //根据 时间戳+拓展名=服务器文件名
  // 确定服务器文件名(经过字符操作加上拓展名)
  String fileName= System.currentTimeMillis()+"."+OriginalFilename.substring(OriginalFilename.lastIndexOf(".")+1);
  //控制台查看服务器文件名
  System.out.println(fileName);
  //确定文件储存位置
  // 文件保存路径 注意最后加上双反斜杠 转义字符所有双反斜杠
  String filePath="F:\\Test\\";
  //目标文件路径 (实际创建在硬盘的文件)
  File dest=new File(filePath+fileName);
  //判断dest的父目录是否存在
  if(dest.getParentFile().exists())
   dest.getParentFile().mkdirs();

  try {
    //前端传过来的文件拷贝在本地
    file.transferTo(dest);
   }catch (Exception e){
    e.printStackTrace();
    return Resp.fail("500",OriginalFilename+"上传失败!");

   }
   //上传成功 返回前端穿过来的文件名
   return Resp.success(fileName);


 }
}
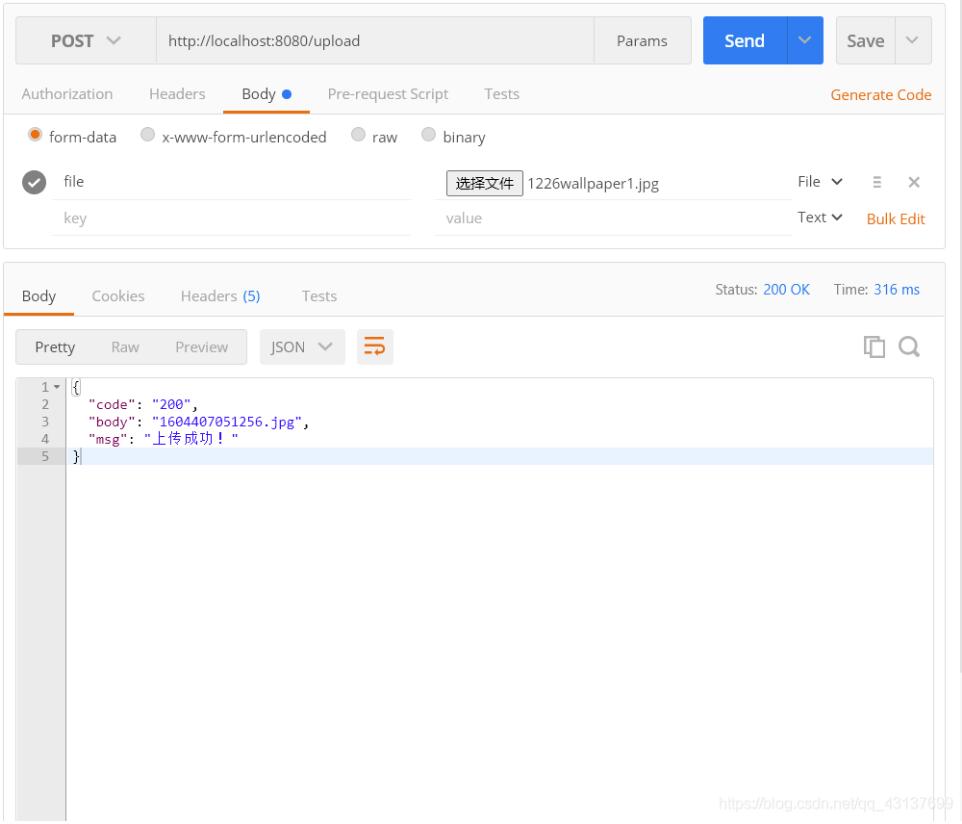
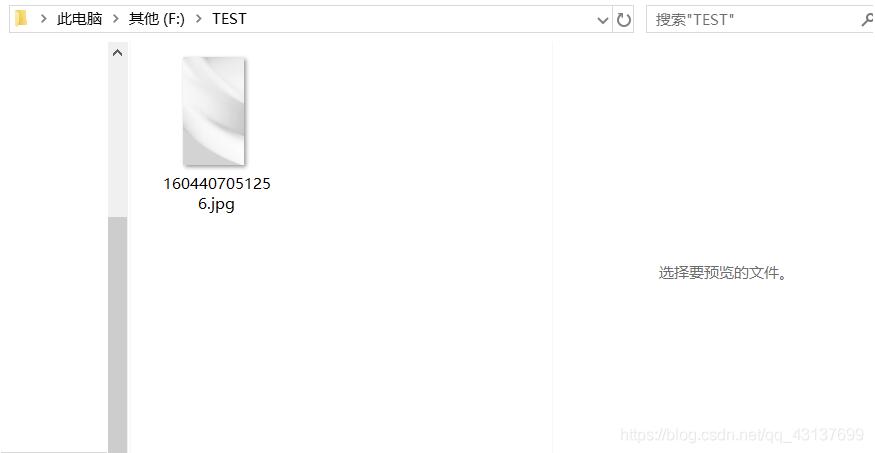
第四步:postman测试上传


可以看到文件以及成功上传到本地啦!
以上就是本文的全部内容,希望对大家的学习有所帮助,也希望大家多多支持脚本之家。
您可能感兴趣的文章:
- springboot 单文件上传的实现步骤
- Spring Boot 2.x 实现文件上传功能
- springboot上传图片文件步骤详解
- Spring Boot项目中实现文件上传功能的示例
- springboot+thymeleaf 文件上传功能的实现代码
- springboot+vue实现文件上传下载
- 文件上传SpringBoot后端MultipartFile参数报空问题的解决办法
- springboot操作阿里云OSS实现文件上传,下载,删除功能
- SpringBoot实现上传文件到AWS S3的代码
- 解决springboot项目上传文件出现临时文件目录为空的问题
- SpringBoot实现本地存储文件上传及提供HTTP访问服务的方法
- Spring Boot应用上传文件时报错的原因及解决方案
相关文章

springboot之SpringApplication生命周期和事件机制解读
这篇文章主要介绍了springboot之SpringApplication生命周期和事件机制,具有很好的参考价值,希望对大家有所帮助。如有错误或未考虑完全的地方,望不吝赐教2023-06-06


最新评论