JavaFX实现简易时钟效果
本文实例为大家分享了JavaFX实现简易时钟效果的具体代码,供大家参考,具体内容如下
首先要在面板中显示一个时钟,我们可以设计一个ClockPane类来显示一个时钟。
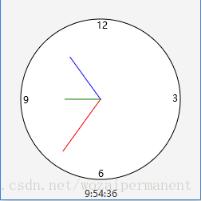
最终效果:

若要绘制一个时钟,需要绘制一个圆并为秒钟、分钟和小时绘制三个指针。为了画一个指针,需要确定一条直线的两端:一端是时钟的中央,位于(centerX,centerY);另外一端位于(endX,endY),由一下公式来确定:
endX=centerX+handLength×sin(θ)
endY=centerY-handLength×cos(θ)
(其中θ是指针和竖直方向12点的夹角)
因为一分钟有60秒,所以第2个指针的角度是:second×(2π/60)
分钟的位置由分钟和秒钟来决定。包含秒数的确切分钟数是minu+second/60。例如,如时间是3分30秒,那么总的分钟数就是3.5。由于一小时有60分钟,因此分针的角度是: (minute+second/60)×(2π/12)
由于一个圆被分为12个小时,所以时针的角度是: (hour+minute/60+second/(60×60))×(2π/12)
为了简化计算,在计算分针和时针角度的时候,可以忽略秒针,因为它们数字太小,基本可以忽略。因此,秒针、分针以及时针的端点可以如下计算:
secondX = centerX + secondHandLength × sin(second × (2π/60))
secondY = centerY - secondHandLength × cos(second × (2π/60))
minuteX = centerX + minuteHandLength × sin(minute × (2π/60))
minuteY = centerY - minuteHandLength × cos(minute × (2π/60))
hourX = centerX + hourHandLength × sin((hour+minute/60) × (2π/12))
hourX = centerX + hourHandLength × sin((hour+minute/60) × (2π/12))
这样就得到了ClockPane类的实现程序:
package com.company;

import javafx.scene.layout.Pane;
import javafx.scene.paint.Color;
import javafx.scene.shape.Circle;
import javafx.scene.shape.Line;
import javafx.scene.text.Text;
import java.util.Calendar;
import java.util.GregorianCalendar;

public class ClockPane extends Pane{
 private int hour;
 private int minute;
 private int second;
 private double w=250,h=250;

 public ClockPane() {
  setCurrentTime();
 }

 public ClockPane(int hour,int minute,int second) {
  this.hour=hour;
  this.minute=minute;
  this.second=second;
  paintClock();
 }

 public int getHour() {
  return hour;
 }

 public void setHour(int hour) {
  this.hour=hour;
  paintClock();
 }

 public int getMinute() {
  return minute;
 }

 public void setMinute(int minute) {
  this.minute=minute;
  paintClock();
 }

 public int getSecond() {
  return second;
 }

 public void setSecond(int second) {
  this.second=second;
  paintClock();
 }

 public double getW() {
  return w;
 }

 public void setW(double w) {
  this.w=w;
  paintClock();
 }

 public double getH() {
  return h;
 }

 public void setH(double h) {
  this.h=h;
  paintClock();
 }

 public void setCurrentTime() {
  Calendar calendar=new GregorianCalendar();
  this.hour=calendar.get(Calendar.HOUR_OF_DAY);
  this.minute=calendar.get(Calendar.MINUTE);
  this.second=calendar.get(Calendar.SECOND);
  paintClock();
 }

 protected void paintClock() {
  double clockRadius=Math.min(w,h)*0.8*0.5;
  double centerX=w/2;
  double centerY=h/2;

  Circle circle=new Circle(centerX,centerY,clockRadius);
  circle.setFill(Color.WHITE);
  circle.setStroke(Color.BLACK);

  Text t1=new Text(centerX-5,centerY-clockRadius+12,"12");
  Text t2=new Text(centerX-clockRadius+3,centerY+5,"9");
  Text t3=new Text(centerX+clockRadius-10,centerY+3,"3");
  Text t4=new Text(centerX-3,centerY+clockRadius-3,"6");

  double sLength=clockRadius*0.8;
  double scondX=centerX+sLength*Math.sin(second*(2*Math.PI/60));
  double scondY=centerY-sLength*Math.cos(second*(2*Math.PI/60));
  Line sline=new Line(centerX,centerY,scondX,scondY);
  sline.setStroke(Color.RED);

  double mLength=clockRadius*0.65;
  double minuteX=centerX+mLength*Math.sin(minute*(2*Math.PI/60));
  double minuteY=centerY-mLength*Math.cos(minute*(2*Math.PI)/60);
  Line mline=new Line(centerX,centerY,minuteX,minuteY);
  mline.setStroke(Color.BLUE);

  double hLength=clockRadius*0.5;
  double hourX=centerX+hLength*Math.sin((hour%12+minute/60.0)*(2*Math.PI/12));
  double hourY=centerY-hLength*Math.cos((hour%12+minute/60)*(2*Math.PI/12));
  Line hline=new Line(centerX,centerY,hourX,hourY);
  hline.setStroke(Color.GREEN);

  getChildren().clear();
  getChildren().addAll(circle,t1,t2,t3,t4,sline,mline,hline);

 }
}
对程序的简要解读:①Java API的GregorianCalendar类可以使用它的无参构造方法来商城一个具有当前时间的Calendar实例。可以从一个Calendar对象,通过调用它的get(Calendar.HOUR)、get(Calendar.MINUTE)和get(Calendar.SECOND)方法来返回小时、分钟以及秒钟。②因为paintClock()方法在任何一个新的属性(hour、minute、second、w以及h)被设置的时候调用,所以之前的内容从面板中被清除。
然后就需要设计一个ClockAnimation类来显示时钟的动画
Timeline类可以用于通过使用一个或者更多的KeyFrame(关键帧)来编写任意动画。
你可以用Timeline来控制时钟的重绘,代码如下:
package com.company;

import javafx.animation.Timeline;
import javafx.application.Application;
import javafx.geometry.Pos;
import javafx.scene.Scene;
import javafx.scene.layout.BorderPane;
import javafx.stage.Stage;
import javafx.util.Duration;
import javafx.event.ActionEvent;
import javafx.event.EventHandler;
import javafx.animation.KeyFrame;
import javafx.scene.control.Label;

public class ClockAnimation extends Application {
 @Override
 public void start(Stage primaryStage) {
  ClockPane clock=new ClockPane();
  BorderPane borderPane=new BorderPane();

  EventHandler<ActionEvent> eventHandler=e -> {
   clock.setCurrentTime();
   String timeString=clock.getHour()+":"+clock.getMinute()+":"+clock.getSecond();
   Label lblCurrentTime=new Label(timeString);
   borderPane.setCenter(clock);
   borderPane.setBottom(lblCurrentTime);
   BorderPane.setAlignment(lblCurrentTime, Pos.TOP_CENTER);
  };

  Timeline animation=new Timeline(new KeyFrame(Duration.millis(1000),eventHandler));
  animation.setCycleCount(Timeline.INDEFINITE);
  animation.play();

  Scene scene=new Scene(borderPane,250,250);
  primaryStage.setTitle("ClockAnimation");
  primaryStage.setScene(scene);
  primaryStage.show();

  borderPane.widthProperty().addListener(ov ->
   clock.setW(borderPane.getWidth())
  );

  borderPane.heightProperty().addListener(ov ->
   clock.setH(borderPane.getHeight())
  );
 }
}
程序简单解读:①在时间线动画的每个关键帧中,这个处理器每秒被调用一次。所以动画中的时间每秒被更新一次。②最后两个监听器是用来修改时钟的面板的大小的,将这个监听器和窗体的宽度和高度属性进行注册,从而在场景的宽度和高度改变的情况下可以重新设置面板大小。代码保证了时钟面板的大小和场景大小是同步的。
最后运行就能达到上面图所示的效果了。
以上就是本文的全部内容,希望对大家的学习有所帮助,也希望大家多多支持脚本之家。
相关文章

一小时迅速入门Mybatis之Prepared Statement与符号的使用
这篇文章主要介绍了一小时迅速入门Mybatis之Prepared Statement与符号的使用,本文给大家介绍的非常详细,对大家的学习或工作具有一定的参考借鉴价值,需要的朋友可以参考下2021-09-09
springcloud feign 接口指定接口服务ip方式
这篇文章主要介绍了springcloud feign 接口指定接口服务ip方式,具有很好的参考价值,希望对大家有所帮助。如有错误或未考虑完全的地方,望不吝赐教2022-03-03


最新评论