Spring cloud oauth2如何搭建认证资源中心
更新时间:2020年11月16日 11:14:19 作者:侯赛雷
这篇文章主要介绍了Spring cloud oauth2如何搭建认证资源中心,文中通过示例代码介绍的非常详细,对大家的学习或者工作具有一定的参考学习价值,需要的朋友可以参考下
一 认证中心搭建
添加依赖,如果使用spring cloud的话,不管哪个服务都只需要这一个封装好的依赖即可
<dependency>
      <groupId>org.springframework.cloud</groupId>
      <artifactId>spring-cloud-starter-oauth2</artifactId>
    </dependency>
配置spring security
/**
 * security配置类
 */
@Configuration
@EnableWebSecurity //开启web保护
@EnableGlobalMethodSecurity(prePostEnabled = true) // 开启方法注解权限配置
public class WebSecurityConfig extends WebSecurityConfigurerAdapter {
  @Qualifier("userDetailsServiceImpl")
  @Autowired
  private UserDetailsService userDetailsService;

  //配置用户签名服务,赋予用户权限等
  @Override
  protected void configure(AuthenticationManagerBuilder auth) throws Exception {
    auth.userDetailsService(userDetailsService)//指定userDetailsService实现类去对应方法认
        .passwordEncoder(passwordEncoder()); //指定密码加密器
  }
  @Bean
  public PasswordEncoder passwordEncoder() {
    return new BCryptPasswordEncoder();
  }
  //配置拦截保护请求,什么请求放行,什么请求需要验证
  @Override
  protected void configure(HttpSecurity http) throws Exception {
    http.authorizeRequests()
        //配置所有请求开启认证
        .anyRequest().permitAll()
        .and().httpBasic(); //启用http基础验证
  }

  // 配置token验证管理的Bean
  @Override
  @Bean
  public AuthenticationManager authenticationManagerBean() throws Exception {
    return super.authenticationManagerBean();
  }
}
配置OAuth2认证中心
/**
 * OAuth2授权服务器
 */
@EnableAuthorizationServer //声明OAuth2认证中心
@Configuration
public class AuthorizationServerConfig extends AuthorizationServerConfigurerAdapter {
  @Autowired
  @Qualifier("authenticationManagerBean")
  private AuthenticationManager authenticationManager;
  @Autowired
  private DataSource dataSource;
  @Autowired
  private UserDetailsService userDetailsService;
  @Autowired
  private PasswordEncoder passwordEncoder;
  /**
   * 这个方法主要是用于校验注册的第三方客户端的信息,可以存储在数据库中,默认方式是存储在内存中,如下所示,注释掉的代码即为内存中存储的方式
   */
  @Override
  public void configure(ClientDetailsServiceConfigurer clients) throws Exception{
        clients.inMemory()
        .withClient("hou") // 客户端id,必须有
        .secret(passwordEncoder.encode("123456")) // 客户端密码
            .scopes("server")
        .authorizedGrantTypes("authorization_code", "password", "refresh_token") //验证类型
        .redirectUris("http://www.baidu.com");
        /*redirectUris 关于这个配置项,是在 OAuth2协议中,认证成功后的回调地址,此值同样可以配置多个*/
     //数据库配置,需要建表
//    clients.withClientDetails(clientDetailsService());
//    clients.jdbc(dataSource);
  }
  // 声明 ClientDetails实现
  private ClientDetailsService clientDetailsService() {
    return new JdbcClientDetailsService(dataSource);
  }

  /**
   * 控制token端点信息
   */
  @Override
  public void configure(AuthorizationServerEndpointsConfigurer endpoints) throws Exception {
    endpoints.authenticationManager(authenticationManager)
        .tokenStore(tokenStore())
        .userDetailsService(userDetailsService);
  }
  //获取token存储类型
  @Bean
  public TokenStore tokenStore() {
    //return new JdbcTokenStore(dataSource); //存储mysql中
    return new InMemoryTokenStore();  //存储内存中
    //new RedisTokenStore(connectionFactory); //存储redis中
  }

  //配置获取token策略和检查策略
  @Override
  public void configure(AuthorizationServerSecurityConfigurer oauthServer) throws Exception {
    oauthServer.tokenKeyAccess("permitAll()") //获取token请求不进行拦截
        .checkTokenAccess("isAuthenticated()") //验证通过返回token信息
        .allowFormAuthenticationForClients();  // 允许 客户端使用client_id和client_secret获取token
  }
}
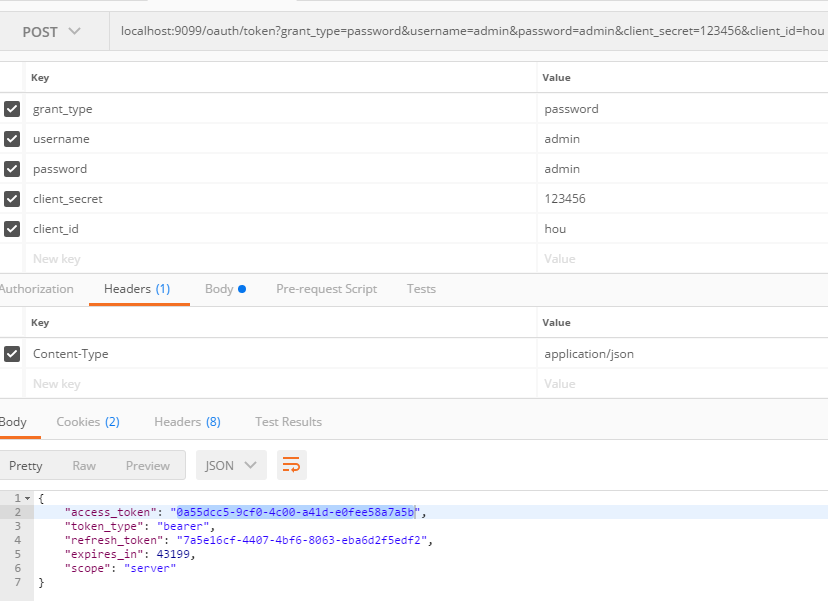
二 测试获取Token
默认获取token接口图中2所示,这里要说明一点,参数key千万不能有空格,尤其是client_这两个

三 需要保护的资源服务配置
yml配置客户端信息以及认中心地址
security:
 oauth2:
  resource:
   tokenInfoUri: http://localhost:9099/oauth/check_token
   preferTokenInfo: true
  client:
   client-id: hou
   client-secret: 123456
   grant-type: password
   scope: server
   access-token-uri: http://localhost:9099/oauth/token
配置认证中心地址即可
/**
 * 资源中心配置
 */
@Configuration
@EnableResourceServer // 声明资源服务,即可开启token验证保护
@EnableGlobalMethodSecurity(prePostEnabled = true) // 开启方法权限注解
public class ResourceServerConfig extends ResourceServerConfigurerAdapter {

  @Override
  public void configure(HttpSecurity http) throws Exception {
    http.authorizeRequests()
        //配置所有请求不需要认证,在方法用注解定制权限
        .anyRequest().permitAll();
  }
}
编写权限控制
@RestController
@RequestMapping("test")
public class TestController {
  //不需要权限
  @GetMapping("/hou")
  public String test01(){
    return "返回测试数据hou";
  }
  @PreAuthorize("hasAnyAuthority('ROLE_USER')") //需要权限
  @GetMapping("/zheng")
  public String test02(){
    return "返回测试数据zheng";
  }
}
四 测试权限
不使用token

使用token

以上就是本文的全部内容,希望对大家的学习有所帮助,也希望大家多多支持脚本之家。
相关文章

解决SSLContext.getInstance()中参数设置TLS版本无效的问题
这篇文章主要介绍了解决SSLContext.getInstance()中参数设置TLS版本无效的问题,具有很好的参考价值,希望对大家有所帮助,如有错误或未考虑完全的地方,望不吝赐教2024-01-01
Spring Boot启动过程(五)之Springboot内嵌Tomcat对象的start教程详解
这篇文章主要介绍了Spring Boot启动过程(五)之Springboot内嵌Tomcat对象的start的相关资料,需要的朋友可以参考下2017-04-04
Spring+Mybatis+Mysql搭建分布式数据库访问框架的方法
这篇文章主要介绍了Spring+Mybatis+Mysql搭建分布式数据库访问框架的方法,非常不错,具有参考借鉴价值,需要的朋友可以参考下2018-03-03


最新评论