vue图片裁剪插件vue-cropper使用方法详解
本文实例为大家分享了vue图片裁剪插件vue-cropper的使用方法,供大家参考,具体内容如下
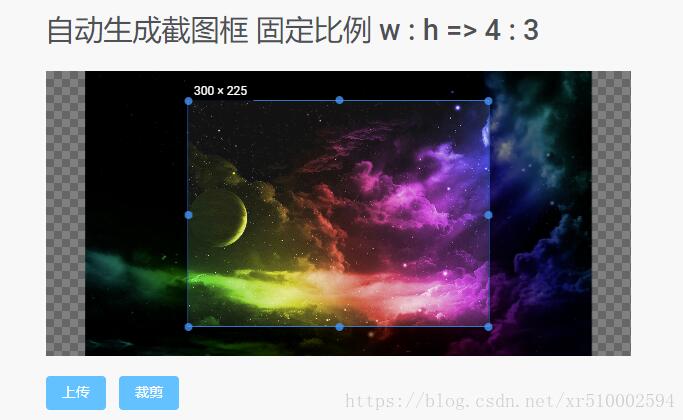
我在网上找了很多关于vue裁剪图片的文章,demo都太长了,实在是太长了。有些还都看不懂,最后还是用了个大佬的demo,但是项目实践过程中还是有问题没解决。先介绍吧。效果是下面这样的,

我这里采用了4:3的固定比例进行裁剪,裁剪后的效果

但是裁剪后的图片路径是base64,超级长的路径,最终还是需要处理地址传给后端的,项目用oss处理图片,最终获得一个类似于aad68a8fd577464dbcdead2e9b20084d这个的后缀传给后端,base64的路径有几万几十万个字符,传给后端会炸的吧。
后来我通过oss进行处理,把base64的路径地址变成通过oss解析过的地址,但是!解析过的地址让我下载,下载的文件不是图片格式,记事本打开文件里面还是base64的路径,复制粘贴,没错,是裁剪之后的图片,这个问题暂时还没有解决,解决之后进行再回来修改。先附上代码吧。这里代码是比较全的,图片地址解析那一部分可以不用。
以上问题以解决,base64转成blob格式就可以处理了,oss上传需要使用new Blob格式(2019/6/22更新)
另外附上文档
裁剪的vue文件:(已更新)
先下载npm install vue-cropper --save
<!-- 裁剪图片 -->
<template>
 <div class="wrapper">
 <div class="model" v-show="model" @click="model = false">
  <div class="model-show">
  <img :src="modelSrc" alt="">
  </div>
 </div>
 <div class="content">

  <div class="show-info">
  <h2>自动生成截图框 固定比例 w : h => 4 : 3</h2>
  <div class="test">
   <vueCropper ref="cropper2" :img="example2.img " :outputSize="example2.size" :outputType="example2.outputType"
   :info="example2.info" :canScale="example2.canScale" :autoCrop="example2.autoCrop"
   :autoCropWidth="example2.autoCropWidth" :autoCropHeight="example2.autoCropHeight" :fixed="example2.fixed"
   :fixedNumber="example2.fixedNumber" :enlarge="4"></vueCropper>
  </div>
  <label class="btn" for="upload2">上传</label>
  <input type="file" id="upload2" style="position:absolute; clip:rect(0 0 0 0);"
   accept="image/png, image/jpeg, image/gif, image/jpg" @change="uploadImg($event,2)">
  <button @click="finish2()" class="btn">裁剪</button>
  </div>
 </div>

 </div>
</template>

<script>
 import { VueCropper } from 'vue-cropper'
 import * as OSS from 'ali-oss';
 export default {
 components: {
  VueCropper,
 },
 data() {
  return {
  model: false,
  modelSrc: '',
  crap: false,
  previews: {},
  form: {
   head: ''
  },
  example2: {
   //img的路径自行修改
   img: '$oss.url + \'/\' + form.head ',
   info: true,
   size: 1,
   outputType: 'jpeg',
   canScale: true,
   autoCrop: true,
   // 只有自动截图开启 宽度高度才生效
   autoCropWidth: 300,
   autoCropHeight: 250,
   fixed: true,
   // 真实的输出宽高
   infoTrue: true,
   fixedNumber: [4, 3]
  },
  downImg: '#'
  }
 },
 methods: {
  //点击裁剪,这一步是可以拿到处理后的地址
  finish2() {
  this.$refs.cropper2.getCropData((data) => {
   this.modelSrc = data
   this.model = false;
   //裁剪后的图片显示
   this.example2.img = this.modelSrc;
   // this.toBlob(data)
   // console.log(data)
   // console.log(this.toBlob(data))

   //阿里云处理图片,项目的接口,这里可以不用,上面的地址打印即为base64的地址
   this.$api.admin.url(data => {
   new OSS.Wrapper({
    region: "oss-cn-hangzhou",
    accessKeyId: data.accessKeyId,
    accessKeySecret: data.accessKeySecret,
    stsToken: data.securityToken,
    // bucket: 'mybg'c
    bucket: 'zhiyuan-hz'
   })
    .put(data.key, this.toBlob(this.example2.img))
    .then(data => {
    console.log(data.url)
    })
    .catch(function (err) {
    console.error("error: %j", err);
    });
   });
  })

  },

  uploadImg(e, num) {
  //上传图片
  this.example2.img = ''
  var file = e.target.files[0]
  if (!/\.(gif|jpg|jpeg|png|bmp|GIF|JPG|PNG)$/.test(e.target.value)) {
   alert('图片类型必须是.gif,jpeg,jpg,png,bmp中的一种')
   return false
  }
  var reader = new FileReader()
  reader.onload = (e) => {
   let data
   data = e.target.result
   if (typeof e.target.result === 'object') {
   // 把Array Buffer转化为blob 如果是base64不需要
   data = window.URL.createObjectURL(new Blob([e.target.result]))
   } else {
   data = e.target.result
   }
   if (num === 1) {
   this.option.img = data
   } else if (num === 2) {
   this.example2.img = data
   }
  }
  // 转化为base64
  // reader.readAsDataURL(file)
  // 转化为blobcs
  reader.readAsArrayBuffer(file)
  },
  // base64转blob
  toBlob(ndata) {
  //ndata为base64格式地址
  console.log(ndata)
  let arr = ndata.split(','),
   mime = arr[0].match(/:(.*?);/)[1],
   bstr = atob(arr[1]),
   n = bstr.length,
   u8arr = new Uint8Array(n);
  while (n--) {
   u8arr[n] = bstr.charCodeAt(n);
  }
  return new Blob([u8arr], {
   type: mime
  })
  }
 },

 }
</script>

<style>
 * {
 margin: 0;
 padding: 0;
 }

 .content {
 margin: auto;
 max-width: 585px;
 margin-bottom: 100px;
 }

 .test-button {
 display: flex;
 flex-wrap: wrap;
 }

 .btn {
 display: inline-block;
 line-height: 1;
 white-space: nowrap;
 cursor: pointer;
 background: #fff;
 border: 1px solid #c0ccda;
 color: #1f2d3d;
 text-align: center;
 box-sizing: border-box;
 outline: none;
 margin: 20px 10px 0px 0px;
 padding: 9px 15px;
 font-size: 14px;
 border-radius: 4px;
 color: #fff;
 background-color: #50bfff;
 border-color: #50bfff;
 transition: all .2s ease;
 text-decoration: none;
 user-select: none;
 }

 .des {
 line-height: 30px;
 }

 code.language-html {
 padding: 10px 20px;
 margin: 10px 0px;
 display: block;
 background-color: #333;
 color: #fff;
 overflow-x: auto;
 font-family: Consolas, Monaco, Droid, Sans, Mono, Source, Code, Pro, Menlo, Lucida, Sans, Type, Writer, Ubuntu, Mono;
 border-radius: 5px;
 white-space: pre;
 }

 .show-info {
 margin-bottom: 50px;
 }

 .show-info h2 {
 line-height: 50px;
 }

 /*.title, .title:hover, .title-focus, .title:visited {
  color: black;
 }*/

 .title {
 display: block;
 text-decoration: none;
 text-align: center;
 line-height: 1.5;
 margin: 20px 0px;
 background-image: -webkit-linear-gradient(left, #3498db, #f47920 10%, #d71345 20%, #f7acbc 30%, #ffd400 40%, #3498db 50%, #f47920 60%, #d71345 70%, #f7acbc 80%, #ffd400 90%, #3498db);
 color: transparent;
 -webkit-background-clip: text;
 background-size: 200% 100%;
 animation: slide 5s infinite linear;
 font-size: 40px;
 }

 .test {
 height: 285px;
 }

 .model {
 position: fixed;
 z-index: 10;
 width: 100vw;
 height: 100vh;
 overflow: auto;
 top: 0;
 left: 0;
 background: rgba(0, 0, 0, 0.8);
 }

 .model-show {
 display: flex;
 justify-content: center;
 align-items: center;
 width: 100vw;
 height: 100vh;
 }

 .model img {
 display: block;
 margin: auto;
 max-width: 80%;
 user-select: none;
 background-position: 0px 0px, 10px 10px;
 background-size: 20px 20px;
 background-image: linear-gradient(45deg, #eee 25%, transparent 25%, transparent 75%, #eee 75%, #eee 100%), linear-gradient(45deg, #eee 25%, white 25%, white 75%, #eee 75%, #eee 100%);
 }

 .c-item {
 display: block;
 padding: 10px 0;
 user-select: none;
 }

 @keyframes slide {
 0% {
  background-position: 0 0;
 }

 100% {
  background-position: -100% 0;
 }
 }

 @media screen and (max-width: 1000px) {
 .content {
  max-width: 90%;
  margin: auto;
 }

 .test {
  height: 400px;
 }
 }
</style>
以上就是本文的全部内容,希望对大家的学习有所帮助,也希望大家多多支持脚本之家。
相关文章

关于element-ui中@selection-change执行两次的问题
这篇文章主要介绍了关于element-ui中@selection-change执行两次的问题,具有很好的参考价值,希望对大家有所帮助。如有错误或未考虑完全的地方,望不吝赐教2022-08-08
详解Vue中的render: h => h(App)示例代码
这篇文章主要介绍了Vue中的render: h => h(App),本文通过实例代码给大家介绍的非常详细,对大家的学习或工作具有一定的参考借鉴价值,需要的朋友可以参考下2023-09-09


最新评论