vue实现登录、注册、退出、跳转等功能
更新时间:2020年12月23日 11:08:11 作者:学习永远不会晚
这篇文章主要介绍了vue实现登录、注册、退出、跳转等功能,需要的朋友可以参考下
本文给大家介绍vue实现登录、注册、退出、跳转功能,具体代码如下所示:
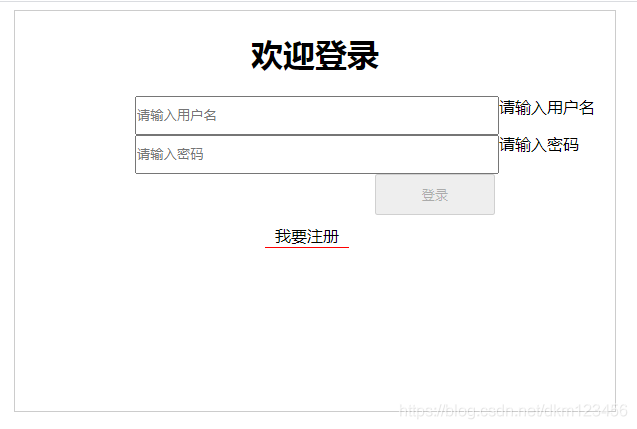
效果图1:

效果图2:

效果图3:

效果图4:

完整实例:
<!DOCTYPE html>
<html>
  <head>
    <meta charset="GBK">
    <title></title>
    <style>
    ul li {

      margin: 0;
      padding: 0;
      list-style: none;
    }
    #app {
      width: 600px;
      height: 400px;
      margin: 0 auto;
      border: 1px solid #ccc;
    }
    .title{
    	text-align:center;
    }
    .tab-tilte{
      width: 99%;
    }
    .tab-tilte li{
      float: left;
      width: 31%;
      padding: 10px 0;
      text-align: center;
      background-color:#f4f4f4;
      cursor: pointer;
    }
   /* 点击对应的标题添加对应的背景颜色 */
    .tab-tilte .active{
      background-color: #09f;
      color: #fff;
    }
    .tab-content div{
      float: left;
      width: 25%;
      line-height: 100px;
      text-align: center;
    }
    .sider_icon{
				display: inline-block;
				width:36px;
				height:40px;
				line-height:36px;
				font-size:20px;
				text-align:center;
				color:#fff;
				background: url(../images/bubble.png) 0 0 no-repeat;
				top:-20px;
			}
    	.contentli{
    		float: left;
	      padding: 10px 0;
	      text-align: center;
    	}
    	.input{
    		float: left;
    		width: 60%;
    		margin-left:20%;
	      padding: 10px 0;
	      align:center;
    	}
    	.btn{
    		float: left;
	      width: 20%;
	      margin-left:60%;
	      padding: 10px 1px;
	      text-align: center;
    	}
    	.guanggao{
    		float:right;
    		padding-right:10px;
    		cursor:pointer;
    	}
    	#bottomDiv{
    		float: left;
	      margin-left:40%;
	      padding: 10px 10px;
	      text-align: center;
    	}
    	#bottomDiv a{
    			 padding: 1px 10px;
    			 cursor:pointer;
    			 border-bottom:1px solid red;
    	}
    </style>
  </head>
  <body>
  	<div id="app" >
  		<div v-show='page==="advert"'>
  			<span class='guanggao' @click='goLogin'>点击跳转<b>{{n}}</b></span>

  			<div id='bottomDiv'>
	  			<h1 class='title'>欢迎体验</h1>
	  		</div>
  		</div>
  		<div v-show='page==="login"'>
	  		<div>
	  			<h1 class='title'>欢迎登录</h1>
	  			<div>
		  			<input type="text" v-model='name' class="input" placeholder='请输入用户名'>
		  			<p v-show='!name'>请输入用户名</p>
	  			</div>
	  			<div>
	  			<input type="text" v-model='pwd' class="input" placeholder='请输入密码'>
	  			<p v-show='!pwd'>请输入密码</p>
	  			</div>
	  			<button @click="add" :disabled="!name||!pwd" class='btn'>登录</button>
	  		</div>
	  		<div id='bottomDiv'>
	  			<a @click="goRegister">我要注册</a>
	  		</div>
  		</div>
  		<div v-show='page==="register"'>
  			<div>
	  			<h1 class='title'>注册界面,没写,哈哈</h1>
  			</div>
  			<div id='bottomDiv'>
	  			<a @click="goLogin">我要登录</a>
	  		</div>
  		</div>
  		<div v-show='page==="suc"'>
  			<div>
	  			<h1 class='title'>登录成功</h1>
  			</div>
  			<div id='bottomDiv'>
	  			<a @click="exit">退出登录</a>
	  		</div>
  		</div>
		</div>
  </body>
  <script src="vue.js"></script>
 	<script>
     new Vue({
      el:'#app',
      data:{
      	page:'advert',//默认是倒计时的显示广告 login/register 分别表示登录、注册
      	n:5,
      	intervalId:'',
      	name:'',
      	pwd:''
      },
      methods:{
      	autoPlay:function(){
      		//自动进行到计时
      		this.intervalId=setInterval(()=>{
      			if(this.n===0){//当倒计时为0的时候,跳转登录界面,并清除定时器
	      			this.page='login';//设置page为login
	      			clearInterval(this.intervalId);
	      			return ;
	      		}
	      		this.n--;
      		},1000);
      	},
      	goLogin:function(){//点击到登录界面
      		this.page='login';//设置page为login
      		clearInterval(this.intervalId);
      	},
      	add:function(){
      		//控制跳转到成功
      		this.page='suc';
      	},
      	goRegister:function(){
      		//控制跳转到注册
      		this.page='register';
      		this.name=this.pwd='';
      	},
      	exit:function(){
      		//控制跳转到登录
      		this.page='login';
      		this.name=this.pwd='';
      	}
      },
      computed:{

      },
      mounted:function(){
      	//生命周期 mounted就执行 倒计时函数
      	this.autoPlay();
      }
    })
 	</script>

</html>
到此这篇关于vue实现登录、注册、退出、跳转等功能的文章就介绍到这了,更多相关vue实现登录、注册、退出、跳转内容请搜索脚本之家以前的文章或继续浏览下面的相关文章希望大家以后多多支持脚本之家!
相关文章

javascript中Set、Map、WeakSet、WeakMap区别
这篇文章主要介绍了javascript中Set、Map、WeakSet、WeakMap区别,需要的朋友可以参考下2022-12-12
vue深入解析之render function code详解
vue对大家来说应该再熟悉不过了,下面这篇文章主要给大家深入的解析了vue之render function code的相关资料,文中通过示例代码介绍的非常详细,对大家具有一定的参考学习价值,需要的朋友们下面来一起看看吧。2017-07-07
vue-cli如何关闭Uncaught error的全屏提示
这篇文章主要介绍了vue-cli如何关闭Uncaught error的全屏提示问题,具有很好的参考价值,希望对大家有所帮助,如有错误或未考虑完全的地方,望不吝赐教2024-04-04


最新评论