python读写修改Excel之xlrd&xlwt&xlutils
py读写修改常用的三种方法
- xlwt:用于写入 Excel 文件
- xlrd:用于读取 Excel 文件
- xlutils:用于操作 Excel 文件的实用工具,比如复制、分割、筛选等
0、安装模块
pip3 install xlrd xlwt xlutils
1. 写入excel
git:https://github.com/python-excel/xlwt/tree/master/examples
实现效果

上代码
from datetime import datetime

import xlwt

font0 = xlwt.Font()

# font0.name = 'Times New Roman' # 适用于字母或数字
font0.name = '宋体'  # 适用于中文,适配字体或者不指定字体才能体现出指定的颜色

# font0.colour_index = 1  # 白色
# font0.colour_index = 2  # 红色
# font0.colour_index = 3  # 绿色
# font0.colour_index = 4  # 蓝色
# font0.colour_index = 5  # 黄色
# font0.colour_index = 6  # 紫色
# font0.colour_index = 7  # 青色
# font0.colour_index = 8  # 黑色,比默认加黑,不加粗
font0.colour_index = 4  # 蓝色
font0.bold = True

style0 = xlwt.XFStyle()
style0.font = font0

# 创建样式对象:日期格式
style1 = xlwt.XFStyle()
style1.num_format_str = 'YYYY-MM-DD'

# 创建样式对象:字体居中对齐
style2 = xlwt.XFStyle()
al = xlwt.Alignment()
al.horz = 0x02 # 设置水平居中
al.vert = 0x01 # 设置垂直居中
style2.alignment = al

# 创建样式对象,设置日期格式与字体居中对齐
style3 = xlwt.XFStyle()
style3.num_format_str = 'YYYY-MM-DD'
style3.alignment = al

# 创建样式对象,设置字体居中 且 设置字体颜色
style4 = xlwt.XFStyle()
style4.alignment = al
style4.font = font0

now_time = datetime.now().strftime('%Y-%m-%d %X')
date_time = datetime.now().strftime('%Y-%m-%d')

# 创建表格
wb = xlwt.Workbook()

# 新建一个名为 Score Sheet 的表单页
score_sheet = wb.add_sheet('Score Sheet')

# 新建一个名为 Record Test Sheet 的表单页
record_test_sheet = wb.add_sheet('Record Test Sheet')

# 1、写入 Score Sheet 表单
# 设置 表头, 第一个参数是行,第二个参数是列
score_sheet.write(0, 0, '时间', style2)
score_sheet.write(0, 1, '班级', style2)
score_sheet.write(0, 2, '姓名', style2)
score_sheet.write(0, 3, '语文', style2)
score_sheet.write(0, 4, '数学', style2)
score_sheet.write(0, 5, '英语', style2)
score_sheet.write(0, 6, '理综', style2)
score_sheet.write(0, 7, '总分', style4)

# 按照位置添加数据
score_sheet.write(1, 0, datetime.now(), style3)
score_sheet.write(1, 1, '高三三班', style2)
score_sheet.write(1, 2, '桑岩', style2)
score_sheet.write(1, 3, 132, style2)
score_sheet.write(1, 4, 150, style2)
score_sheet.write(1, 5, 140, style2)
score_sheet.write(1, 6, 290, style2)
score_sheet.write(1, 7, xlwt.Formula("D2+E2+F2+G2"), style2)

score_sheet.write(2, 0, datetime.now(), style3)
score_sheet.write(2, 1, '高三三班', style2)
score_sheet.write(2, 2, '项天骐', style2)
score_sheet.write(2, 3, 140, style2)
score_sheet.write(2, 4, 150, style2)
score_sheet.write(2, 5, 132, style2)
score_sheet.write(2, 6, 280, style2)
score_sheet.write(2, 7, xlwt.Formula("D3+E3+F3+G3"), style2)

score_sheet.write(3, 0, datetime.now(), style3)
score_sheet.write(3, 1, '高三三班', style2)
score_sheet.write(3, 2, '向淮南', style2)
score_sheet.write(3, 3, 135, style2)
score_sheet.write(3, 4, 150, style2)
score_sheet.write(3, 5, 145, style2)
score_sheet.write(3, 6, 270, style2)
score_sheet.write(3, 7, xlwt.Formula("D4+E4+F4+G4"), style2)


# 2、写入 Record Test Sheet 表单
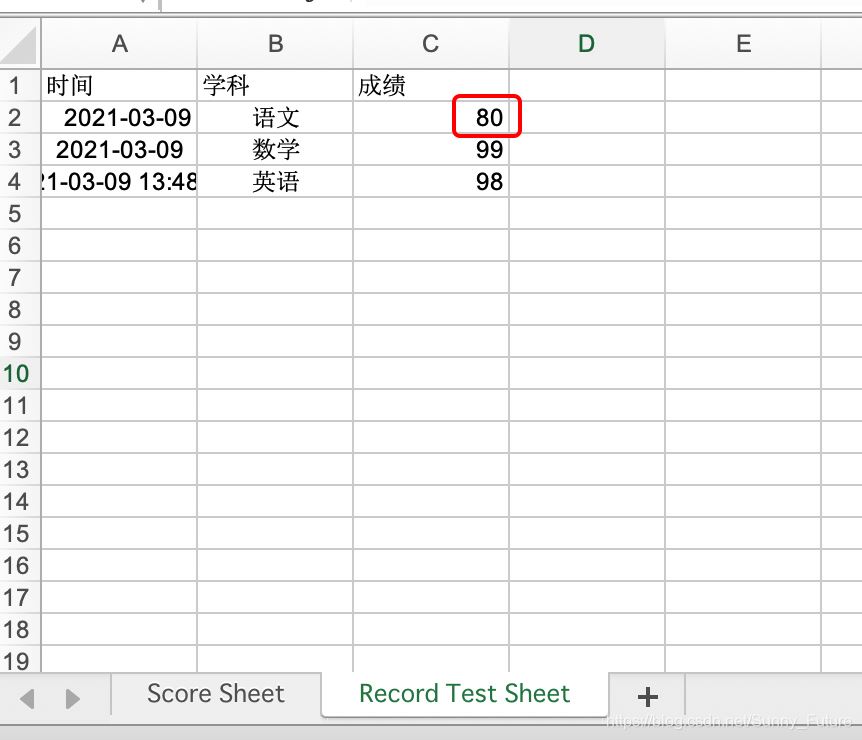
record_test_sheet.write(0, 0, '时间')
record_test_sheet.write(0, 1, '学科', style1)
record_test_sheet.write(0, 2, '成绩', style1)
record_test_sheet.write(1, 0, datetime.now(), style1)
record_test_sheet.write(1, 1, '语文', style2)
record_test_sheet.write(1, 2, 80)
record_test_sheet.write(2, 0, datetime.now(), style3)
record_test_sheet.write(2, 1, '数学', style2)
record_test_sheet.write(2, 2, 99)
record_test_sheet.write(3, 0, now_time, style2)
record_test_sheet.write(3, 1, '英语', style2)
record_test_sheet.write(3, 2, 98)


# 保存表格,这里应该是覆盖写,注意每次都是覆盖所有表单内容,建议每次生成的表单加上时间版本区分
# wb.save('example.xls')
wb.save('example-{0}.xls'.format(date_time))
2、读 Excel
git:https://github.com/python-excel/xlrd
实现效果,读取sheet 表单内容

| 数值 | 类型 | 说明 |
|---|---|---|
| 0 | empty | 空 |
| 1 | string | 字符串 |
| 2 | number | 数字 |
| 3 | date | 日期 |
| 4 | boole | 布尔值 |
| 5 | error | 错误 |
代码
import xlrd

# 打开 xls文件
wb = xlrd.open_workbook("example-2021-03-09.xls")

# 获取并打印 sheet 数量
print("sheet 数量:", wb.nsheets)     # sheet 数量: 2

# 获取并打印 sheet 名称
print("sheet 名称:", wb.sheet_names())  # sheet 名称: ['Score Sheet', 'Record Test Sheet']

# 根据 sheet 索引获取内容
sh1 = wb.sheet_by_index(0)
# 或者
# 也可根据 sheet 名称获取内容
# sh = wb.sheet_by_name('Score Sheet')

# 获取并打印该 sheet 行数和列数
print(u"sheet: %s表单 共 %d 行 %d 列" % (sh1.name, sh1.nrows, sh1.ncols))   # sheet: Score Sheet表单 共 4 行 8 列

# 获取并打印某个单元格的值
print("第一行第二列的值为:", sh1.cell_value(0, 1))    # 第一行第二列的值为: 班级

# 获取整行或整列的值
row_info = sh1.row_values(0)  # 获取第一行内容
col_info = sh1.col_values(1)  # 获取第二列内容

# 打印获取的行列值
print("第一行的值为:", row_info)   # 第一行的值为: ['时间', '班级', '姓名', '语文', '数学', '英语', '理综', '总分']
print("第二列的值为:", col_info)   # 第二列的值为: ['班级', '高三三班', '高三三班', '高三三班']

# 获取单元格内容的数据类型,注意这里的值 另有含义
print("第二行第一列的【值类型】为:", sh1.cell(1, 0).ctype)   # 第二行第一列的【值类型】为: 3

# 遍历所有表单内容
for sh in wb.sheets():
  for r in range(sh.nrows):

    # 输出指定行内容,这里包含原有类型指定,不能直接获取到指定列的值
    row_val_list = sh.row(r)
    print(row_val_list)
    # [text:'时间', text:'班级', text:'姓名', text:'语文', text:'数学', text:'英语', text:'理综', text:'总分']

    # 遍历行内,输出当前行内的所有列值
    col_val_list = [col_val.value for col_val in row_val_list]
    print(col_val_list)
3、修改 Excel
修改 Excel 是通过 xlutils 库的 copy 方法将原来的 Excel 整个复制一份,然后再做修改操作,最后再保存
修改前

修改后

上代码
import xlrd
from xlutils.copy import copy


# 打开 excel 文件, 带格式复制
read_book = xlrd.open_workbook("example-2021-03-09.xls", formatting_info=True)

# 复制一份
wb = copy(read_book)

# 选取第一个表单
sh1 = wb.get_sheet(0)

# 在第五行新增写入数据
sh1.write(4, 0, '2020-12-16')
sh1.write(4, 1, '高三三班')
sh1.write(4, 2, '小鱼仙倌儿')
sh1.write(4, 3, 150)
sh1.write(4, 4, 150)
sh1.write(4, 5, 150)
sh1.write(4, 6, 300)

# 选取第二个表单
sh2 = wb.get_sheet(1)

# 替换总成绩数据
sh2.write(1, 2, 100)

# 保存
wb.save('example-2021-03-09.xls')
注意,复制 xls这里有格式问题
似乎没有任何简单的方法可以保留单元格的格式;它总是被吹走并设置为空白。
https://www.coder.work/article/80896
https://zhuanlan.zhihu.com/p/128674458
附录
参考:http://www.ityouknow.com/python/2019/12/29/python-excel-103.html
官网:http://www.python-excel.org/
到此这篇关于python读写修改Excel之xlrd&xlwt&xlutils的文章就介绍到这了,更多相关python读写修改Excel内容请搜索脚本之家以前的文章或继续浏览下面的相关文章希望大家以后多多支持脚本之家!
相关文章

Python 进程操作之进程间通过队列共享数据,队列Queue简单示例
这篇文章主要介绍了Python 进程操作之进程间通过队列共享数据,队列Queue,结合实例形式分析了Python进程数据共享、队列数据处理相关操作技巧,需要的朋友可以参考下2019-10-10
pytest利用request fixture实现个性化测试需求详解
这篇文章主要为大家详细介绍了pytest如何利用request fixture实现个性化测试需求,文中的示例代码讲解详细,感兴趣的小伙伴可以跟随小编一起了解一下2023-09-09
Pycharm安装第三方库时Non-zero exit code错误解决办法
这篇文章主要介绍了Pycharm安装第三方库时Non-zero exit code错误解决办法,最好的解决办法可以通过“Pycharm”左下角的“Terminal”,在pycharm内使用pip安装,以安装“requests”为例,需要的朋友可以参考下2023-01-01
如何使用draw.io插件在vscode中一体化导出高质量图片
这篇文章主要介绍了draw.io插件在vscode中一体化导出高质量图片需要的工具是vscode, draw.io扩展,draw.io桌面版 、python,本文给大家介绍的非常详细,对大家的学习或工作具有一定的参考借鉴,需要的朋友可以参考下2022-08-08


最新评论