如何在CocosCreator中利用常驻节点做图层管理
CocosCreator版本:2.3.4
一般游戏都有图层管理,比如
- sceneLayer 场景层
- panelLayer 弹框层
- tipLayer 提示框层
cocos里的场景不是持久化的,每次切换都会自动destroy,如果在场景上放这些图层,那么每个scene都要放一遍?然后再获取,这样很麻烦。
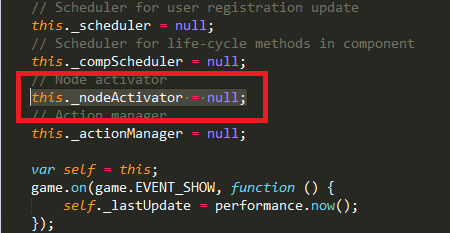
加载场景使用的是cc.director.loadScene,scene的容器node貌似是director上的一个nodeActivator

现在如果不考虑scene的容器或者cocos的顶层容器。我想一想两种图层管理的方法。
一、只有一个scene
整个游戏一个scene,就是游戏入口的scene,在这个scene上放sceneLayer等图层的node,这个入口scene相当于egret和laya的stage。
然后所有场景scene和弹框模块,都做成预制件prefab,每次显示都addChild到入口scene的相应图层上就行了。

二、使用常驻节点
比如我在场景1,放置sceneLayer等图层。为了方便显示,我每个图层加了个单色。

常驻节点必须在根节点下,也就是和canvas同级。把3个图层设置为常驻节点。
onLoad(){
    cc.game.addPersistRootNode(cc.find("sceneLayer"));
    cc.game.addPersistRootNode(cc.find("panelLayer"));
    cc.game.addPersistRootNode(cc.find("tipLayer"));
}
然后切换场景,在新场景中,仍然可以显示并获取到sceneLayer等图层。

onLoad(){
    console.log(cc.find("sceneLayer"));  //输出sceneLayer的cc.Node
}
利用常驻节点,我们可以在入口场景中放置sceneLayer等图层。用图层管理类保存引用。
三、最佳实践
图层管理类,单例
export default class LayerManager extends cc.Component {

    private static instance:LayerManager;
    public static ins():LayerManager{
        if(this.instance == null){
            this.instance = new LayerManager();
        }
        return this.instance;
    }

    public panelLayer:cc.Node;
    public tipLayer:cc.Node;

}
在入口场景中设置常驻节点layer, 用图层管理类保存引用。以备之后使用。
@ccclass
export default class Helloworld extends cc.Component {

    onLoad(){
        cc.game.addPersistRootNode(cc.find("sceneLayer"));
        cc.game.addPersistRootNode(cc.find("panelLayer"));
        cc.game.addPersistRootNode(cc.find("tipLayer"));

        LayerManager.ins().panelLayer = cc.find("panelLayer");
        LayerManager.ins().tipLayer = cc.find("tipLayer");
    }
}
以上就是如何在CocosCreator中利用常驻节点做图层管理的详细内容,更多关于CocosCreator常驻节点做图层管理的资料请关注脚本之家其它相关文章!
相关文章

有趣的script标签用getAttribute方法来自脚本吧
有趣的script标签用getAttribute方法来自脚本吧...2007-03-03
javascript window.onerror事件学习新收获
javascript window.onerror事件学习新收获...2007-11-11
javascript判断iphone/android手机横竖屏模式的函数
iphone能很好的使用onorientationchange事件,但是android的onresize事件即使不旋转也会触发多次2011-12-12


最新评论