发工资啦!教你用Python实现邮箱自动群发工资条
更新时间:2021年05月10日 14:29:59 作者:Harris-H
这篇文章主要介绍了发工资啦!教你用Python实现邮箱自动群发工资条,文中有非常详细的代码示例,对正在学习python的小伙伴们有很好地帮助,需要的朋友可以参考下
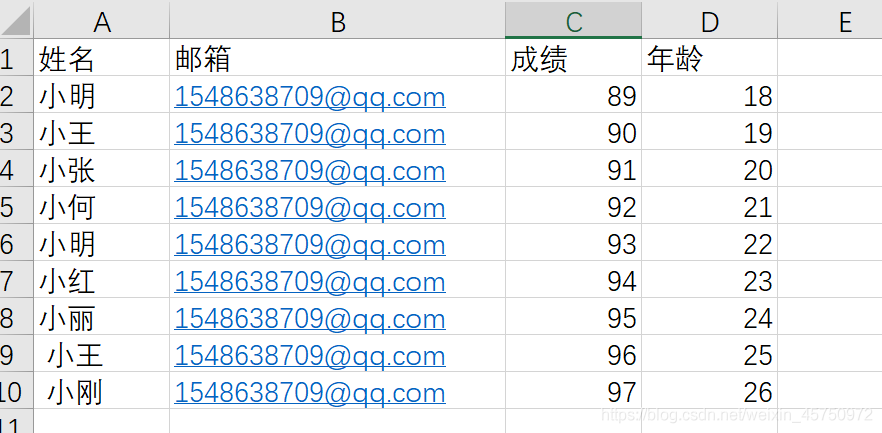
一、excel的内容

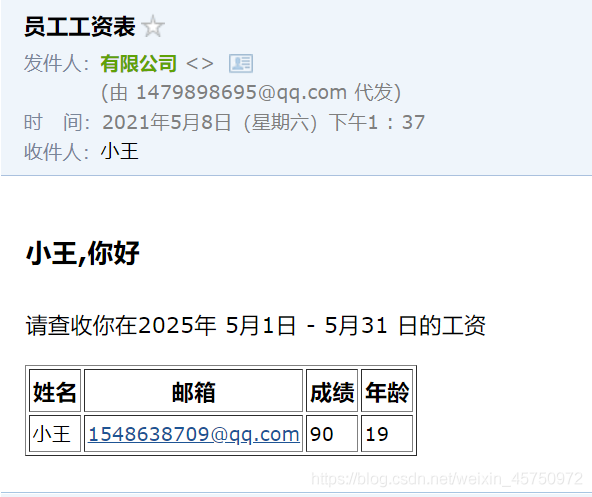
二、效果

三、需要用的库:
- openpyxl
- smptlib
- email.mime.text
- email.header
四、实现步骤
4.1 获取excel表的数据
wb = load_workbook('数据表.xlsx')
sheet = wb.active
for row in sheet:
	for cell in row:
        print(cell.value)
4.2 编写邮件内容
使用字符串拼接成html
for row in sheet:
        tbody = '<tr>'
        cnt += 1
        if cnt == 1:
            for cell in row:
                thead += f'<th>{cell.value}</th>'
            thead += '</thead>'
        else:
            for cell in row:
                tbody += f'<td>{cell.value}</td>'
            tbody += '</tr>'
        name = row[0].value
        mail = row[1].value
        #  2.编写邮件内容
        content = f'''
            <h3>{name},你好</h3>
            <p>请查收你在2025年 5月1日 - 5月31 日的工资</p>
            <table border='1px solid black'>
            {thead}
            {tbody}
            </table>
        '''
4.3 发送邮件
# 发送邮件
class Test:
    def ck_log(self):
        pass

    def send_email(self, econtent, ename, mail):
        host = 'smtp.qq.com'
        user = '你的邮箱'
        password = '你的授权码'
        receivers = [mail]
        subject = '员工工资表'
        msg = MIMEText(econtent, 'html', 'utf-8')
        msg['From'] = Header('有限公司')
        msg['To'] = Header(ename)
        msg['Subject'] = Header(subject, 'utf-8')

        try:
            obj = smtplib.SMTP_SSL(host, 465)
            obj.login(user, password)
            obj.sendmail(user, receivers, msg.as_string())
            print("邮件发送成功!")
        except smtplib.SMTPException as e:
            print("Error: 无法发送邮件")
            print(e)
五、所有代码
from openpyxl import load_workbook
import smtplib
from email.mime.text import MIMEText
from email.header import Header

'''
1.获取excel表的数据
2.编写邮件内容
3.发送邮件
'''


# 发送邮件
class Test:
    def ck_log(self):
        pass

    def send_email(self, econtent, ename, mail):
        host = 'smtp.qq.com'
        user = '1479898695@qq.com'
        password = 'bijoplffwqqlbaci'
        receivers = [mail]
        subject = '员工工资表'
        msg = MIMEText(econtent, 'html', 'utf-8')
        msg['From'] = Header('有限公司')
        msg['To'] = Header(ename)
        msg['Subject'] = Header(subject, 'utf-8')

        try:
            obj = smtplib.SMTP_SSL(host, 465)
            obj.login(user, password)
            obj.sendmail(user, receivers, msg.as_string())
            print("邮件发送成功!")
        except smtplib.SMTPException as e:
            print("Error: 无法发送邮件")
            print(e)


if __name__ == '__main__':
    wb = load_workbook('数据表.xlsx')
    o = Test()
    cnt = 0
    sheet = wb.active
    thead = '<thead>'
    #  1.获取excel表的数据
    for row in sheet:
        tbody = '<tr>'
        cnt += 1
        if cnt == 1:
            for cell in row:
                thead += f'<th>{cell.value}</th>'
            thead += '</thead>'
        else:
            for cell in row:
                tbody += f'<td>{cell.value}</td>'
            tbody += '</tr>'
        name = row[0].value
        mail = row[1].value
        #  2.编写邮件内容
        content = f'''
            <h3>{name},你好</h3>
            <p>请查收你在2025年 5月1日 - 5月31 日的工资</p>
            <table border='1px solid black'>
            {thead}
            {tbody}
            </table>
        '''
        #  3.发送邮件
        if cnt == 3:
            print('content:', content)
            print(name, mail)
            o.send_email(content, name, mail)
到此这篇关于发工资啦!教你用Python实现邮箱自动群发工资条的文章就介绍到这了,更多相关Python自动群发工资条内容请搜索脚本之家以前的文章或继续浏览下面的相关文章希望大家以后多多支持脚本之家!
相关文章

Python虚拟环境库virtualenvwrapper安装及使用
这篇文章主要介绍了Python虚拟环境库virtualenvwrapper安装及使用,文中通过示例代码介绍的非常详细,对大家的学习或者工作具有一定的参考学习价值,需要的朋友可以参考下2020-06-06
python中时间转换datetime和pd.to_datetime详析
这篇文章主要给大家介绍了关于python中时间转换datetime和pd.to_datetime的相关资料,文中通过示例代码介绍的非常详细,对大家学习或者使用python具有一定的参考学习价值,需要的朋友们下面来一起学习学习吧2019-08-08


最新评论