Spring基于XML实现Aop
更新时间:2021年07月16日 11:35:22 作者:宁在春
这篇文章主要介绍了Spring中基于xml的AOP的详细步骤,本文通过实例代码给大家介绍的非常详细,对大家的学习或工作具有一定的参考借鉴价值,需要的朋友可以参考下
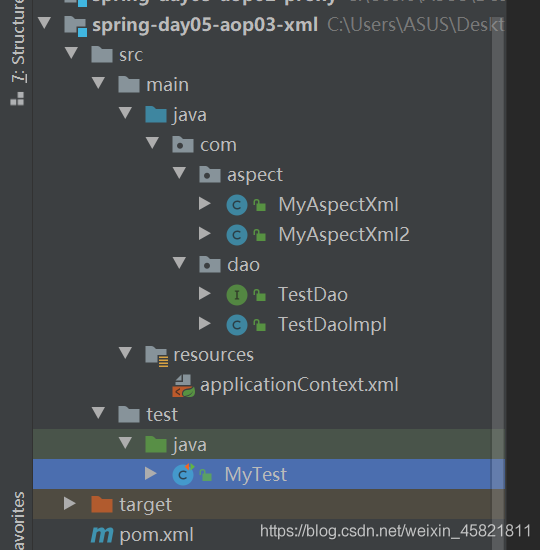
项目结构

具体步骤
1、创建maven 项目 导入依赖 创建好项目结构
 <dependencies>
        <dependency>
            <groupId>org.projectlombok</groupId>
            <artifactId>lombok</artifactId>
            <version>1.18.18</version>
        </dependency>
        <dependency>
            <groupId>junit</groupId>
            <artifactId>junit</artifactId>
            <version>4.12</version>
            <scope>test</scope>
        </dependency>
        <dependency>
            <groupId>org.springframework</groupId>
            <artifactId>spring-context</artifactId>
            <version>5.3.4</version>
        </dependency>
        <dependency>
            <groupId>org.springframework</groupId>
            <artifactId>spring-beans</artifactId>
            <version>5.3.4</version>
        </dependency>
        <dependency>
            <groupId>org.springframework</groupId>
            <artifactId>spring-core</artifactId>
            <version>5.3.4</version>
        </dependency>
        <dependency>
            <groupId>org.springframework</groupId>
            <artifactId>spring-expression</artifactId>
            <version>5.3.4</version>
        </dependency>
        <dependency>
            <groupId>org.springframework</groupId>
            <artifactId>spring-aop</artifactId>
            <version>5.3.4</version>
        </dependency>
        <dependency>
            <groupId>org.aspectj</groupId>
            <artifactId>aspectjweaver</artifactId>
            <version>1.9.6</version>
        </dependency>
        <dependency>
            <groupId>org.aspectj</groupId>
            <artifactId>aspectjrt</artifactId>
            <version>1.9.6</version>
        </dependency>
    </dependencies>
2、写一个TestDao接口 及实现类
/**
 * @version 1.0
 * @author: crush
 * @date: 2021-03-05 10:26
 */
public interface TestDao {
    public void sayHello();
    public void save();
    public void modify();
    public void delete();
}
/**
 * @version 1.0
 * @author: crush
 * @date: 2021-03-05 10:27
 */
public class TestDaoImpl implements TestDao {
    public void sayHello() {
        System.out.println("正在执行的方法-->武汉加油!中国加油!");
    }
    public void save() {
        System.out.println("正在执行的方法-->保存");
    }
    public void modify() {
        System.out.println("正在执行的方法-->修改");
    }
    public void delete() {
        System.out.println("正在执行的方法-->删除");
    }
}
3、编写切面类
/**
 * @version 1.0
 * @author: crush
 * @date: 2021-03-10 17:12
 */
public class MyAspectXml {
    /**
     * 前置通知 使用JoinPoint 接口作为参数获得目标对象的信息
     **/
    public void before(JoinPoint jp){
        System.out.print("前置通知:模拟权限控制   ");
        System.out.println("目标对象:"+jp.getTarget()+",被增强的方法:"+jp.getSignature().getName());
    }
    public void afterReturning(JoinPoint jp){
        System.out.print("后置返回通知:"+"模拟删除临时文件"  );
        System.out.println(",被增强的方法"+jp.getSignature().getName());
    }
    public Object around(ProceedingJoinPoint pjp) throws Throwable {
        System.out.println("环绕开始:执行目标方法前,模拟开启事务");
        Object obj = pjp.proceed();
        System.out.println("环绕结束:执行目标方法后,模拟关闭事务");
        return obj;
    }
    public void except(Throwable throwable){
        System.out.println("异常通知:"+"程序执行异常"+throwable.getMessage());
    }
    public void after(){
        System.out.println("最终通知:释放资源");
    }
}```
### 4、application.xml文件
```xml
<?xml version="1.0" encoding="UTF-8"?>
<beans xmlns="http://www.springframework.org/schema/beans"
       xmlns:xsi="http://www.w3.org/2001/XMLSchema-instance"
       xmlns:aop="http://www.springframework.org/schema/aop"
       xmlns:context="http://www.springframework.org/schema/context"
       xsi:schemaLocation="http://www.springframework.org/schema/beans
       http://www.springframework.org/schema/beans/spring-beans.xsd
       http://www.springframework.org/schema/aop
       https://www.springframework.org/schema/aop/spring-aop.xsd
       http://www.springframework.org/schema/context
       https://www.springframework.org/schema/context/spring-context.xsd">
    <!--
    <aop:aspectj-autoproxy />
    声明自动为spring容器中那些配置@aspectJ切面的bean创建代理,织入切面。
    proxy-target-class属性,默认为false,表示使用jdk动态代理织入增强,
    为true时: 表示使用CGLib动态代理技术织入增强。
    -->
    <aop:aspectj-autoproxy proxy-target-class="true"/>
    <bean id="testDaoImpl" class="com.dao.TestDaoImpl"/>
    <bean id="myAspectXML" class="com.aspect.MyAspectXml"/>
<!--    <bean id="myAspectXML2" class="com.aspect.MyAspectXml2"/>-->
    <!--
        补充:<aop:pointcut>如果位于<aop:aspect>元素中,则命名切点只能被当前<aop:aspect>内定义的元素访问到,
        为了能被整个<aop:config>元素中定义的所有增强访问,则必须在<aop:config>下定义切点。
    -->
    <aop:config>
        <!--切入点  execution 表达式 通过这个表达式筛选连接点 -->
        <aop:pointcut id="myPointCut" expression="execution(* com.dao.*.*(..))"/>
        <aop:aspect ref="myAspectXML">
			           <!--aop:after 是表示 这个方法是那种通知类型after 是方法之后
           method="after" 这个after是切面类中的方法  -->
            <aop:after method="after" pointcut-ref="myPointCut"/>
            <aop:before method="before" pointcut-ref="myPointCut"/>
            <aop:after-returning method="afterReturning" pointcut-ref="myPointCut"/>
            <aop:after-throwing method="except" throwing="throwable" pointcut-ref="myPointCut"/>
            <aop:around method="around" pointcut-ref="myPointCut"/>
        </aop:aspect>
    </aop:config>
</beans>
测试
    @Test
    public void Test(){
        ApplicationContext applicationContext = new ClassPathXmlApplicationContext("applicationContext.xml");
        TestDao testDao = applicationContext.getBean("testDaoImpl", TestDaoImpl.class);
        testDao.save();
        /**
         * 输出:
         * 前置通知:模拟权限控制   目标对象:com.dao.TestDaoImpl@704f1591,被增强的方法:save
         * 环绕开始:执行目标方法前,模拟开启事务
         * 正在执行的方法-->保存
         * 环绕结束:执行目标方法后,模拟关闭事务
         * 后置返回通知:模拟删除临时文件,被增强的方法save
         * 最终通知:释放资源
         */
    }
总结
本篇文章就到这里了,希望能给你带来帮助,也希望能够您能够关注脚本之家的更多内容!
相关文章

如何自定义Mybatis-Plus分布式ID生成器(解决ID长度超过JavaScript整数安全范围问题)
MyBatis-Plus默认生成的是 64bit 长整型,而 JS 的 Number 类型精度最高只有 53bit,这篇文章主要介绍了如何自定义Mybatis-Plus分布式ID生成器(解决ID长度超过JavaScript整数安全范围问题),需要的朋友可以参考下2024-08-08


最新评论