python单测框架之pytest常见用法
单测框架的作用
- 测试发现:从多个文件中寻找测试用例。
- 测试执行:按照一定顺序去执行并且生成结果。
- 测试断言:判断最终结果与实际结果的差异。
- 测试报告:统计测试进度、耗时、通过率,生成测试报告。
pytest简介
pytest是python的单测框架,使用灵活,插件丰富,以下是pytest常用的插件
- pytest
- pytest-html:生成html测试报告插件
- pytest-xdist:多线程执行用例插件
- pytest-ordering:自定义用例顺序插件
- pytest-rerunfailures:失败重跑插件
- allure-pytest:生成allure美观测试报告插件
pip install 就行,只有有这些插件,下面的某些命令行才生效
pytest默认规则
- 模块名必须以test_开头或者_test结尾
- 类名必须以Test开头
- 测试方法必须以test开头
- pytest用例运行顺序默认从上到下(代码中可以使用装饰器@pytest.mark.run(order=1)来指定执行顺序)
使用pytest.ini文件可以修改默认规则
pytest的运行方式
主函数模式
import pytest

if __name__ == '__main__':
    pytest.main(["-vs", "./test_demo/test_demo1.py"])
这样就可以运行所有用例
命令行模式
pytest -vs ./test_demo/test_demo1.py
参数详解
- -s:输出调试的信息
- -v:表示详细的方式输出
- ./test_demo/test_demo1.py表示运行指定模块,相对路径表示
- ./test_demo/test_demo1.py::TestCase1::test_case1 nodeid表示,代表运行./test_demo/test_demo1.py模块下的TestCase1类的test_case1 方法
- -n分布式运行测试用例,-n num,参数num代表几个线程运行用例
- –reruns=2表示用例失败重跑2次,常用于一些不稳定的用例,如web自动化
- -x只要有一个用例报错,那么就会停止
- –maxfail=2,有2个用例失败就会停止
- -k根据测试用例部分字符串指定测试用例,如 -k “ao”,代表会执行带有ao名称的字符串
读取pytest.ini配置文件运行
不论是主函数模式还是命令行模式都会读取这个配置文件,该文件需要使用gbk编码,下面是这个配置文件的例子
[pytest]
# 命令行参数,用空格分隔
addopts = -vs
# 测试用例文件夹,可以自己配置
testpaths = ./test_demo
# 配置测试搜索的模块文件名称
python_files = test*.py
# 配置测试搜索的类名
python_classes = Test*
# 配置搜索的函数名
python_functions = test
分组执行
定义三个组,冒烟:smoke,用户管理:user_manager,作业管理:worker_manager
目前有几个用例给加个分组的装饰器
import pytest


class TestDemo:

    @pytest.mark.somke
    def test_case1(self):
        print("1")

    @pytest.mark.user_manage
    def test_case2(self):
        print("2")

    @pytest.mark.worker_manage
    def test_case3(self):
        print("3")
配置文件中加入分组信息
markers =
    smoke:冒烟测试
    user_manage:用户管理
    worker_manage:作业管理
运行
运行多组
import pytest

if __name__ == '__main__':
    pytest.main(["-vs", "-m smoke or usermanage"])
运行单组
import pytest

if __name__ == '__main__':
    pytest.main(["-vs", "-m smoke"])
忽略执行
无条件忽略
直接使用装饰器@pytest.mark.skip(reason=“原因填写”)
有条件忽略
使用装饰器@pytest.mark.skipif(条件, 原因)
例子:
import pytest


class TestDemo:
    age = 18

    @pytest.mark.smoke
    def test_case1(self):
        print("1")

    @pytest.mark.usermanage
    @pytest.mark.skipif(age < 18, "未成年")
    def test_case2(self):
        print("2")

    @pytest.mark.workermanage
    @pytest.mark.skip(reason="原因填写")
    def test_case3(self):
        print("3")
pytest中的前后置处理
为什么需要前后置?比如执行用例前需要做一些准备工作,比如打开浏览器,在执行用例后需要一些后置工作,比如关闭浏览器
模块级别
在每个模块执行前会调用setup_module方法,在每个模块执行后会使用teardown_module方法。
例子:
import pytest


def setup_module():
    print("模块用例前执行")


def teardown_module():
    print("模块用例后执行")


class TestDemo:
    def test_case1(self):
        print("1")

    def test_case2(self):
        print("2")

    def test_case3(self):
        print("3")


class TestDemo2:
    def test_case4(self):
        print("4")
结果:
test_demo/test_demo2.py::TestDemo::test_case1 模块用例前执行
1
PASSED
test_demo/test_demo2.py::TestDemo::test_case2 2
PASSED
test_demo/test_demo2.py::TestDemo::test_case3 3
PASSED
test_demo/test_demo2.py::TestDemo2::test_case4 4
PASSED模块用例后执行
类级别
类级别函数 setup_class/teardown_class 对类有效,位于类中,在测试类中前后调用一次。
class TestDemo:
    def setup_class(self):
        print("类级别前置")

    def test_case1(self):
        print("1")

    def test_case2(self):
        print("2")

    def test_case3(self):
        print("3")

    def teardown_class(self):
        print("类级别后置")
test_demo/test_demo2.py::TestDemo::test_case1 模块用例前执行
类级别前置
1
PASSED
test_demo/test_demo2.py::TestDemo::test_case2 2
PASSED
test_demo/test_demo2.py::TestDemo::test_case3 3
PASSED类级别后置
模块用例后执行
方法级别
方法级别函数 setup_method/teardown_method和setup/teardown对类有效,也位于类中,这两个效果一样,在测试类中每个测试方法前后调用一次。
class TestDemo:
    def setup_method(self):
        print("方法级别前置")

    def test_case1(self):
        print("1")

    def test_case2(self):
        print("2")

    def test_case3(self):
        print("3")

    def teardown_method(self):
        print("方法级别后置")
test_demo/test_demo3.py::TestDemo::test_case1 方法级别前置

PASSED方法级别后置

test_demo/test_demo3.py::TestDemo::test_case2 方法级别前置

PASSED方法级别后置

test_demo/test_demo3.py::TestDemo::test_case3 方法级别前置

PASSED方法级别后置
部分用例的前后置 pytest.fixture装饰器
import pytest

@pytest.fixture(scope="function", params=["1", "2", "3"], autouse=False, ids=None, name="new_name")
def my_feature(request):
    i = request.param
    print("前置")
    yield i
    print("后置")

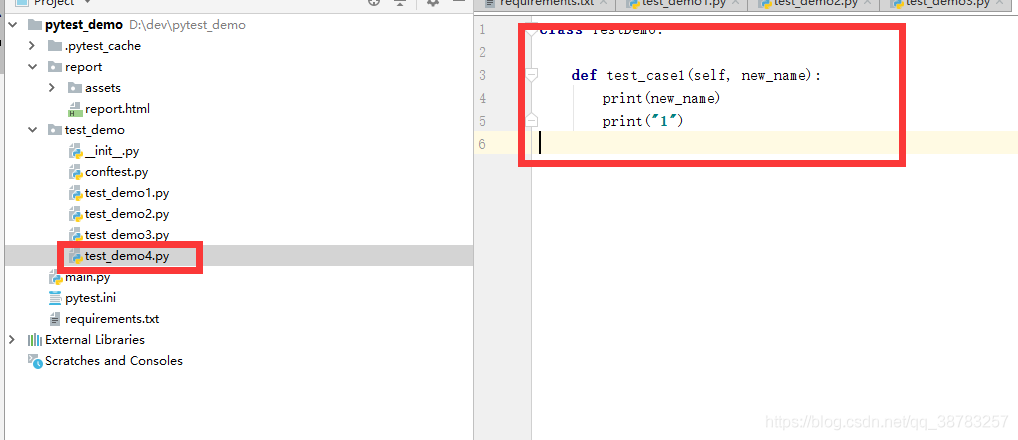
class TestDemo:

    def test_case1(self, new_name):
        print(new_name)
        print("1")
结果
test_demo/test_demo4.py::TestDemo::test_case1[1] 前置
1
1
PASSED后置test_demo/test_demo4.py::TestDemo::test_case1[2] 前置
2
1
PASSED后置test_demo/test_demo4.py::TestDemo::test_case1[3] 前置
3
1
PASSED后置
- scope:表示作用域
- params:表示参数化,与yield使用会调用len(params)次用例,如例子所示,一般用于数据驱动
- autouse:默认使用,一般设置为false
- ids:params参数化时,给每个参数起名字
- name:给该方法取别名
pytest.fixture+conftest
fixture为session级别是可以跨.py模块调用的,也就是当我们有多个.py文件的用例的时候,如果多个用例只需调用一次fixture,那就可以设置为scope=“session”,并且写到conftest.py文件里。
conftest.py文件名称时固定的,pytest会自动识别该文件。放到项目的根目录下就可以全局调用了,如果放到某个package下,那就在改package内有效。
例子:
在包下创建conftest.py,注意,该配置只在本包生效

和之前一样使用

结果还是和之前一样。
pytest生成测试报告
pytest-html插件生成报告
pytest -vs --html ./report/report.html
参数化与数据驱动
主要用的装饰器是@pytest.mark.parametrize(argnames, argvalues)
不带名字数据驱动
import pytest

class TestDemo:
    @pytest.mark.parametrize("args",[(4399, 'AAAA'), (2012, 'BBBB')])
    def test_case1(self, args):
        print(args)
结果:
test_demo/test_demo4.py::TestDemo::test_case1[args0] (4399, ‘AAAA')
PASSED
test_demo/test_demo4.py::TestDemo::test_case1[args1] (2012, ‘BBBB')
PASSED 带名字的数据驱动
import pytest

class TestDemo:
    @pytest.mark.parametrize("arg1,arg2", [(4399, 'AAAA'), (2012, 'BBBB')])
    def test_case1(self, arg1, arg2):
        print(arg1, arg2)
结果:
test_demo/test_demo4.py::TestDemo::test_case1[4399-AAAA] 4399 AAAA
PASSED
test_demo/test_demo4.py::TestDemo::test_case1[2012-BBBB] 2012 BBBB
PASSED
到此这篇关于python单测框架之pytest惯用法的文章就介绍到这了,更多相关python单测框架pytest内容请搜索脚本之家以前的文章或继续浏览下面的相关文章希望大家以后多多支持脚本之家!
相关文章

OpenCV 使用imread()函数读取图片的六种正确姿势
这篇文章主要介绍了OpenCV 使用imread()函数读取图片的六种正确姿势,文中通过示例代码介绍的非常详细,对大家的学习或者工作具有一定的参考学习价值,需要的朋友们下面随着小编来一起学习学习吧2020-07-07
Pycharm Terminal 与Project interpreter 安装
本文主要介绍了Pycharm Terminal 与Project interpreter 安装包不同步问题解决,文中通过示例代码介绍的非常详细,对大家的学习或者工作具有一定的参考学习价值,需要的朋友们下面随着小编来一起学习学习吧2023-02-02


最新评论