Java实例讲解文件上传与跨域问题
Java文件上传实例并解决跨域问题
目在Web应用系统开发中,文件上传和下载功能是非常常用的功能,今天来讲一下JavaWeb中的文件上传功能的实现。
了解MultipartFile接口
我们实现文件的上传用到了Spring-web框架中的 MultipartFile接口,MultipartFile接口的源码注释中说“MultipartFile接口是 在大部分请求中接收的上载文件的表示形式。”
A representation of an uploaded file received in a multipart request.
The file contents are either stored in memory or temporarily on disk. In either case, the user is responsible for copying file contents to a session-level or persistent store as and if desired. The temporary storage will be cleared at the end of request processing.
常用方法如下表
| Method Summary | ||
|---|---|---|
byte[] |
获取文件的字节数组 | getBytes()Return the contents of the file as an array of bytes. |
String |
获取文件的类型 | getContentType()Return the content type of the file. |
InputStream |
获取文件的输入流 | getInputStream()Return an InputStream to read the contents of the file from. |
String |
获取文件名 | getName()Return the name of the parameter in the multipart form. |
String |
获取原始文件名(防止篡改文件类型) | getOriginalFilename()Return the original filename in the client's filesystem. |
long |
获取文件的大小,以字节的形式) | getSize()Return the size of the file in bytes. |
boolean |
判断文件是否为空 | isEmpty()Return whether the uploaded file is empty, that is, either no file has been chosen in the multipart form or the chosen file has no content. |
void |
将接收到的文件传输到给定的目标文件。 | transferTo(File dest)Transfer the received file to the given destination file. |
文件上传业务代码
Controller类
/**
 * @Author: 小小张自由
 * @Date: 2021/7/6 - 20:56
 * @Description: 文件上传
 * @version: 1.0
 */
@Controller
@RequestMapping("upload")
public class UploadController {

    @Autowired
    private UploadService uploadService;

    @PostMapping("image")
    public ResponseEntity<String> uploadImage(@RequestParam("file") MultipartFile file){
       String url= this.uploadService.uploadImage(file);
       if (StringUtils.isBlank(url)){
           return ResponseEntity.badRequest().build();
       }
        return ResponseEntity.status(HttpStatus.CREATED).body(url);
    }
}
Service类
写了具体的业务逻辑
/**
 * @Author: 小小张自由
 * @Date: 2021/7/6 - 21:01
 * @Description: 文件上传
 * @version: 1.0
 */
@Service
public class UploadService {

    //用于判断文件的类型,暂时只判断了“image/gif","image/jpeg”
    private static final List<String> CONTENT_TYPES= Arrays.asList("image/gif","image/jpeg");

    private static final Logger LOGGER= LoggerFactory.getLogger(UploadService.class);

    /**
     * 业务逻辑代码
     * @param file 文件的存储的url
     * @return
     */
    public String uploadImage(MultipartFile file) {

        String originalFilename = file.getOriginalFilename();
        //校验文件类型
        //方法一:截取字符串
        String afterLast = StringUtils.substringAfterLast(".", originalFilename);
        //方法二:使用getContentType方法
        String contentType = file.getContentType();
        if (!CONTENT_TYPES.contains(contentType)){
            LOGGER.info("文件类型不合法:"+originalFilename);
            return null;
        }
        //校验文件内容
        try {
            //获取文件流
            BufferedImage bufferedImage = ImageIO.read(file.getInputStream());
            if (bufferedImage==null){
                LOGGER.info("文件内容不合法:{}",originalFilename);
                return null;
            }
            //保存到服务器   E:\Leyou\image
            //将接收到的文件传输到给定的目标文件。
            file.transferTo(new File("E:\\Leyou\\Image\\"+originalFilename));

            //返回URL,进行回显
            //可以使用Nginx-图片服务器
            return "http://image.leyou.com/"+originalFilename;
        } catch (Exception e) {
            LOGGER.info("服务器内部错误:"+originalFilename);
            e.printStackTrace();
        }
        return null;
    }
}
修改nginx配置
将文件存储到文件服务器中
修改Nginx的配置文件nginx.conf,监听80端口,设置root的值为:E盘
- 图片不能保存在服务器内部,这样会对服务器产生额外的加载负担
一般静态资源都应该使用独立域名,这样访问静态资源时不会携带一些不必要的cookie,减小请求的数据量
server {
        listen       80;
        server_name  image.leyou.com;

        proxy_set_header X-Forwarded-Host $host;
		proxy_set_header X-Forwarded-Server $host;
		proxy_set_header X-Forwarded-For $proxy_add_x_forwarded_for;

		location / {
			root E:\\Leyou\\image;
		}
    }
如何绕过网关
每次上传文件都会经过网关,必然会给网关带来很大的压力,那我们如何绕过网关呢?
1.在网关中配置白名单
在网关中配置白名单,这样也会走网关,只是压力少了一点点
@Slf4j
public class AuthorizeFilter implements GlobalFilter, Ordered {

    //白名单:存放放行的URL
    private List<String> allowPaths;


    @Override
    public Mono<Void> filter(ServerWebExchange exchange, GatewayFilterChain chain) {

        //获取请求的url路径
        String path = request.getURI().getPath();
        boolean flag=isAllowPath(path);
        if (flag) {
            log.info("请求在白名单中,leyou.filter: {}",path);
            //放行
            return chain.filter(exchange);
        } else {
          //写其他的业务逻辑
            ~~~~

        }
    }

    private boolean isAllowPath(String path) {

          //判断是否允许放行
         if (allowPaths.contains(path)){
             return true;
         }
         return  false;

  }
2.在nginx做转发
在nginx做转发,当请求文件上传时,直接转到相应的服务
本实例使用了方法二,需要增加配置
	server {
        listen       80;
        server_name  api.leyou.com;

        proxy_set_header X-Forwarded-Host $host;
		proxy_set_header X-Forwarded-Server $host;
		proxy_set_header X-Forwarded-For $proxy_add_x_forwarded_for;
		# 新增加的配置,用于文件上传
		location /api/upload {
			proxy_pass http://127.0.0.1:8082;
			proxy_connect_timeout 600;
			proxy_read_timeout 600;

			rewrite "^/api/(.*)$" /$1 break;
		}
		# 网关的配置
		location / {
			proxy_pass http://127.0.0.1:10010;
			proxy_connect_timeout 600;
			proxy_read_timeout 600;
		}
    }
当这样配置之后,文件上传就不会过网关,减少了网关的压力。但是有引来了一个新问题那就是跨域。
解决上传文件出现跨域问题
由于Nginx将文件上传的请求直接转发到了具体服务中,不再走gateway,所以gateway中的跨域配置,不再生效了。 需要在文件上传这个服务中单独配置跨域。
写配置类CorsFilter
/**
 * @Author: 小小张自由
 * @Date: 2021/6/15 - 11:12
 * @Description: 解决 跨域问题
 * @version: 1.0
 */
@Configuration
public class LeyouCorsConfiguration {

    @Bean
    public CorsFilter corsFilter(){
        //初始化配置对象
        CorsConfiguration configuration = new CorsConfiguration();
        //允许跨域访问的域名
        configuration.addAllowedOrigin("*");
       // configuration.setAllowCredentials(true);  //运行携带cookie
        configuration.addAllowedMethod("*"); //代表所有请求方法
        configuration.addAllowedHeader("*"); //允许携带任何头信息

        //初始化cors配置源对象
        UrlBasedCorsConfigurationSource configurationSource=new UrlBasedCorsConfigurationSource();
        configurationSource.registerCorsConfiguration("/**",configuration);

        //返回CorSfilter实例,参数
        return new CorsFilter(configurationSource);
    }

}
到此应该就可以上传了,但是还是报跨域,我已经配置好了啊,为什么还是报跨域呢?
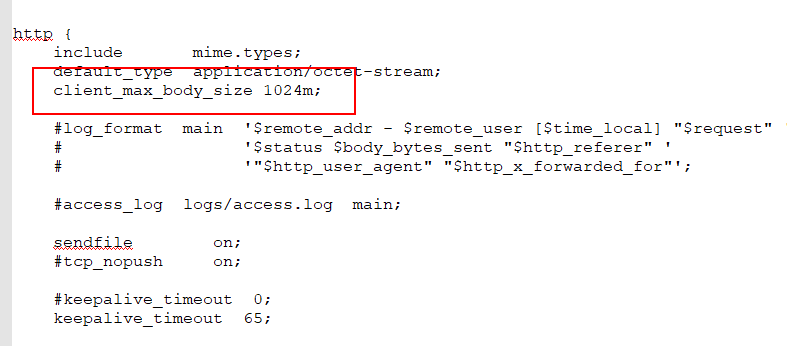
在nginx配置中配置请求实体大小
我就想是不是Nginx的问题,然后我就一行一行的读配置,最后发现
nginx配置中没有配置请求实体大小

加上这行配置就好了
client_max_body_size 1024m;
到此这篇关于Java实例讲解文件上传与跨域问题的文章就介绍到这了,更多相关Java文件上传跨域内容请搜索脚本之家以前的文章或继续浏览下面的相关文章希望大家以后多多支持脚本之家!
相关文章

Java中Collection和Collections的区别
Collection是一个集合接口,集合类的顶级接口,Collections是一个包装类,本文主要介绍了Java中Collection和Collections的区别,具有一定的参考价值,感兴趣的可以了解一下2024-04-04
Spring定时任务@Scheduled注解(cron表达式fixedRate fixedDelay)
这篇文章主要为大家介绍了Spring定时任务@Scheduled注解(cron表达式fixedRate fixedDelay)使用详解,有需要的朋友可以借鉴参考下,希望能够有所帮助,祝大家多多进步,早日升职加薪2023-11-11


最新评论