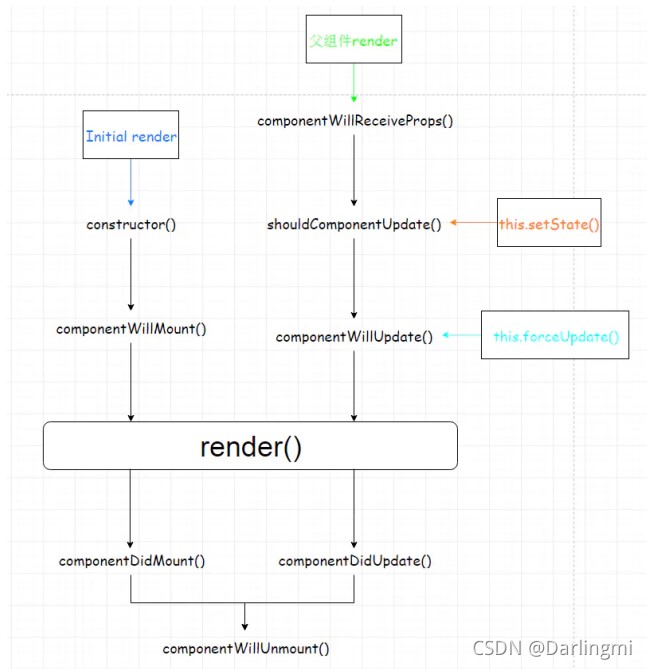
React组件的生命周期详细描述
一、什么是生命周期
组件的生命周期就是React的工作过程,就好比人有生老病死,自然界有日月更替,每个组件在网页中也会有被创建、更新和删除,如同有生命的机体一样。
React组件的生命周期可以分为三个过程
- 装载(挂载)过程(mount):就是组件第一次在DOM树中渲染的过程。
- 更新过程(update):组件被重新渲染的过程。
- 卸载过程(unmount):组件从DOM中被移除的过程。
二、装载过程
依次调用如下函数constructor、getInitialState、getDefaultProps、componentWillMount、render、componentDidMount。
1、constructor
就是ES6里的构造函数,创建一个组件类的实例,在这一过程中要进行两步操作:初始化state,绑定成员函数的this环境。
2、render
render是React组件中最为重要的一个函数。这是react中唯一不可忽略的函数,在render函数中,只能有一个父元素。render函数是一个纯函数,它并不进行实际上的渲染动作,它只是一个JSX描述的结构,最终是由React来进行渲染过程,render函数中不应该有任何操作,对页面的描述完全取决于this.state和this.props的返回结果,不能在render调用this.setState。
- 有一个公式总结的非常形象 UI=render(data)
3、componentWillMount和componentDidMount
这两个函数分别在render前后执行,由于这一过程通常只能在浏览器端调用,所以我们在这里获取异步数据,而且在componentDidMount调用的时候,组件已经被装载到DOM树上了。
三、更新过程
简单来说就是props和state被修改的过程,依次调用componentWillReceiveProps、shouldComponentUpdate、componentWillUpdate、render、componentDidUpdate。
1、componentWillReceiveProps(nextProps)
并不是只有在props发生改变的时候才会被调用,实际上只要是父组件的render函数被调用,render里面被渲染的子组件就会被更新,不管父组件传给子组件的props有没有被改变,都会触发子组件的componentWillReceiveProps过程,但是,this.setState方法的触发过程不会调用这个函数,因为这个函数适合根据新的props的值来计算出是不是要更新内部状态的state。
2、shouldComponentUpdate(nextProps, nextState)
这个函数的重要性,仅次于render,render函数决定了该渲染什么,而shouldComponentUpdate决定了不需要渲染什么,都需要返回函数,这一过程可以提高性能,忽略掉没有必要重新渲染的过程。
3、componentWillUpdate和componentDidUpdate
和装载过程不同,这里的componentDidUpdate,既可以在浏览器端执行,也可以在服务器端执行
4、触发render
在react中,触发render的有4条路径。
以下假设shouldComponentUpdate都是按照默认返回true的方式:
(1) 首次渲染Initial Render。
(2) 调用this.setState (并不是一次setState会触发一次render,React可能会合并操作,再一次性进行render)。
(3) 父组件发生更新(一般就是props发生改变,但是就算props没有改变或者父子组件之间没有数据交换也会触发render)。
(4) 调用this.forceUpdate。

注意:如果在shouldComponentUpdate里面返回false可以提前退出更新路径。
四、卸载过程
实际中很少用到,这里只有一个componentWillUnmount,一般在componentDidMount里面注册的事件需要在这里删除。
五、生命周期流程
1、第一次初始化渲染显示: ReactDOM.render()
constructor():创建对象初始化 statecomponentWillMount() :将要插入回调render() :用于插入虚拟 DOM 回调componentDidMount() :已经插入回调
2、每次更新 state: this.setState()
componentWillUpdate(): 将要更新回调render(): 更新(重新渲染)componentDidUpdate(): 已经更新回调
3、移除组件: ReactDOM.unmountComponentAtNode(containerDom)
- componentWillUnmount() : 组件将要被移除回调
六、示例
<div id='container'></div>
<script type="text/babel">
class LifeCycle extends React.Component {
constructor(props) {
super(props);
alert("Initial render");
alert("constructor");
this.state = {str: "hello"};
}
componentWillMount() {
alert("componentWillMount");
}
componentDidMount() {
alert("componentDidMount");
}
componentWillReceiveProps(nextProps) {
alert("componentWillReceiveProps");
}
shouldComponentUpdate() {
alert("shouldComponentUpdate");
return true; // 记得要返回true
}
componentWillUpdate() {
alert("componentWillUpdate");
}
componentDidUpdate() {
alert("componentDidUpdate");
}
componentWillUnmount() {
alert("componentWillUnmount");
}
setTheState() {
let s = "hello";
if (this.state.str === s) {
s = "HELLO";
}
this.setState({
str: s
});
}
forceItUpdate() {
this.forceUpdate();
}
render() {
alert("render");
return(
<div>
<span>{"Props:"}<h2>{parseInt(this.props.num)}</h2></span>
<br />
<span>{"State:"}<h2>{this.state.str}</h2></span>
</div>
);
}
}
class Container extends React.Component {
constructor(props) {
super(props);
this.state = {
num: Math.random() * 100
};
}
propsChange() {
this.setState({
num: Math.random() * 100
});
}
setLifeCycleState() {
this.refs.rLifeCycle.setTheState();
}
forceLifeCycleUpdate() {
this.refs.rLifeCycle.forceItUpdate();
}
unmountLifeCycle() {
// 这里卸载父组件也会导致卸载子组件
ReactDOM.unmountComponentAtNode(document.getElementById("container"));
}
parentForceUpdate() {
this.forceUpdate();
}
render() {
return (
<div>
<a href="javascript:;" onClick={this.propsChange.bind(this)}>propsChange</a>
<a href="javascript:;" onClick={this.setLifeCycleState.bind(this)}>setState</a>
<a href="javascript:;" onClick={this.forceLifeCycleUpdate.bind(this)}>forceUpdate</a>
<a href="javascript:;" onClick={this.unmountLifeCycle.bind(this)}>unmount</a>
<a href="javascript:;" onClick={this.parentForceUpdate.bind(this)}>parentForceUpdateWithoutChange</a>
<LifeCycle ref="rLifeCycle" num={this.state.num}></LifeCycle>
</div>
);
}
}
ReactDOM.render(
<Container></Container>,
document.getElementById('container')
);
</script>
总结
本篇文章就到这里了,希望能够给你带来帮助,也希望您能够多多关注脚本之家的更多内容!
相关文章

React-router v6在Class组件和非组件代码中的正确使用
这篇文章主要介绍了React-router v6在Class组件和非组件代码中的正确使用方式,具有很好的参考价值,希望对大家有所帮助,如有错误或未考虑完全的地方,望不吝赐教2024-03-03
React组件实例三大属性state props refs使用详解
这篇文章主要为大家介绍了React组件实例三大属性state props refs使用详解,有需要的朋友可以借鉴参考下,希望能够有所帮助,祝大家多多进步,早日升职加薪2022-09-09


最新评论