python机器学习Sklearn实战adaboost算法示例详解
pandas批量处理体测成绩
import numpy as np
import pandas as pd
from pandas import Series,DataFrame
import matplotlib.pyplot as plt
data = pd.read_excel("/Users/zhucan/Desktop/18级高一体测成绩汇总.xls")
cond = data["班级"] != "班级"
data = data[cond]

data.fillna(0,inplace=True)
data.isnull().any()   #没有空数据了
结果:
班级 False
性别 False
姓名 False
1000米 False
50米 False
跳远 False
体前屈 False
引体 False
肺活量 False
身高 False
体重 False
dtype: bool
data.head()

#1000米成绩有string 有int
def convert(x):
    if isinstance(x,str):
        minute,second = x.split("'")
        int(minute)
        minute = int(minute)
        second = int(second)
        return minute + second/100.0
    else:
        return x
data["1000米"] = data["1000米"].map(convert)

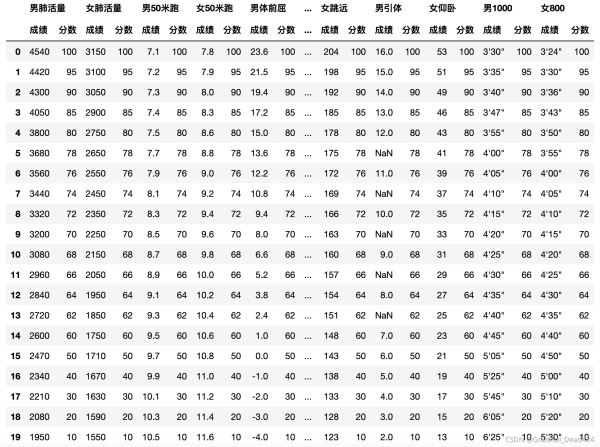
score = pd.read_excel("/Users/zhucan/Desktop/体侧成绩评分表.xls",header=[0,1])
score
def convert(item):
    m,s = item.strip('"').split("'")
    m,s =int(m),int(s)
    return m+s/100.0
score.iloc[:,-4] = score.iloc[:,-4].map(convert)
def convert(item):
    m,s = item.strip('"').split("'")
    m,s =int(m),int(s)
    return m+s/100.0
score.iloc[:,-2] = score.iloc[:,-2].map(convert)
score

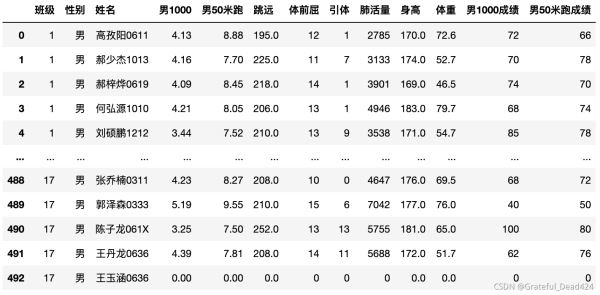
data.columns = ['班级', '性别', '姓名', '男1000', '男50米跑', '跳远', '体前屈', '引体', '肺活量', '身高', '体重']
data["男50米跑"] = data["男50米跑"].astype(np.float)
for col in ["男1000","男50米跑"]:
    #获取成绩的标准
    s = score[col]
    def convert(x):
        for i in range(len(s)):
            if x<=s["成绩"].iloc[0]:
                if x == 0:
                    return 0 #没有参加这个项目
                return 100
            elif x>s["成绩"].iloc[-1]:
                return 0  #跑的太慢
            elif (x>s["成绩"].iloc[i-1]) and (x<=s["成绩"].iloc[i]):
                return s["分数"].iloc[i]
    data[col + "成绩"] = data[col].map(convert)
for col in ['跳远', '体前屈', '引体', '肺活量']:
    s = score["男"+col]
    def convert(x):
        for i in range(len(s)):
            if x>s["成绩"].iloc[i]:
                return s["分数"].iloc[i]
        return 0
    data[col+"成绩"] = data[col].map(convert)

data.columns
结果:
Index(['班级', '性别', '姓名', '男1000', '男50米跑', '跳远', '体前屈', '引体', '肺活量', '身高',
       '体重', '男1000成绩', '男50米跑成绩', '跳远成绩', '体前屈成绩', '引体成绩', '肺活量成绩'],
      dtype='object')
#根据索引的顺序,去data取值
cols = ['班级', '性别', '姓名', '男1000','男1000成绩','男50米跑','男50米跑成绩','跳远','跳远成绩','体前屈','体前屈成绩','引体','引体成绩', '肺活量','肺活量成绩','身高','体重']
data[cols]

#计算BMI
data["BMI"] = data["体重"]/data["身高"]
def convert(x):
    if x>100:
        return x/100
    else:
        return x
data["身高"] = data["身高"].map(convert)
data["BMI"] = data["体重"]/(data["身高"])**2
def convert_bmi(x):
    if x >= 26.4:
        return 60
    elif (x <= 16.4) or (x > 23.3 and x <= 26.3):
        return 80
    elif x >= 16.5 and x <= 23.2:
        return 100
    else:
        return 0
data["BMI_score"] = data["BMI"].map(convert_bmi)
#统计分析
data["BMI_score"].value_counts().plot(kind = "pie",autopct = "%0.2f%%")
#统计分析
data["BMI_score"].value_counts().plot(kind = "bar")

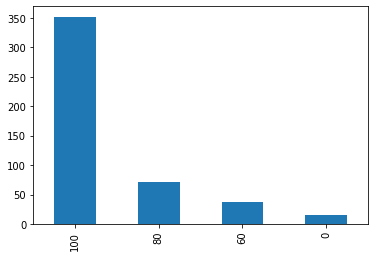
data.groupby(["男1000成绩"])["BMI_score"].count().plot(kind = "bar")

adaboost


 值
值
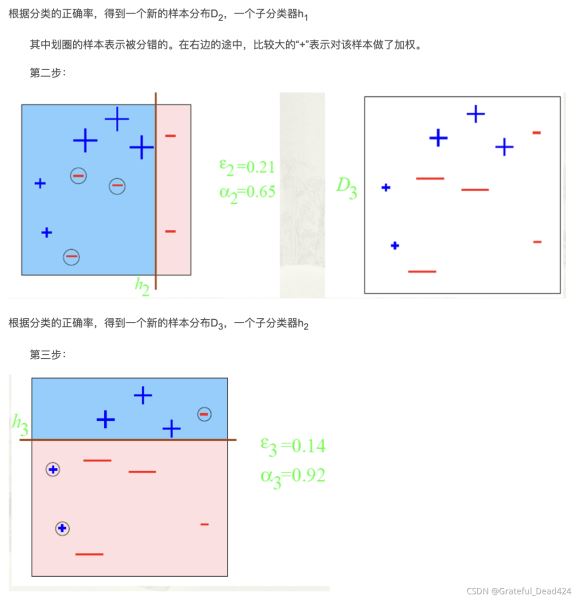
越大,特征越明显,越被容易分开;越后面的学习器,权重越大
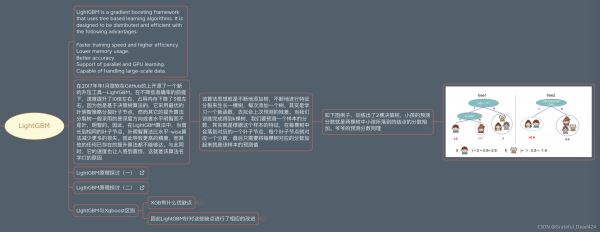
梯度提升树没有修改原来的数据,使用的是残差,最终结果就是最后一棵树
上面的图不是GBDT

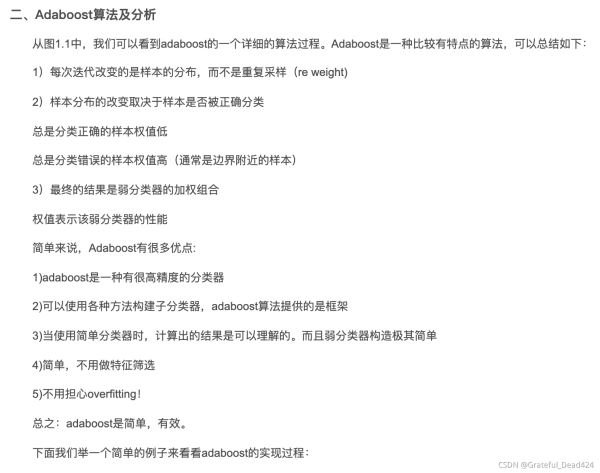
Boosting与Bagging模型相比,Boosting可以同时降低偏差和方差,Bagging只能降低模型的方差。在实际应用中,Boosting算法也还是存在明显的高方差问题,也就是过拟合。

import numpy as np
y = np.array([0,1]*5)
y_ = np.array([0,0,0,0,0,0,0,1,0,1])
w = 0.1*(y != y_).sum()
round(w,1)
结果:
0.3
0.5*np.log((1-0.3)/0.3)
round((0.5*np.log((1-0.3)/0.3)),2)
结果:
0.42





adaboost原理案例举例
from sklearn.ensemble import AdaBoostClassifier
from sklearn import tree
import matplotlib.pyplot as plt
X = np.arange(10).reshape(-1,1)
y = np.array([1,1,1,-1,-1,-1,1,1,1,-1])
ada = AdaBoostClassifier(n_estimators=3)
ada.fit(X,y)
plt.figure(figsize = (9,6))
_ = tree.plot_tree(ada[0])
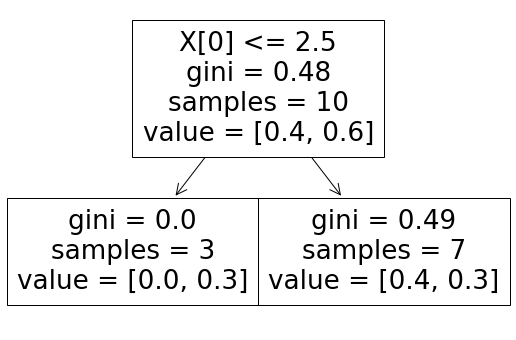
y_ = ada[0].predict(X),4
y_
结果:
array([ 1, 1, 1, -1, -1, -1, -1, -1, -1, -1])
#误差率
e1 = np.round(0.1*(y != y_).sum(),4)
e1
结果:
0.3
#计算第一棵树权重
#随机森林中每棵树的权重是一样的
#adaboost提升树中每棵树的权重不同
a1 = np.round(1/2*np.log((1-e1)/e1),4)
a1
结果:
0.4236
#样本预测准确:更新的权重
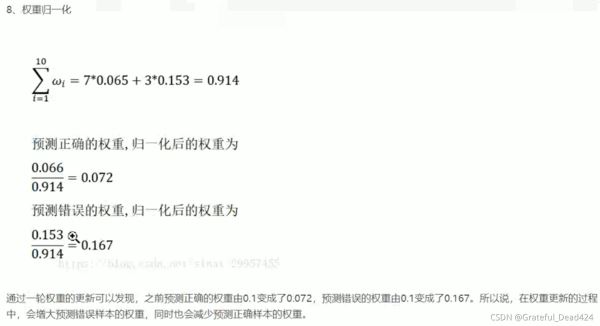
w2 = 0.1*np.e**(-a1*y*y_)
w2 = w2/w2.sum()
np.round(w2,4)
结果:
array([0.0714, 0.0714, 0.0714, 0.0714, 0.0714, 0.0714, 0.1667, 0.1667,
       0.1667, 0.0714])
#样本预测准确:更新的权重
w2 = 0.1*np.e**(-a1*y*y_)
w2 = w2/w2.sum()
np.round(w2,4)
结果:
array([0.0714, 0.0714, 0.0714, 0.0714, 0.0714, 0.0714, 0.1667, 0.1667,
       0.1667, 0.0714])
从上述第一轮的整个迭代过程可以看出:被误分类样本的权值之和影响误差率,误差率影响基本分类器在最终分类器中所占的权重
分类函数 f1(x)= a1*G1(x)= 0.4236G1(x)

plt.figure(figsize = (9,6))
_ = tree.plot_tree(ada[1])

e2 = 0.0714*3
e2
结果:
0.2142
a2 = np.round(1/2*np.log((1-e2)/e2),4)
a2
结果:
0.6499
y_ = ada[1].predict(X)
#样本预测准确:更新的权重
w3 = w2*np.e**(-a2*y*y_)
w3 = w3/w3.sum()
np.round(w3,4)
结果:
array([0.0454, 0.0454, 0.0454, 0.1667, 0.1667, 0.1667, 0.106 , 0.106 ,
       0.106 , 0.0454])
plt.figure(figsize = (9,6))
_ = tree.plot_tree(ada[2])


树划分按照gini系数;结果和按照误差率是一致的~
y_ = ada[2].predict(X)
e3 = (w3*(y_ != y)).sum()
a3 = 1/2*np.log((1-e3)/e3)
a3
#样本预测准确:更新的权重
w4 = w3*np.e**(-a3*y*y_)
w4 = w4/w4.sum()
np.round(w4,4)
结果:
array([0.125 , 0.125 , 0.125 , 0.1019, 0.1019, 0.1019, 0.0648, 0.0648,
       0.0648, 0.125 ])
display(a1,a2,a3)
结果:
0.4236
0.6498960745553556
0.7521752700597043
弱分类器合并成强分类器
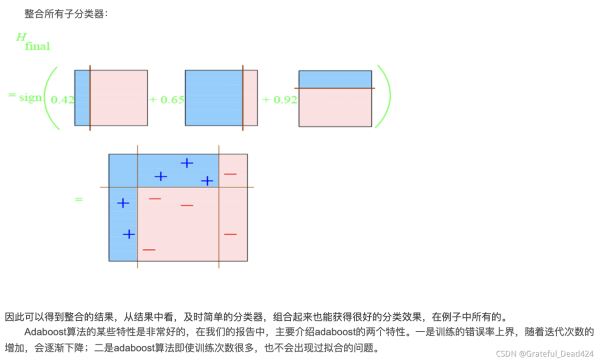
综上,将上面计算得到的a1、a2、a3各值代入G(x)中
G(x) = sign[f3(x)] = sign[ a1 * G1(x) + a2 * G2(x) + a3 * G3(x) ]
得到最终的分类器为:
G(x) = sign[f3(x)] = sign[ 0.4236G1(x) + 0.6496G2(x)+0.7514G3(x) ]
ada.predict(X)
结果:
array([ 1, 1, 1, -1, -1, -1, 1, 1, 1, -1])
y_predict = a1*ada[0].predict(X) +  a2*ada[1].predict(X) +a3*ada[2].predict(X)
y_predict
np.sign(y_predict).astype(np.int)
array([ 1, 1, 1, -1, -1, -1, 1, 1, 1, -1])
以上就是python机器学习Sklearn实战adaboost算法示例详解的详细内容,更多关于机器学习Sklearn实战adaboost算法的资料请关注脚本之家其它相关文章!
相关文章

python生成tensorflow输入输出的图像格式的方法
本篇文章主要介绍了python生成tensorflow输入输出的图像格式的方法,小编觉得挺不错的,现在分享给大家,也给大家做个参考。一起跟随小编过来看看吧2018-02-02
在Python的Django框架中用流响应生成CSV文件的教程
这篇文章主要介绍了在Python的Django框架中用流响应生成CSV文件的教程,作者特别讲到了防止CSV文件中的中文避免出现乱码等问题,需要的朋友可以参考下2015-05-05


最新评论