关于WPF WriteableBitmap类直接操作像素点的问题
更新时间:2022年01月25日 14:33:54 作者:wu.g.q
WPF是微软新一代图形系统,运行在.NET Framework 3.0及以上版本下,为用户界面、2D/3D 图形、文档和媒体提供了统一的描述和操作方法,本文重点给大家介绍WPF WriteableBitmap类直接操作像素点的问题,感兴趣的朋友一起看看吧
WPF(Windows Presentation Foundation)是微软推出的基于Windows 的用户界面框架,属于.NET Framework 3.0的一部分。它提供了统一的编程模型、语言和框架,真正做到了分离界面设计人员与开发人员的工作;同时它提供了全新的多媒体交互用户图形界面。
还是话不多说,直接上码:
1.新建WpfApp应用程序
2.MainWindow.xaml文件代码如下:
<Window x:Class="WpfApp1.MainWindow"
        xmlns="http://schemas.microsoft.com/winfx/2006/xaml/presentation"
        xmlns:x="http://schemas.microsoft.com/winfx/2006/xaml"
        xmlns:d="http://schemas.microsoft.com/expression/blend/2008"
        xmlns:mc="http://schemas.openxmlformats.org/markup-compatibility/2006"
        xmlns:local="clr-namespace:WpfApp1"
        mc:Ignorable="d"
        Title="MainWindow" Height="450" Width="800">
    <Grid>
        <Grid.RowDefinitions>
            <RowDefinition Height="*"></RowDefinition>
            <RowDefinition Height="10*" ></RowDefinition>
        </Grid.RowDefinitions>

        <Button Name="button" Grid.Row="0" HorizontalAlignment="Center" Content="generate_bitmap" MinWidth="120"  MinHeight="30" Click="Button_Click"></Button>
        <Grid x:Name="imgGrid" Grid.Row="1">
            <Viewbox>
                <Image x:Name="img"  Width="{Binding RelativeSource={RelativeSource Self}, Path=Source.PixelWidth}"
                       Height="{Binding RelativeSource={RelativeSource Self}, Path=Source.PixelHeight}"
                        Source="{Binding CtrlImage, IsAsync=True}"
                      Stretch="None" />
            </Viewbox>
        </Grid>
    </Grid>
</Window>
3.MainWindow.xaml.cs文件代码如下:
using System;
using System.Collections.Generic;
using System.Globalization;
using System.Linq;
using System.Text;
using System.Windows;
using System.Windows.Controls;
using System.Windows.Data;
using System.Windows.Documents;
using System.Windows.Input;
using System.Windows.Media;
using System.Windows.Media.Imaging;
using System.Windows.Navigation;
using System.Windows.Shapes;
using System.Drawing;
using System.Drawing.Drawing2D;

namespace WpfApp1
{
    /// <summary>
    /// Interaction logic for MainWindow.xaml
    /// </summary>
    public partial class MainWindow : Window
    {
        public MainWindow()
        {
            InitializeComponent();
        }
        public void Button_Click(object sender, RoutedEventArgs e)
            WriteableBitmap wb = new WriteableBitmap((int)imgGrid.ActualWidth, (int)imgGrid.ActualHeight, 96, 96, PixelFormats.Pbgra32, null);
            wb.Lock();
            Bitmap backBitmap = new Bitmap((int)imgGrid.ActualWidth, (int)imgGrid.ActualHeight, wb.BackBufferStride, System.Drawing.Imaging.PixelFormat.Format32bppArgb, wb.BackBuffer);
            Int32Rect rect = new Int32Rect(0, 0, (int)imgGrid.ActualWidth, (int)imgGrid.ActualHeight);
            byte[] pixels = new byte[(int)imgGrid.ActualWidth * (int)imgGrid.ActualHeight * wb.Format.BitsPerPixel / 8];
            Random rand = new Random();
            for (int y = 0; y < wb.PixelHeight; y++)
            {
                for (int x = 0; x < wb.PixelWidth; x++)
                {
                    int alpha = 0;
                    int red = 0;
                    int green = 0;
                    int blue = 0;
                    if ((x % 5 == 0) || (y % 7 == 0))
                    {
                        red = (int)((double)y / wb.PixelHeight * 255);
                        green = rand.Next(100, 255);
                        blue = (int)((double)x / wb.PixelWidth * 255);
                        alpha = 255;
                    }
                    else
                        red = (int)((double)x / wb.PixelWidth * 255);
                        blue = (int)((double)y / wb.PixelHeight * 255);
                        alpha = 50;
                    int pixeloffset = (x + y * wb.PixelWidth) * wb.Format.BitsPerPixel / 8;
                    pixels[pixeloffset] = (byte)blue;
                    pixels[pixeloffset + 1] = (byte)green;
                    pixels[pixeloffset + 2] = (byte)red;
                    pixels[pixeloffset + 3] = (byte)alpha;
                }
                int stride = (wb.PixelWidth * wb.Format.BitsPerPixel) / 8;
                wb.WritePixels(rect, pixels, stride, 0);
            }
            wb.Unlock();
            backBitmap.Dispose();
            backBitmap = null;
            img.Source = wb;
    }
}
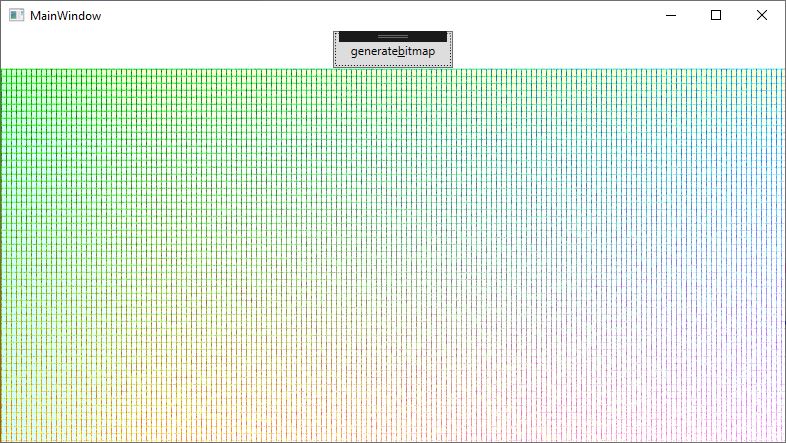
效果如下:

到此这篇关于C#中WPF WriteableBitmap类直接操作像素点的文章就介绍到这了,更多相关WPF WriteableBitmap类内容请搜索脚本之家以前的文章或继续浏览下面的相关文章希望大家以后多多支持脚本之家!
相关文章

使用AJAX实现UTF8编码表单提交到GBK编码脚本无乱码的解决方法
这篇文章主要介绍了用AJAX实现,多个不同编码的项目(GBK,UTF8)互相通过 POST/GET 汇总表单数据。最终实现 使用同一个页面接收 不同编码的 表单(GBK,UTF8),特别适合 JS 采集项目,需要的朋友可以参考下2020-09-09


最新评论