java Spring的启动原理详解
引入
为什么突然说一下Spring启动原理呢,因为之前面试的时候,回答的那可谓是坑坑洼洼,前前后后,补补贴贴。。。
总而言之就是不行,再次看一下源码发掘一下。。。
在Spring Boot还没有广泛到家家在用的时候,我们都还在书写繁琐的配置,什么web.xml、spring.xml、bean.xml等等。虽然现在很少,可以说几乎没有企业在去使用Spring的老一套,而会去使用Spring Boot约定大于配置来进行快速开发,但是,Spring的也要去学习,去挖掘,毕竟是我们Java程序员的基础呀。
spring的启动是建筑在servlet容器之上的,所有web工程的初始位置就是web.xml,它配置了servlet的上下文(context)和监听器(Listener)
web.xml
<!--上下文监听器,用于监听servlet的启动过程-->
    <listener>
        <description>ServletContextListener</description>
        <!--这里是自定义监听器,个性化定制项目启动提示-->
        <listener-class>com.trace.app.framework.listeners.ApplicationListener</listener-class>
    </listener>
    <!--dispatcherServlet的配置,这个servlet主要用于前端控制,这是springMVC的基础-->
    <servlet>
        <servlet-name>service_dispatcher</servlet-name>
        <servlet-class>org.springframework.web.servlet.DispatcherServlet</servlet-class>
        <init-param>
            <param-name>contextConfigLocation</param-name>
            <param-value>/WEB-INF/spring/services/service_dispatcher-servlet.xml</param-value>
        </init-param>
        <load-on-startup>1</load-on-startup>
    </servlet>
    <!--spring资源上下文定义,在指定地址找到spring的xml配置文件-->
    <context-param>
        <param-name>contextConfigLocation</param-name>
        <param-value>/WEB-INF/spring/application_context.xml</param-value>
    </context-param>
    <!--spring的上下文监听器-->
    <listener>
        <listener-class>
            org.springframework.web.context.ContextLoaderListener
        </listener-class>
    </listener>
    <!--Session监听器,Session作为公共资源存在上下文资源当中,这里也是自定义监听器-->
    <listener>
        <listener-class>
            com.trace.app.framework.listeners.MySessionListener
        </listener-class>
    </listener>
Spring启动过程
spring的上下文监听器
<context-param>
        <param-name>contextConfigLocation</param-name>
        <param-value>/WEB-INF/spring/application_context.xml</param-value>
</context-param>

<listener>
        <listener-class>
            org.springframework.web.context.ContextLoaderListener
        </listener-class>
 </listener>
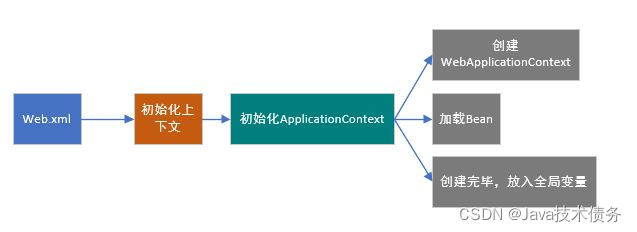
spring的启动其实就是IOC容器的启动过程,通过上述的第一段配置 <context-param> 是初始化上下文,然后通过后一段的的<listener>来加载配置文件,其中调用的spring包中的ContextLoaderListener这个上下文监听器,ContextLoaderListener是一个实现了ServletContextListener接口的监听器,他的父类是 ContextLoader,在启动项目时会触发contextInitialized上下文初始化方法。
public void contextInitialized(ServletContextEvent event) {
        initWebApplicationContext(event.getServletContext());
}
调用了父类ContextLoader的initWebApplicationContext(event.getServletContext());方法,很显然,这是对ApplicationContext的初始化方法,也就是到这里正是进入了springIOC的初始化。
接下来看一下initWebApplicationContext(event.getServletContext())的工作:
if (servletContext.getAttribute(WebApplicationContext.ROOT_WEB_APPLICATION_CONTEXT_ATTRIBUTE) != null) {
            throw new IllegalStateException(
                    "Cannot initialize context because there is already a root application context present - " +
                    "check whether you have multiple ContextLoader* definitions in your web.xml!");
        }

        Log logger = LogFactory.getLog(ContextLoader.class);
        servletContext.log("Initializing Spring root WebApplicationContext");
        if (logger.isInfoEnabled()) {
            logger.info("Root WebApplicationContext: initialization started");
        }
        long startTime = System.currentTimeMillis();

        try {
            // Store context in local instance variable, to guarantee that
            // it is available on ServletContext shutdown.
            if (this.context == null) {
                this.context = createWebApplicationContext(servletContext);
            }
            if (this.context instanceof ConfigurableWebApplicationContext) {
                ConfigurableWebApplicationContext cwac = (ConfigurableWebApplicationContext) this.context;
                if (!cwac.isActive()) {
                    // The context has not yet been refreshed -> provide services such as
                    // setting the parent context, setting the application context id, etc
                    if (cwac.getParent() == null) {
                        // The context instance was injected without an explicit parent ->
                        // determine parent for root web application context, if any.
                        ApplicationContext parent = loadParentContext(servletContext);
                        cwac.setParent(parent);
                    }
                    configureAndRefreshWebApplicationContext(cwac, servletContext);
                }
            }
            servletContext.setAttribute(WebApplicationContext.ROOT_WEB_APPLICATION_CONTEXT_ATTRIBUTE, this.context);

            ClassLoader ccl = Thread.currentThread().getContextClassLoader();
            if (ccl == ContextLoader.class.getClassLoader()) {
                currentContext = this.context;
            }
            else if (ccl != null) {
                currentContextPerThread.put(ccl, this.context);
            }

            if (logger.isDebugEnabled()) {
                logger.debug("Published root WebApplicationContext as ServletContext attribute with name [" +
                        WebApplicationContext.ROOT_WEB_APPLICATION_CONTEXT_ATTRIBUTE + "]");
            }
            if (logger.isInfoEnabled()) {
                long elapsedTime = System.currentTimeMillis() - startTime;
                logger.info("Root WebApplicationContext: initialization completed in " + elapsedTime + " ms");
            }

            return this.context;
        }
        catch (RuntimeException ex) {
            logger.error("Context initialization failed", ex);
            servletContext.setAttribute(WebApplicationContext.ROOT_WEB_APPLICATION_CONTEXT_ATTRIBUTE, ex);
            throw ex;
        }
        catch (Error err) {
            logger.error("Context initialization failed", err);
            servletContext.setAttribute(WebApplicationContext.ROOT_WEB_APPLICATION_CONTEXT_ATTRIBUTE, err);
            throw err;
        }
总结:
创建WebApplicationContext。加载对应的spring配置文件中的Bean。将WebApplicationContext放入ServletContext(Java Web的全局变量)中。
接下来,来到了configureAndRefreshWebApplicationContext()方法
作用:
就是用来加载spring配置文件中的Bean实例的。这个方法于封装ApplicationContext数据并且初始化所有相关Bean对象。它会从web.xml中读取名为 contextConfigLocation的配置,这就是spring xml数据源设置,然后放到ApplicationContext中,最后调用传说中的refresh方法执行所有Java对象的创建。
总结:

总结
首先对于一个web应用,需要部署到web容器中,web容器提供了一个全局的上下文环境,ServletContext,SpringIOC的宿主环境。
其次,在web容器启动时,触发容器初始化,web.xml中提供的有ContextLoaderListener监听器会监听这个事件,初始化方法contextInitialized被调用,初始化spring上下文
WebApplicationContext接口,实现类时XmlWebApplicationContext即SpringIOC容器,对应的Bean定义是有context-param标签定义指定,然后存储到ServletContext中,方便获取。
ContextLoaderListener监听初始化完成后,开始初始化web.xml中配置的Servlet,指DisapatchServlet前端控制器,用来匹配,转发,处理每个Servlet请求,DisaptchServlet初始化时会创建自己的IOC上下文,用来持有Spring MVC的相关bean。
首先会从之前初始化存储在ServletContext中的上下文左右parent上下文,再初始化自己的上下文,大概的工作就是初始化处理器映射、视图解析等。这个servlet自己持有的上下文默认实现类也是xmlWebApplicationContext。然后存储到ServletContext。每个Servlet拥有自己的上下文,也会共享parent的上下文。
到此这篇关于java Spring的启动原理详解的文章就介绍到这了,更多相关java Spring启动原理内容请搜索脚本之家以前的文章或继续浏览下面的相关文章希望大家以后多多支持脚本之家!
相关文章

解决Tomcat启动报异常java.lang.ClassNotFoundException问题
这篇文章主要介绍了解决Tomcat启动报异常java.lang.ClassNotFoundException问题,具有很好的参考价值,希望对大家有所帮助。如有错误或未考虑完全的地方,望不吝赐教2023-01-01
Spring使用@Autowired为抽象父类注入依赖代码实例
这篇文章主要介绍了Spring使用@Autowired为抽象父类注入依赖代码实例,文中通过示例代码介绍的非常详细,对大家的学习或者工作具有一定的参考学习价值,需要的朋友可以参考下2019-11-11


最新评论