vuex入门教程,图文+实例解析
我理解的概念
vuex是为vue提供了全局的状态仓库(store),就像一个状态机,避免了父子、兄弟组件之前复杂的传参。他维持了全局共用的数据的一致性。
核心概念秒懂
1,state 共用的数据
2,getters 处理state后得到想要的数据
3,mutations 唯一可以修改state的函数
4,actions 只能显式的调用mutations,可以异步、请求数据
5,moudles 把1、2、3、4包装起来的当成一个模块,可以有多个也可以没有
不说废话直接在实例里面一一解释
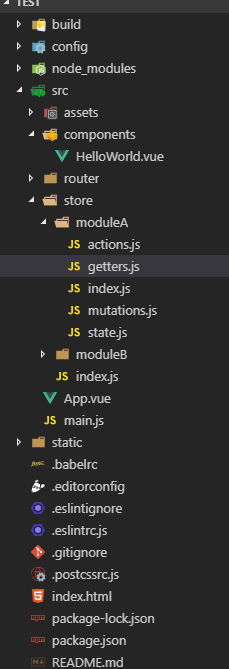
项目结构:

安装
cnpm i vuex -S
创建
创建如图的store
以下代码都是moduleA代码,
state.js
const state = {
  userInfo: {
    userName: '秋刀鱼笛滋味',
    age: 28,
    job: '前端工程师'
  },
  firend: [],
  girlfirend: [
    {
      name: 'LuoSi',
      age: 20,
      nationality: '韩国'
    },
    {
      name: 'AnNi',
      age: 22,
      nationality: '俄罗斯'
    }
  ]
}
export default state;
state没啥好解释的就一个对象,放你要用的状态码
getters.js
const getters = {
  userJob: (state) => {
    return `${state.userInfo.job}`
  },
  girlfirendInfo: (state, getters) => {
    const girlfirend = state.girlfirend
    let info = girlfirend.map((item, index) => {
      return `${index + 1}号女友的名字是${item.name},年龄${item.age},来自${item.nationality}`
    }).join(',')
    return `一共有${girlfirend.length}个女友,${info},可怕的是他只是一名${getters.userJob}。`
  }
}
export default getters;
getters接受两个参数,第一个是state,第二个是getters里面其他的函数
mutation.js
import axios from 'axios';
const mutations = {
  ageAdd (state, payload) {
    payload = payload || 1
    state.userInfo.age += payload
  },
  addGirlFirend (state, payload) {
    state.girlfirend.push({ name: payload.name, age: payload.age, nationality: payload.nationality })
  },
  getFirend (state, payload) {
    state.firend = payload
  },
  mutfired (state) { //vuex严禁在mutations里面进行异步操作,严格模式报错,难于调试
    axios.get('/myServer').then(res => {
      if (res.status === 200) {
        state.firend = res.data.data.list
      }
    })
  }
}
export default mutations;
mutations接受两个参数:state payload(调用时携带的参数),他是唯一可以修改state的地方,注意不可异步、不可调接口,严格模式会报错
如图:

actions.js
import axios from 'axios';
const actions = {
  addGirlFirend ({ commit, state, getters }, payload) {
    commit('addGirlFirend', payload);
  },
  getFirends (ctx) { //ctx是store下当前module对象
    axios.get('/myServer').then(res => {
      if (res.status === 200) {
        ctx.commit('getFirend', res.data.data.list)
        //直接在actions里面也可以修改state,但是不建议,创建store时用严格模式,会报错,不符合vuex单向数据流的规范(只能在mutions里面修改state)
        // ctx.state.firend = res.data.data.list
      }
    })
  }
}
export default actions;
actions接受一个当前module的上下文对象(常用有commit),用来commit 提交mutations,主要用来请求后端数据,可以异步
index.js
import state from './state';
import getters from './getters';
import mutations from './mutations.js';
import actions from './actions';
const moduleA = {
  state,
  getters,
  mutations,
  actions
}
export default moduleA;
把各个组件集合起来暴露出模块
再来看看store的实例化
store/index.js
import Vuex from 'vuex'
import Vue from 'vue'
import moduleA from './moduleA';
import moduleB from './moduleB';
Vue.use(Vuex)
let store = new Vuex.Store({
  //在严格模式下,无论何时发生了状态变更且不是由 mutation 函数引起的,将会抛出错误。这能保证所有的状态变更都能被调试工具跟踪到。
  //*严格模式会深度监测状态树来检测不合规的状态变更——请确保在发布环境下关闭严格模式,以避免性能损失。
  strict: process.env.NODE_ENV !== 'production',//自动在生产环境下关闭严格模式
  modules: {
    moduleA,
    moduleB
  }
})
export default store
注意:一定要用Vue.use一下vuex,最好使用严格模式!
当然store里面还可以用命名空间和插件,一般项目用不上
挂载store
在项目主文件
main.js 实例化vue时,挂载
new Vue({
  el: '#app',
  router,
  store,
  components: { App },
  template: '<App/>'
})
直接在实例里面看怎么快速使用store吧
helloWorld.vue
<template>
  <div>
    <Card style="width:550px">
      <div slot="title">
        <Icon type="ios-film-outline"></Icon>
        个人信息
      </div>
      <div>
        <p>姓名: {{userInfo.userName}}</p>
        <p>年龄: {{userInfo.age}}</p>
        {{girlfirendInfo}}
      </div>
    </Card>
    <hr style="margin:20px 0" />
    <Button type="success" @click="ageAdd()">增加了一岁</Button>
    <hr style="margin:20px 0" />
    <Button type="success" @click="addAge">增加了两岁(commit)</Button>
    <hr style="margin:20px 0" />
    <Card style="width:550px">
      <div slot="title">
        <Icon type="ios-film-outline"></Icon>
        女友信息:
      </div>
      <div>
        名字:
        <Input v-model="girlInfo.name"></Input>
        年龄:</br>
        <Input-number :max="100" :min="1" v-model="girlInfo.age"></Input-number></br>
        国籍:
        <Input v-model="girlInfo.nationality"></Input>
      </div>
      <Button type="success" @click="addGirlFirend(girlInfo)">增加</Button>
      <Button type="success" @click="addGirlFirend1">增加(dispatch)</Button>
    </Card>
    <hr style="margin:20px 0" />
    <Card style="width:550px">
      <div slot="title">
        <Icon type="ios-film-outline"></Icon>
        朋友信息:
      </div>
      <div>
        <p v-for="item in firend" :key="item.userName">{{item.userName}}</p>
      </div>
      <Button type="info" @click="getFirends">获取朋友</Button>
    </Card>
  </div>
</template>
<script>
import { mapState, mapGetters, mapMutations, mapActions } from 'vuex'
export default {
  data () {
    return {
      girlInfo: {
        name: '',
        age: 18,
        nationality: ''
      }
    }
  },
  computed: {
    ...mapGetters(['girlfirendInfo']),
    ...mapState({
      userInfo: state => state.moduleA.userInfo, //使用vuex的modules后一定要指明模块
      firend: state => state.moduleA.firend
    })
  },
  methods: {
    ...mapActions(['addGirlFirend', 'getFirends']), //this.$store.dispatch('addGirlFirend',payload)
    ...mapMutations(['ageAdd']), //this.$store.commit('ageAdd',payload)
    // 上面两个辅助函数方法的实质跟下面是一样的,推荐 使用辅助函数
    addAge () {
      this.$store.commit('ageAdd', 2)
    },
    addGirlFirend1 () {
      this.$store.dispatch('addGirlFirend', this.girlInfo)
    }
  }
}
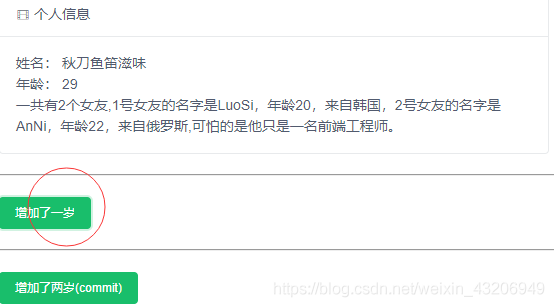
先看一下初始UI吧

简单解释一下
主要的4个模块,有对应的四个辅助函数,用处是把状态 和 操作映射到当前页面
mapState和mapGetters,是状态数据,放在计算属性;mapMutations和mapActions是操作函数, 显然放在方法里面;
注意带的注释;
直接看效果吧
调用mutations

调用actions

actions调接口


vuex的问题,解决方法点击vuex刷新state就没了
以上为个人经验,希望能给大家一个参考,也希望大家多多支持脚本之家。
相关文章

vue3使用element-plus再次封装table组件的基本步骤
这篇文章主要介绍了vue3使用element-plus再次封装table组件的基本步骤,本文给大家介绍的非常详细,对大家的学习或工作具有一定的参考借鉴价值,需要的朋友参考下吧2024-03-03


最新评论