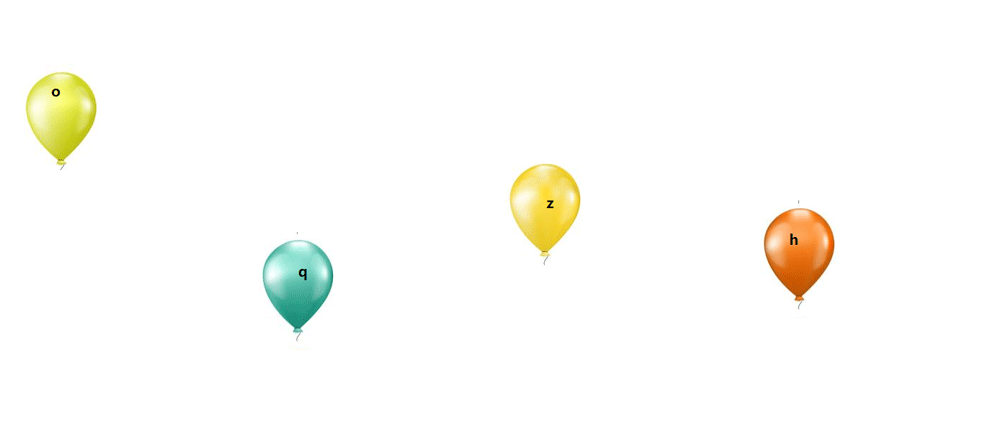
JavaScript实现气球打字的小游戏
一、实现效果

1、定义球的类
气球类中我们需要对26个字符进行处理
this.arr = "abcdefghijklmnopqrstuvwxyz".split("");生成一个随机字母
this.index = parseInt(Math.random() * this.arr.length);
// 定义随机字符
this.str = this.arr[this.index];
生成一个div标签并对图片进行处理
// 元素属性
this.dom = document.createElement("div");
// 图片属性
this.img = img;
// 图片的宽
this.width = this.img.width / 4;
// 图片的高
this.height = this.img.height / 3;
// 图片的背景定位X
this.positionX = parseInt(Math.random() * 4);
// 图片的背景定位Y
this.positionY = parseInt(Math.random() * 3);
关于样式的处理操作
// 设置样式
this.setStyle = function() {
// 设置元素定位
this.dom.style.position = "absolute";
this.dom.style.left = 0;
// 设置元素的内部文本
this.dom.innerHTML = this.str;
// 设置文本样式
this.dom.style.lineHeight = this.height * 2 / 3+ "px";
this.dom.style.textAlign = "center";
this.dom.style.fontSize = "20px";
this.dom.style.fontWeight = "bold";
this.dom.style.top = parseInt(Math.random() * (document.documentElement.clientHeight - this.height)) + "px";
// 设置元素的宽度和高度
this.dom.style.width = this.width + "px";
this.dom.style.height = this.height + "px";
// 设置元素背景图片
this.dom.style.backgroundImage = "url(" + this.img.src + ")";
// 设置元素的背景定位
this.dom.style.backgroundPositionX = -this.width * this.positionX + "px";
this.dom.style.backgroundPositionY = -this.height * this.positionY + "px";
}
定义一个上树的方法
// 上树方法
this.upTree = function() {
document.body.appendChild(this.dom);
}
我们需要检测气球是否到达浏览器边缘
// 检测气球是否到达边界
this.check = function() {
// 判断定位left值值是否到达别界
if (this.dom.offsetLeft >= document.documentElement.clientWidth - this.width) {
// 设置定位值
this.dom.style.left = document.documentElement.clientWidth - this.width + "px";
return true;
}
return false;
}
定义一个下树的方法
// 下树方法
this.boom = function() {
this.dom.parentNode.removeChild(this.dom);
}
定义一个移动的方法,其中的数字表示气球移动的速度
// 移动方法
this.move = function() {
this.dom.style.left = this.dom.offsetLeft + 5 + "px";
}
定义初始化的方法并执行
// 定义初始化方法
this.init = function() {
this.setStyle();
this.upTree();
}
// 执行init
this.init();
创建图片元素
// 创建图片元素
var img = document.createElement("img");
// 设置路径
img.src = "images/balloon.jpg";气球每隔多少时间生成一个,我们需要设置定时器以及气球到达边界的处理,其中代码中的70表示每移动70次创建一个气球。
// 定义数组
var arr = [];
// 定义定时器
var timer = null;
// 定义一个信号量
var count = 0;
// 添加事件
img.onload = function() {
// 初始化气球对象
var balloon = new Balloon(img);
// 第一个气球也要放入数组中
arr.push(balloon);
// 赋值定时器
timer = setInterval(function() {
// 信号量++
count++;
// 判断信号量
if (count % 70 === 0) {
// 气球每移动70次, 创建一个气球
arr.push(new Balloon(img));
}
// 循环数组
for (var i = 0; i < arr.length; i++) {
// 调用move方法
arr[i].move();
// 调用check方法
var result = arr[i].check();
// 判断是否到达别界
if (result) {
// 说明气球到达边界了
// 将气球从数组中移除
arr.splice(i, 1);
// 防止数组塌陷
i--;
// 清除并接触边界进行弹窗
// clearInterval(this.timer)
// alert('游戏结束')
}
}
}, 20)
最后就是我们在气球未触到边缘时,通过键盘清除打出对应的字母
// 给document绑定键盘事件
document.onkeydown = function(e) {
// 获取用户按下的字符
var key = e.key;
// 拿着这个key与数组中每一个气球对象的str属性值作比对,如果比对上了,就让气球从数组中移除并且从dom中移除

for (var i = 0; i < arr.length; i++) {
// 判断
if (key.toLowerCase() === arr[i].str.toLowerCase()) {
// 调用boom方法
arr[i].boom();
// 移除当前项
arr.splice(i, 1);
break;
}
}
}
二、源码仓库和效果
<!DOCTYPE html>
<html lang="en">
<head>
	<meta charset="UTF-8">
	<title>Document</title>
</head>
<body>
	<script type="text/javascript">
	// 定义气球类
	function Balloon(img) {
		// 定义携带的字符
		this.arr = "abcdefghijklmnopqrstuvwxyz".split("");
		// 定义索引
		this.index = parseInt(Math.random() * this.arr.length);
		// 定义随机字符
		this.str = this.arr[this.index];
		// 元素属性
		this.dom = document.createElement("div");
		// 图片属性
		this.img = img;
		// 图片的宽
		this.width = this.img.width / 4;
		// 图片的高
		this.height = this.img.height / 3;
		// 图片的背景定位X
		this.positionX = parseInt(Math.random() * 4);
		// 图片的背景定位Y
		this.positionY = parseInt(Math.random() * 3);
		// 设置样式
		this.setStyle = function() {
			// 设置元素定位
			this.dom.style.position = "absolute";
			this.dom.style.left = 0;
			// 设置元素的内部文本
			this.dom.innerHTML = this.str;
			// 设置文本样式
			this.dom.style.lineHeight = this.height * 2 / 3+ "px";
			this.dom.style.textAlign = "center";
			this.dom.style.fontSize = "20px";
			this.dom.style.fontWeight = "bold";
			this.dom.style.top = parseInt(Math.random() * (document.documentElement.clientHeight - this.height)) + "px";
			// 设置元素的宽度和高度
			this.dom.style.width = this.width + "px";
			this.dom.style.height = this.height + "px";
			// 设置元素背景图片
			this.dom.style.backgroundImage = "url(" + this.img.src + ")";
			// 设置元素的背景定位
			this.dom.style.backgroundPositionX = -this.width * this.positionX + "px";
			this.dom.style.backgroundPositionY = -this.height * this.positionY + "px";
		}
		// 上树方法
		this.upTree = function() {
			document.body.appendChild(this.dom);
		}
		// 检测气球是否到达边界
		this.check = function() {
			// 判断定位left值值是否到达别界
			if (this.dom.offsetLeft >= document.documentElement.clientWidth - this.width) {
				// 设置定位值
				this.dom.style.left = document.documentElement.clientWidth - this.width + "px";
				return true;
			}
			return false;
		}
		// 下树方法
		this.boom = function() {
			this.dom.parentNode.removeChild(this.dom);
		}
		// 移动方法
		this.move = function() {
			this.dom.style.left = this.dom.offsetLeft + 5 + "px";
		}
		// 定义初始化方法
		this.init = function() {
			this.setStyle();
			this.upTree();
		}
		// 执行init
		this.init();
	}

	// 创建图片元素
	var img = document.createElement("img");
	// 设置路径
	img.src = "images/balloon.jpg";

	// 定义数组
	var arr = [];
	// 定义定时器
	var timer = null;
	// 定义一个信号量
	var count = 0;
	// 添加事件
	img.onload = function() {
		// 初始化气球对象
		var balloon = new Balloon(img);
		// 第一个气球也要放入数组中
		arr.push(balloon);
		// 赋值定时器
		timer = setInterval(function() {
			// 信号量++
			count++;
			// 判断信号量
			if (count % 70 === 0) {
				// 气球每移动70次, 创建一个气球
				arr.push(new Balloon(img));
			}
			// 循环数组
			for (var i = 0; i < arr.length; i++) {
				// 调用move方法
				arr[i].move();
				// 调用check方法
				var result = arr[i].check();
				// 判断是否到达别界
				if (result) {
					// 说明气球到达边界了
					// 将气球从数组中移除
					arr.splice(i, 1);
					// 防止数组塌陷
					i--;
          // 清除并接触边界进行弹窗
          // clearInterval(this.timer)
          // alert('游戏结束')
				}
			}
		}, 20)
	}


	// 给document绑定键盘事件
	document.onkeydown = function(e) {
		// 获取用户按下的字符
		var key = e.key;
		// 拿着这个key与数组中每一个气球对象的str属性值作比对,如果比对上了,就让气球从数组中移除并且从dom中移除

		for (var i = 0; i < arr.length; i++) {
			// 判断
			if (key.toLowerCase() === arr[i].str.toLowerCase()) {
				// 调用boom方法
				arr[i].boom();
				// 移除当前项
				arr.splice(i, 1);
				break;
			}
		}
	}
	</script>
</body>
</html>
效果:

到此这篇关于JavaScript实现气球打字的小游戏的文章就介绍到这了,更多相关JavaScript气球打字游戏内容请搜索脚本之家以前的文章或继续浏览下面的相关文章希望大家以后多多支持脚本之家!
相关文章

JavaScript字符串的json的自定义加密解密函数示例
JavaScript自定义函数中使用String.fromCharCode函数将输入字符串中每个字符的Unicode编码加1,然后将加密后的字符拼接成一个新字符串返回,调用JSON.stringify函数转换json成一个普通字符串2023-12-12
Bootstrap Metronic完全响应式管理模板学习笔记
这篇文章主要为大家分享了Bootstrap Metronic完全响应式管理模板学习笔记,感兴趣的小伙伴们可以参考一下2016-07-07
npm install报错无法创建packge.json文件的解决办法
当你在运行 npm install 时遇到错误,提示无法找到 package.json 文件,也没有创建一个 package.json 文件,只创建了一个package-lock.json文件,本文给大家介绍详细的解决办法,需要的朋友可以参考下2024-02-02


最新评论