浅谈PHP Extension的开发——基础篇
下面是“say_hello.c”中需要编写的info_func的具体代码:
/* {{{ PHP_MINFO_FUNCTION
*/
PHP_MINFO_FUNCTION(say_hello)
{
php_info_print_table_start();
php_info_print_table_header(2, "say_hello support", "enabled");
php_info_print_table_row(2, "author", "Zhang Yang"); /* Replace with your name */
php_info_print_table_end();
/* Remove comments if you have entries in php.ini
DISPLAY_INI_ENTRIES();
*/
}
/* }}} */
可以看到我们编写了两行内容、组件是否可用以及作者信息。
编写核心函数
编写核心函数,总共分为三步:1、使用宏PHP_FUNCTION定义函数体;2、使用宏ZEND_BEGIN_ARG_INFO和ZEND_END_ARG_INFO定义参数信息;3、使用宏PHP_FE将函数加入到say_hello_functions中。下面分步说明。
使用宏PHP_FUNCTION定义函数体
PHP_FUNCTION(say_hello_func)
{
char *name;
int name_len;
if (zend_parse_parameters(ZEND_NUM_ARGS() TSRMLS_CC, "s", &name, &name_len) == FAILURE)
{
return;
}
php_printf("Hello %s!", name);
RETURN_TRUE;
}
上文说过,编写PHP扩展时几乎所有东西都不能裸写,而是必须使用相应的宏。从上面代码可以清楚看到这一点。总体来说,核心函数代码一般由如下几部分构成:
定义函数,这一步通过宏PHP_FUNCTION实现,函数的外部名称就是宏后面括号里面的名称。
声明并定义局部变量。
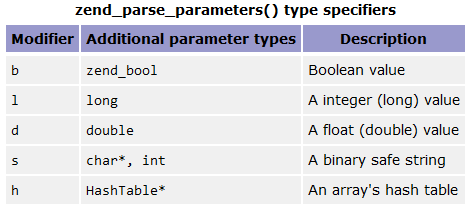
解析参数,这一步通过zend_parse_parameters函数实现,这个函数的作用是从函数用户的输入栈中读取数据,然后转换成相应的函数参数填入变量以供后面核心功能代码使用。zend_parse_parameters的第一个参数是用户传入参数的个数,可以由宏“ZEND_NUM_ARGS() TSRMLS_CC”生成;第二个参数是一个字符串,其中每个字母代表一个变量类型,我们只有一个字符串型变量,所以第二个参数是“s”;最后各个参数需要一些必要的局部变量指针用于存储数据,下表给出了不同变量类型的字母代表及其所需要的局部变量指针。
参数解析完成后就是核心功能代码,我们这里只是输出一行字符,php_printf是Zend版本的printf。
最后的返回值也是通过宏实现的。RETURN_TRUE宏是返回布尔值“true”。
使用宏ZEND_BEGIN_ARG_INFO和ZEND_END_ARG_INFO定义参数信息
参数信息是函数所必要部分,这里不做深究,直接给出相应代码:
ZEND_BEGIN_ARG_INFO(arginfo_say_hello_func, 0)
ZEND_END_ARG_INFO()
如需了解具体信息请阅读相关宏定义。
使用宏PHP_FE将函数加入到say_hello_functions中
最后,我们需要将刚才定义的函数和参数信息加入到say_hello_functions数组里,代码如下:
const zend_function_entry say_hello_functions[] = {
PHP_FE(say_hello_func, arginfo_say_hello_func)
{NULL, NULL, NULL}
};
这一步就是通过PHP_EF宏实现,注意这个数组最后一行必须是{NULL, NULL, NULL} ,请不要删除。
下面是编写完成后的say_hello.c全部代码:
/*
+----------------------------------------------------------------------+
| PHP Version 5 |
+----------------------------------------------------------------------+
| Copyright (c) 1997-2010 The PHP Group |
+----------------------------------------------------------------------+
| This source file is subject to version 3.01 of the PHP license, |
| that is bundled with this package in the file LICENSE, and is |
| available through the world-wide-web at the following url: |
| http://www.php.net/license/3_01.txt |
| If you did not receive a copy of the PHP license and are unable to |
| obtain it through the world-wide-web, please send a note to |
| license@php.net so we can mail you a copy immediately. |
+----------------------------------------------------------------------+
| Author: |
+----------------------------------------------------------------------+
*/
/* $Id: header 297205 2010-03-30 21:09:07Z johannes $ */
#ifdef HAVE_CONFIG_H
#include "config.h"
#endif
#include "php.h"
#include "php_ini.h"
#include "ext/standard/info.h"
#include "php_say_hello.h"
/* If you declare any globals in php_say_hello.h uncomment this:
ZEND_DECLARE_MODULE_GLOBALS(say_hello)
*/
/* True global resources - no need for thread safety here */
static int le_say_hello;
/* {{{ PHP_FUNCTION
*/
PHP_FUNCTION(say_hello_func)
{
char *name;
int name_len;
if (zend_parse_parameters(ZEND_NUM_ARGS() TSRMLS_CC, "s", &name, &name_len) == FAILURE)
{
return;
}
php_printf("Hello %s!", name);
RETURN_TRUE;
}
ZEND_BEGIN_ARG_INFO(arginfo_say_hello_func, 0)
ZEND_END_ARG_INFO()
/* }}} */
/* {{{ say_hello_functions[]
*
* Every user visible function must have an entry in say_hello_functions[].
*/
const zend_function_entry say_hello_functions[] = {
PHP_FE(say_hello_func, arginfo_say_hello_func)
{NULL, NULL, NULL} /* Must be the last line in say_hello_functions[] */
};
/* }}} */
/* {{{ say_hello_module_entry
*/
zend_module_entry say_hello_module_entry = {
#if ZEND_MODULE_API_NO >= 20010901
STANDARD_MODULE_HEADER,
#endif
"say_hello",
say_hello_functions,
NULL,
NULL,
NULL,
NULL,
PHP_MINFO(say_hello),
#if ZEND_MODULE_API_NO >= 20010901
"0.1", /* Replace with version number for your extension */
#endif
STANDARD_MODULE_PROPERTIES
};
/* }}} */
#ifdef COMPILE_DL_SAY_HELLO
ZEND_GET_MODULE(say_hello)
#endif
/* {{{ PHP_MINFO_FUNCTION
*/
PHP_MINFO_FUNCTION(say_hello)
{
php_info_print_table_start();
php_info_print_table_header(2, "say_hello support", "enabled");
php_info_print_table_row(2, "author", "Zhang Yang"); /* Replace with your name */
php_info_print_table_end();
/* Remove comments if you have entries in php.ini
DISPLAY_INI_ENTRIES();
*/
}
/* }}} */
编译并安装扩展
在say_hello目录下输入下面命令:
/usr/bin/phpize
./configure
make
make install
这样就完成了say_hello扩展的安装(如果没有报错的话)。
这时如果你去放置php扩展的目录下,会发现多了一个say_hello.so的文件。如下图所示:
下面就是将其加入到php.ini配置中,然后重启Apache(如果需要的话)。这些都是PHP基本配置的内容,我就不详述了。
扩展测试
如果上面顺利完成,这时运行phpinfo(),应该能看到如下信息:
这说明扩展已经安装成功了。然后我们编写一个测试用PHP脚本:
<?php
say_hello_func('Zhang Yang');
?>
执行这个脚本,结果如下:
说明扩展已经正常工作了。
总结
这篇文章主要用示例方法介绍PHP Extension的开发基础。在PHP的使用中,也许是因为需要支持新的组件(如新的数据库),又或是业务需要或性能需要,几乎都会遇到需要开发PHP扩展的地方。后续如果有机会,我会写文章介绍一些关于扩展开发较为深入的东西,如扩展模块生命周期、INI使用以及编写面向对象的扩展模块等等。
本文基于署名-非商业性使用 3.0许可协议发布,欢迎转载或演绎,但是必须保留本文的署名张洋(包含链接),且不得用于商业用途。如您有任何疑问或者授权方面的协商,请与我联系。
相关文章

PHP 杂谈《重构-改善既有代码的设计》之一 重新组织你的函数
我把我比较喜欢的和比较关注的地方写下来和大家分享。上次我写了篇《php 跟老大的对话》。还是有很多疑问,这书帮了我不少的忙2012-04-04


最新评论