filebeat收集多个域名网站日志并存储到不同es索引库过程
1.为什么要针对不同的应用系统创建不同的索引
公司生产环境中一台机器上一定会运行着多个域名的应用,web应用也是集群的方式,如果filebeat收集来的日志都是分散存储,且在es上建立的索引也都是分散的,这样不利于日志的聚合汇总,因此就需要把同一种应用的不同机器上的日志全部采集过来存储到一个索引库中,在kibana根据各种条件去匹配
2.搭建web集群环境
2.1.环境准备
| IP | 服务 | 应用 |
|---|---|---|
| 192.168.81.210 | nginx01 | bbs、blog、www |
| 192.168.81.220 | nginx02 | bbs、blog、www |
2.2.web集群部署
所有节点都按如下配置
1.安装nginx
yum -y install nginx
2.配置站点配置文件
cat www.conf
server{
	server_name www.jiangxl.com;
	listen 80;
	location ~ / {
		root /web/www;
		index index.html;
	}
}
cat bbs.conf
server{
	server_name bbs.jiangxl.com;
	listen 80;
	location ~ / {
		root /web/bbs;
		index index.html;
	}
}
cat blog.conf
server{
	server_name blog.jiangxl.com;
	listen 80;
	location ~ / {
		root /web/blog;
		index index.html;
	}
}
3.创建站点路径
mkdir /web/{www,bbs,blog} -p
chown -R nginx.nginx /web/
echo "www index" > /web/www/index.html
echo "bbs index" > /web/bbs/index.html
echo "blog index" > /web/blog/index.html
4.重载nginx
nginx -t
nginx: the configuration file /etc/nginx/nginx.conf syntax is ok
nginx: configuration file /etc/nginx/nginx.conf test is successful
systemctl reload nginx
5.访问站点
curl www.jiangxl.com bbs.jiangxl.com blog.jiangxl.com
www index
bbs index
blog index

2.3.配置应用支持json格式的日志输出
所有节点都这样配置
cat www.conf
server{
	server_name www.jiangxl.com;
	listen 80;
	location ~ / {
		root /web/www;
		index index.html;
	}
	access_log  /var/log/nginx/www_access.log  main;
}
cat bbs.conf
server{
	server_name bbs.jiangxl.com;
	listen 80;
	location ~ / {
		root /web/bbs;
		index index.html;
	}
	access_log  /var/log/nginx/bbs_access.log  main;
}
cat blog.conf
server{
	server_name blog.jiangxl.com;
	listen 80;
	location ~ / {
		root /web/blog;
		index index.html;
	}
	access_log  /var/log/nginx/blog_access.log  main;
}

3.配置filebeat实现不同日志对应不同索引
3.1.实现思路
**日志索引思路:**如何才能让filebeat根据不同的日志路径去创建不同的索引,其实我们可以想一下ls -l命令,使用ls -l命令才能得到文件的详细信息,但是使用ll也可以得到,这是为什么呢?是由于ll仅仅只是一个别名,我们也可以当成一个标记,ll对应的就是ls -l命令
那么日志也一样的,我们可以把www_access.log当成是一个标记,当标记内容为www_access.log时,我们就把他的日志存储在www_access_xxx的索引库中
具体配置:如果一个主机上有多个不同应用的日志需要采集,我们可以定义多个type类型,最后根据定义的标记在indices中进行匹配
**日志聚合思路:**我们也可以将所有机器的tomcat、nginx日志进行聚合收集,不需要根据应用去区分,而是把所有的tomcat日志收集在一起,这样便于开发人员去查询日志,查哪台主机的就在kibana上进行过滤就行了
如下图所示,tomcat就是聚合收集,查哪台机器的日志就添加一个筛选写上主机名就可以了

filebeat标记匹配语法:
filebeat.inputs:
- type: log 									//一个日志一个type
  enabled: true										//是否写在es中
  paths:											//日志路径
    - /var/log/nginx/www_access.log
  json.keys_under_root: true								//开启json格式解析
  json.overwrite_keys: true
  tags: ["www"]														//标记内容,在[]里填写即可
output.elasticsearch:
  hosts: ["192.168.81.210:9200"]
  indices:													//索引匹配
    - index: "nginx-www-access-%{+yyyy.MM.dd}"					//索引库名称
      when.contains:										//匹配什么标记
        tags: "www"											//匹配标记为www的日志
3.2.配置filebeat不同日志使用不同索引库
nginx集群内的所有filebeat都需要如下配置
vim复制小技巧:复制2-8行的内容,粘贴到第9行的操作命令:在vim命令模式输入:2,8t9,2,8表示2-8t行复制,9表示粘贴在第九行
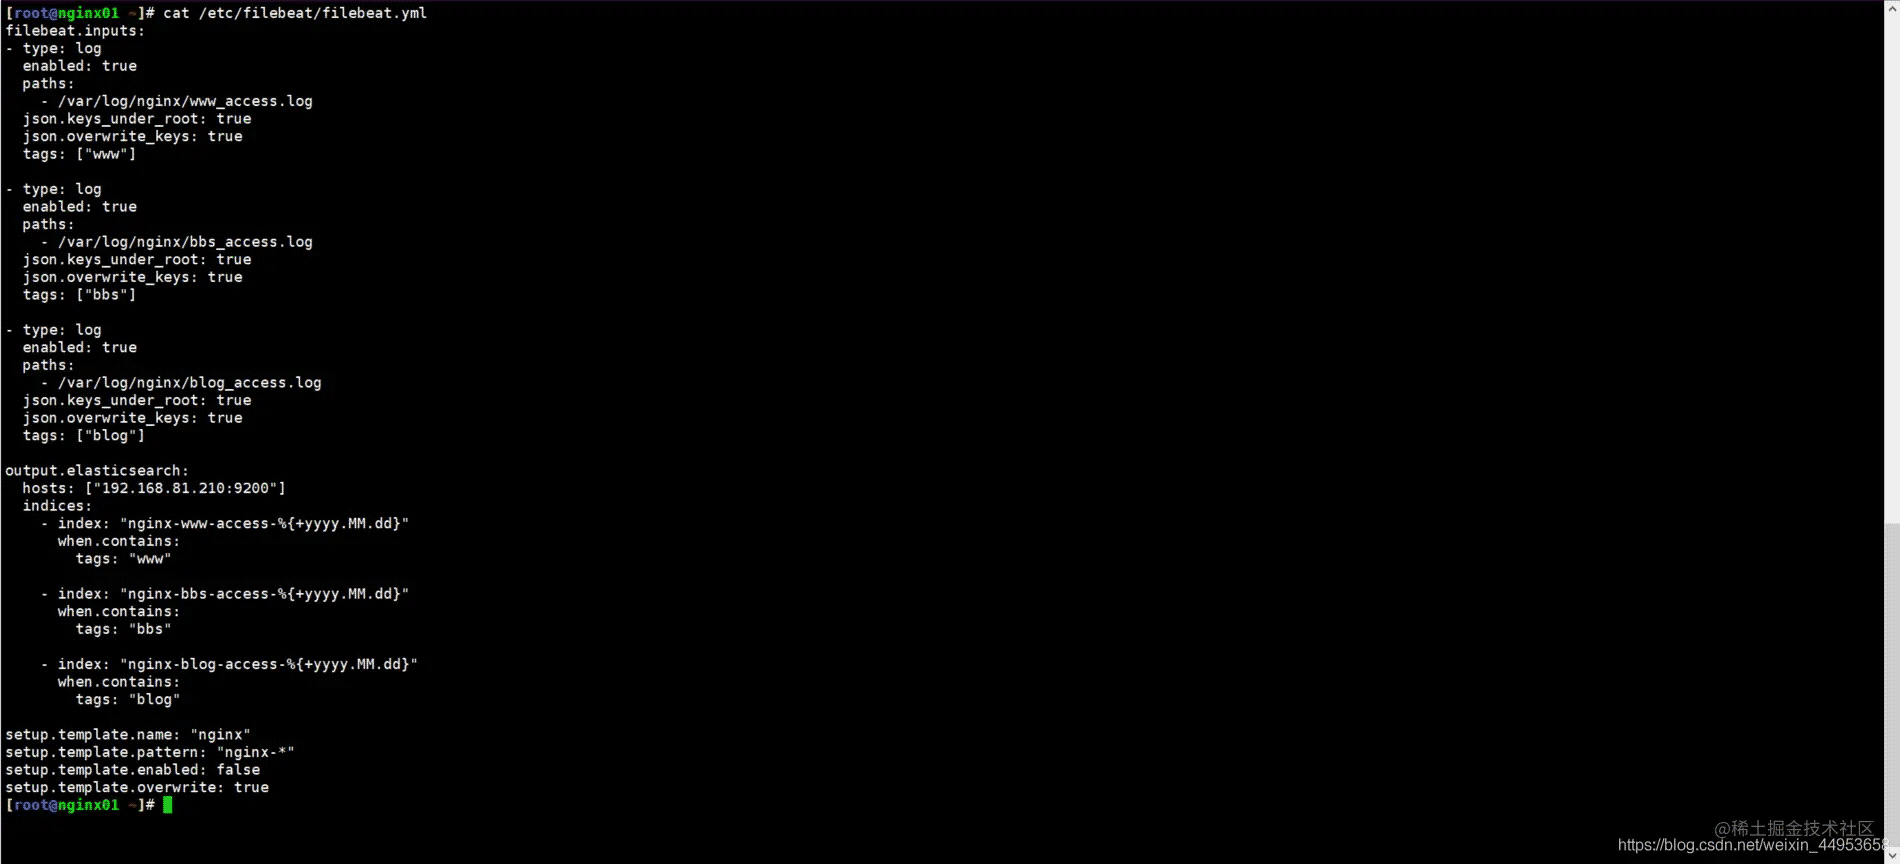
1.配置filebeat
vim /etc/filebeat/filebeat.yml
filebeat.inputs:
- type: log
  enabled: true
  paths:
    - /var/log/nginx/www_access.log
  json.keys_under_root: true
  json.overwrite_keys: true
  tags: ["www"]
- type: log
  enabled: true
  paths:
    - /var/log/nginx/bbs_access.log
  json.keys_under_root: true
  json.overwrite_keys: true
  tags: ["bbs"]
- type: log
  enabled: true
  paths:
    - /var/log/nginx/blog_access.log
  json.keys_under_root: true
  json.overwrite_keys: true
  tags: ["blog"]
output.elasticsearch:
  hosts: ["192.168.81.210:9200"]
  indices:
    - index: "nginx-www-access-%{+yyyy.MM.dd}"
      when.contains:
        tags: "www"
    - index: "nginx-bbs-access-%{+yyyy.MM.dd}"
      when.contains:
        tags: "bbs"
    - index: "nginx-blog-access-%{+yyyy.MM.dd}"
      when.contains:
        tags: "blog"
setup.template.name: "nginx"
setup.template.pattern: "nginx-*"
setup.template.enabled: false
setup.template.overwrite: true
2.重启filebeat
systemctl restart filebeat
3.3.在es上查看创建的索引库
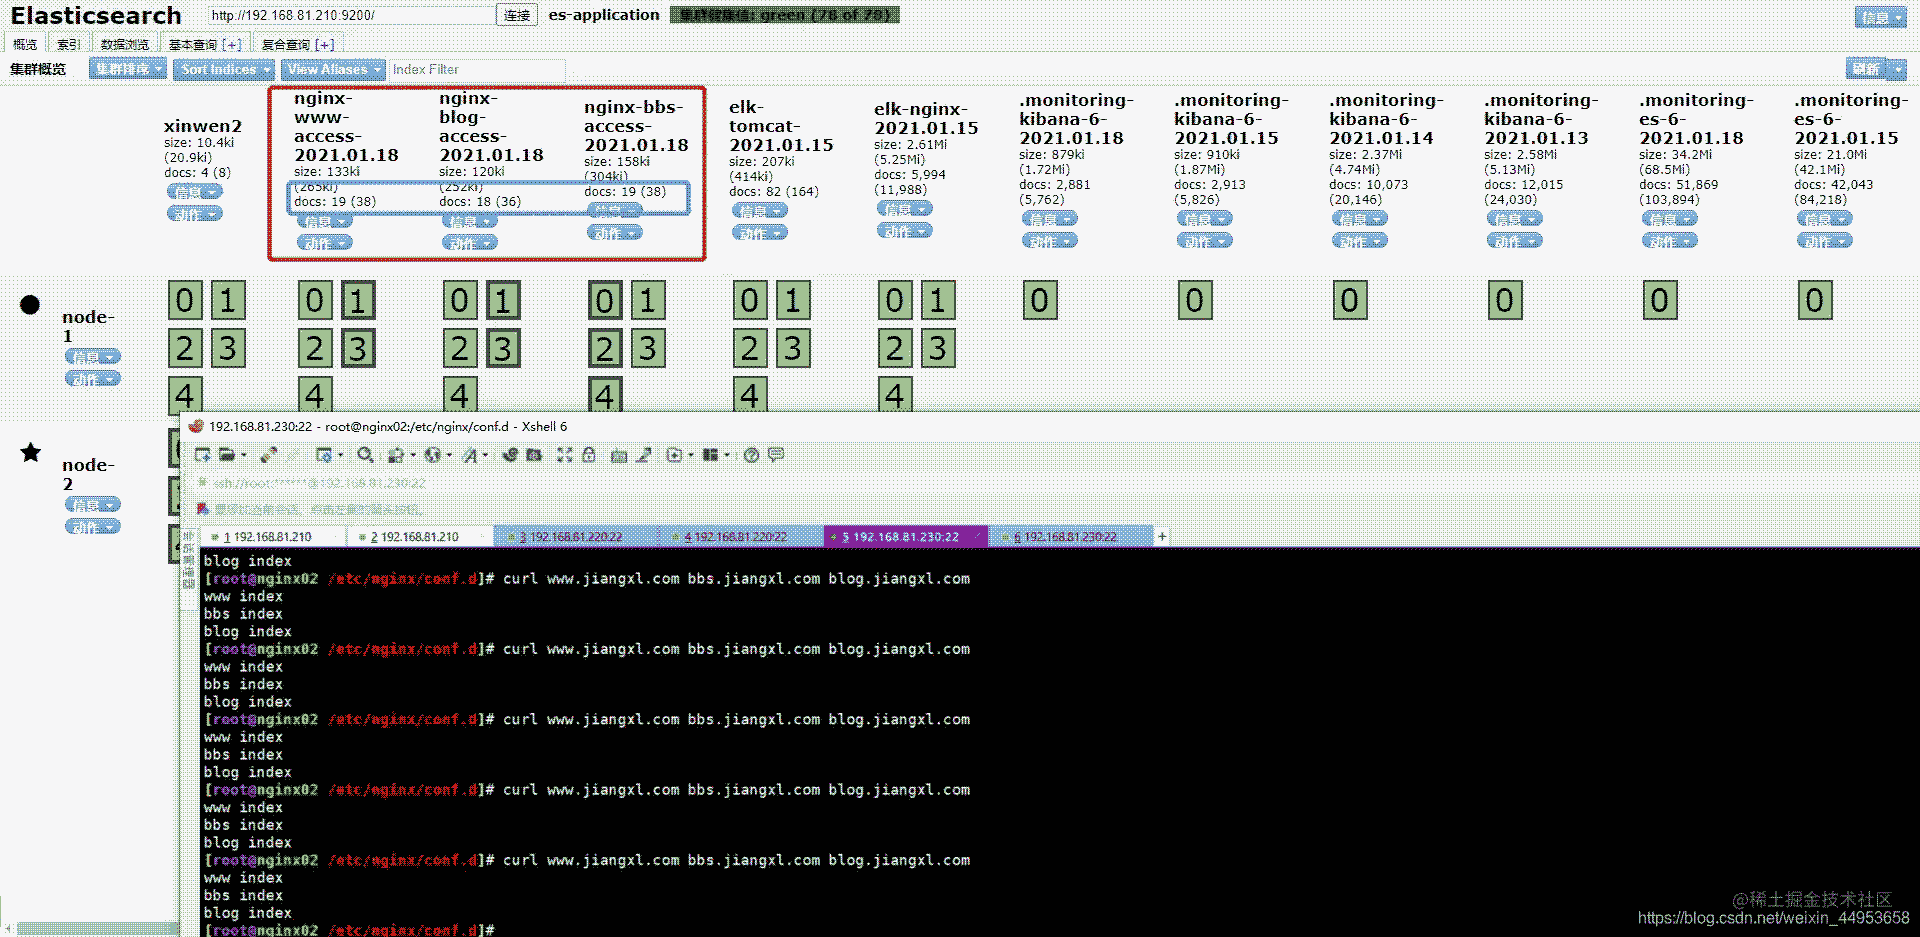
由于nginx集群相同的应用是要写在同一个索引库中的,因此我们要观察每加一个集群产生的数据变化
刚配置完nginx01时的样子
www:12条 blog:11条 bbs:12条

增加nginx02后的样子
访问nginx02上的应用六七次后,数据明显发生了变化
www:19条 blog:18条 bbs:19条
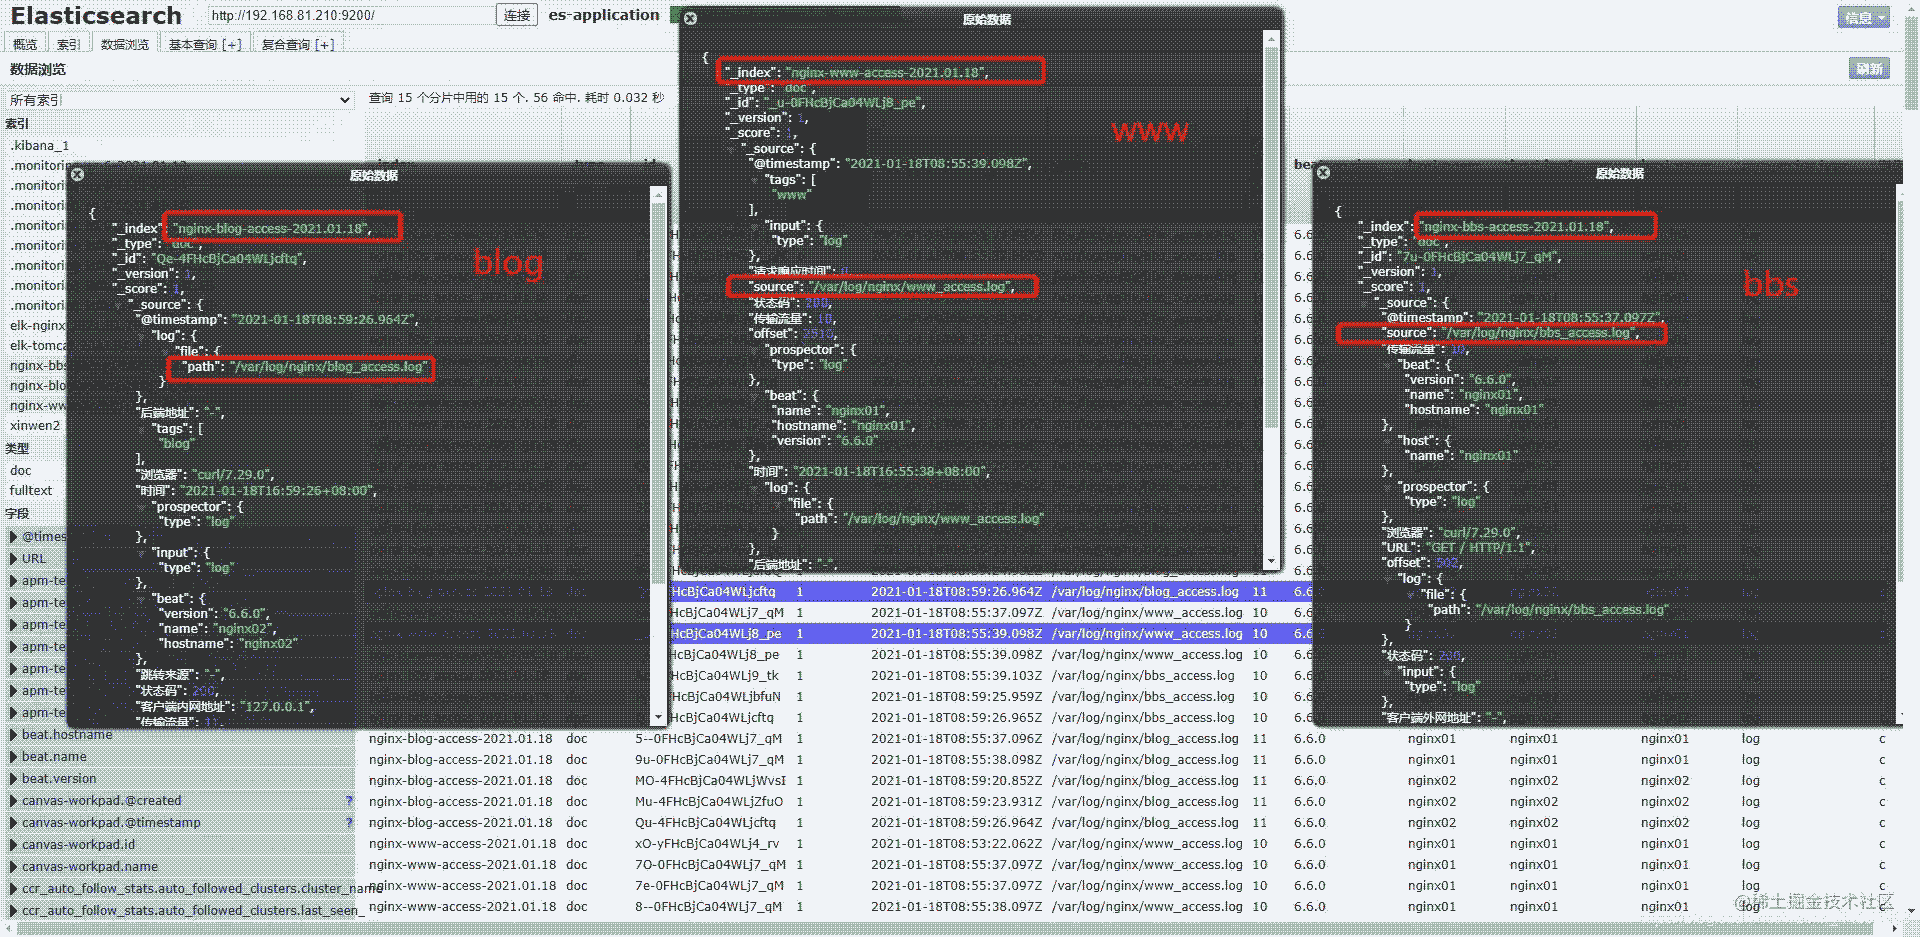
可以具体看索引中的数据,看看是不是对应的日志,完全正确
3.4.在kibana上关联es索引库
3.4.1.创建www索引库
点击Managerment----索引模式---创建索引

字段选择@timestamp

3.4.2.创建bbs索引库
操作与www的一致

3.4.3.创建blog索引库
操作与www的一致

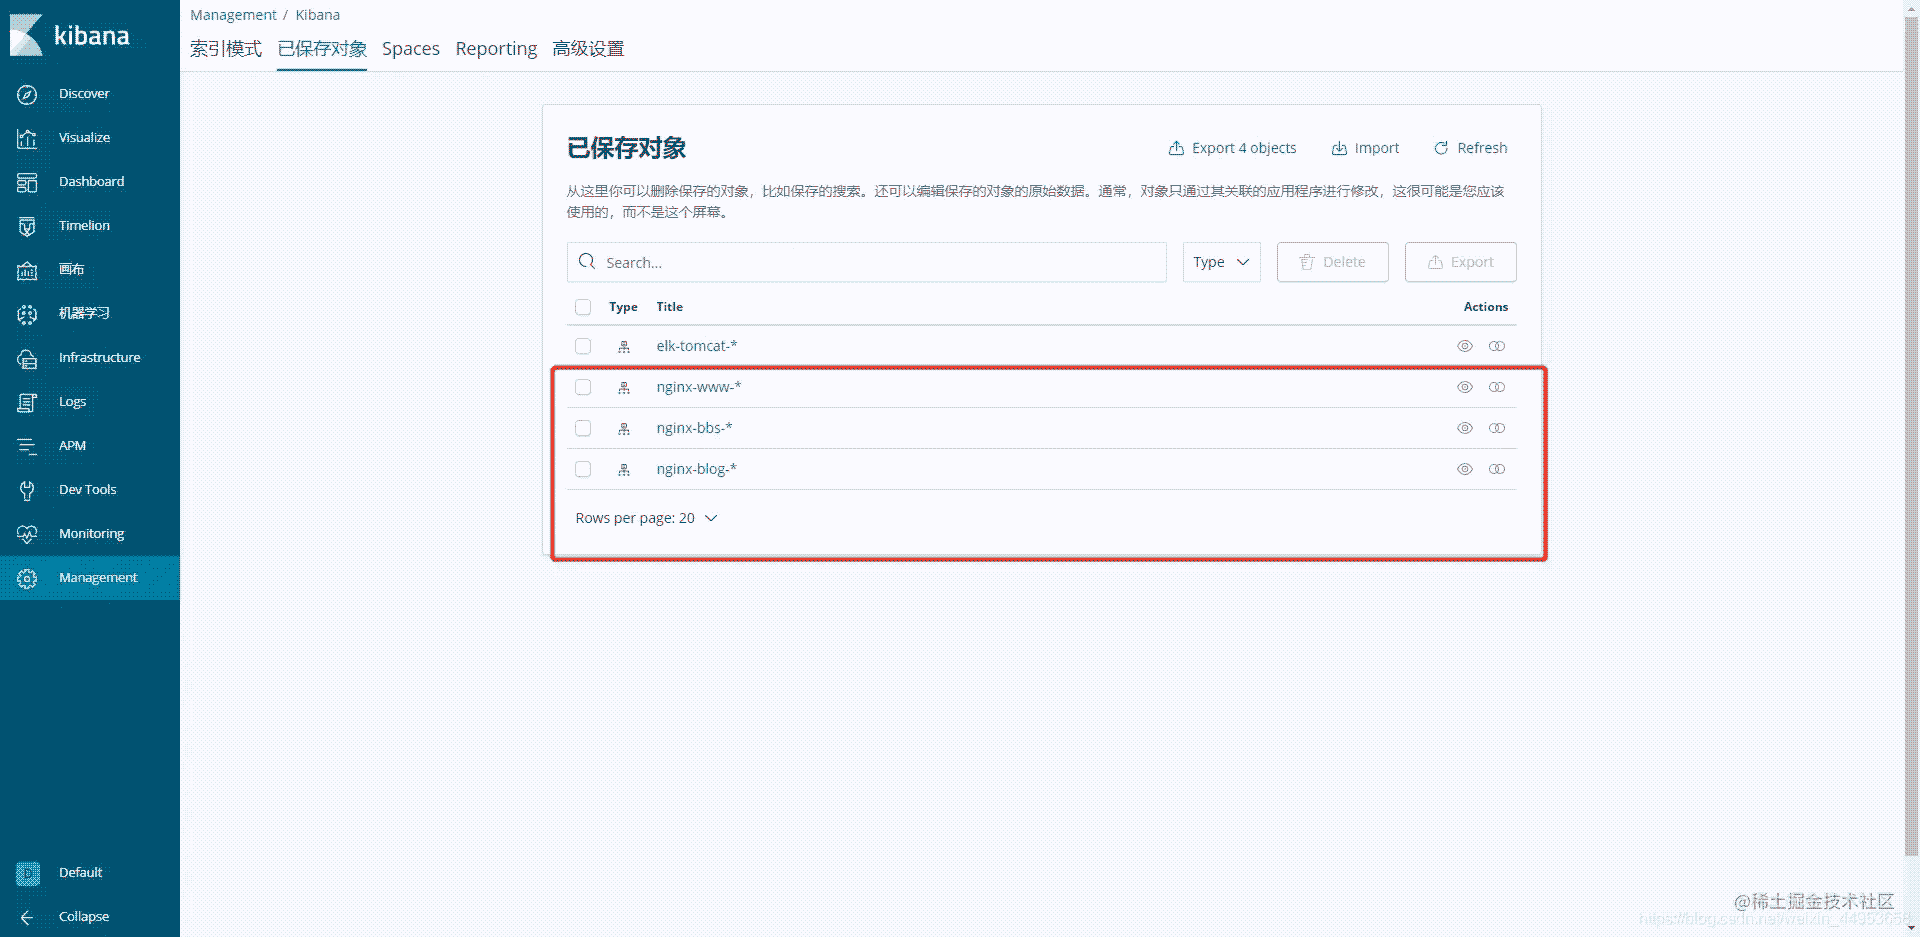
3.4.4.所有应用索引库都一一对应上了
4.在kibana统计日志分析
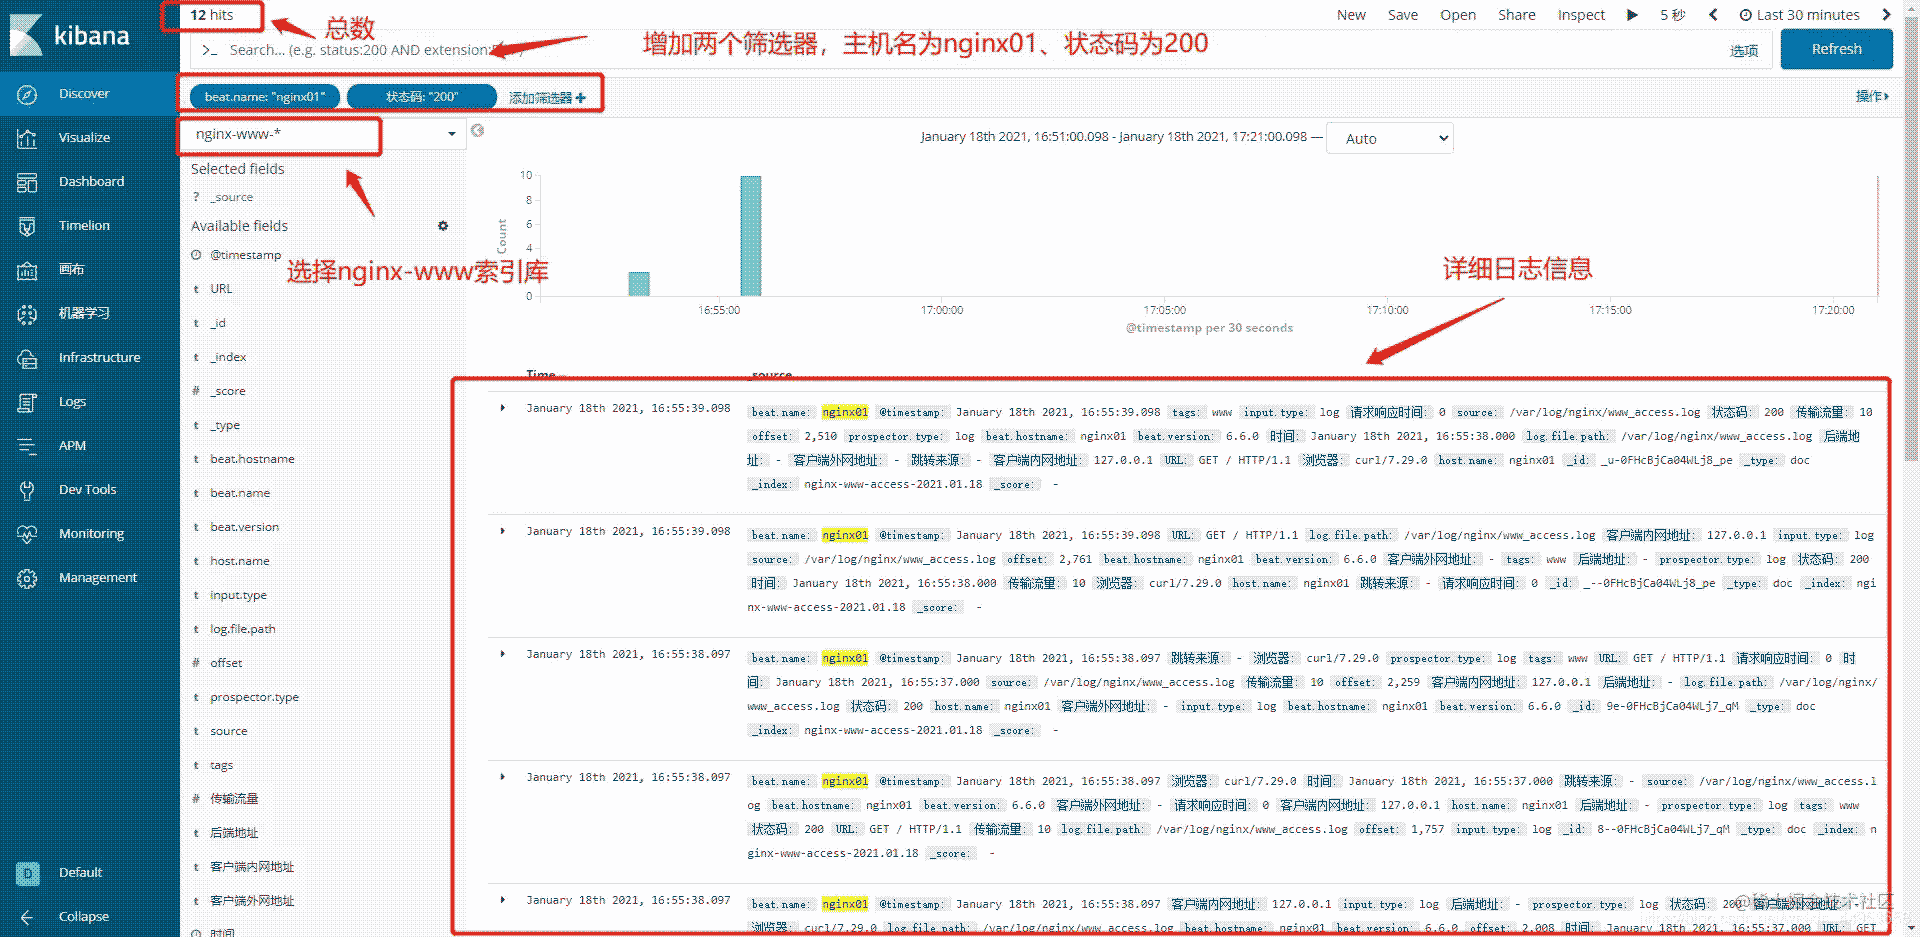
4.1.统计nginx01主机www应用200状态码数量
筛选添加:beat.name(主机名)is(是) nginx01(主机名)
状态码(访问状态码) is(是) 200(状态码为200)
4.2.统计所有节点访问状态码为200的日志
只需要添加一个筛选器即可
筛选添加:状态码(访问状态码) is(是) 200(状态码为200)
日志也起到了聚合的作用,所有节点都可以统计

以上就是filebeat收集多个域名网站日志并存储到不同es索引库过程的详细内容,更多关于filebeat收集网站日志存储es的资料请关注脚本之家其它相关文章!
相关文章

详解使用Nginx和uWSGI配置Python的web项目的方法
这篇文章主要介绍了使用Nginx和uWSGI配置Python的web项目的方法,与其他CGI连接方式相比uwsgi的连接性能也较为出众,需要的朋友可以参考下2015-12-12
Nginx安装后/etc/nginx/conf.d下没有default.conf的解决
nginx.conf是nginx默认加载的配置文件 通过nginx -V可以看nginx默认配置文件路径,本文主要介绍了Nginx安装后/etc/nginx/conf.d下没有default.conf的解决,感兴趣的可以了解一下2023-11-11
权限问题导致Nginx 403 Forbidden错误的解决方法
这篇文章主要介绍了权限问题导致Nginx 403 Forbidden错误的解决方法,本文中导致 403 Forbidden错误的原因是配置文件中没有指明一个用户,需要的朋友可以参考下2014-08-08


最新评论