Vue3实现provide/inject的示例详解
实现思路
场景分析
可以在全局父组件里通过provide将所有需要对外提供的全局属性方法进行跨组件透传,无论嵌套多深的子组件都可以进行inject注入使用,包括不限于计算属性、方法等,甚至将整个app.vue实例进行相应的透传;
测试用例
// example/apiinject/App.js
import { h, provide, inject } from "../../lib/guide-mini-vue.esm.js";

const Provider = {
    name: 'Provider',
    setup(){
        provide("foo","fooVal");
        provide("bar","barVal");

    },
    render() {
        return h("div",{},[
            h("hr",{},""),
            h("p",{},"Provider"),
            h("hr",{},""),
            h(Provider2)]
        )
    }
}

const Provider2 = {
    name: 'Provider2',
    setup(){
        provide("foo","Provider2-foo");
        const foo = inject("foo","default Provider2-foo")

        return{
            foo
        }
    },
    render() {
        return h("div",{},[
            h("p",{},`Provider2 foo:${this.foo}`),
            h("hr",{},""),
            h(Consumer)]
        )
    }
}

const Consumer = {
    name: "Consumer",
    setup() {
        const foo = inject("foo");
        const bar = inject("bar");
        const bars = inject("bars",'bares default');
        const barfn = inject("barss",() => 'bares default fn');

        return {
            foo,
            bar,
            bars,
            barfn
        }
    },
    render(){
        return h("div",{},`Consumer: - ${this.foo} - ${this.bar} - ${this.bars} - ${this.barfn}`)
    }
}

export default {
    name: "App",
    setup() {},
    render() {
        return h("div",{},[
            h("h1",{},"apiInject - apiProvide"),
            h(Provider)
        ])
    }
}
// example/apiinject/index.html
<!DOCTYPE html>
<html lang="en">
<head>
<meta charset="UTF-8">
<meta http-equiv="X-UA-Compatible" content="IE=edge">
<meta name="viewport" content="width=device-width, initial-scale=1.0">
<title>API-Inject+provide</title>
</head>
<body>
<div id="app"></div>
<!-- <script src="main.js" type="module"></script> -->
<script type="module">
import { createApp } from "../../lib/guide-mini-vue.esm.js"
import App from "./App.js";
const rootContainer = document.querySelector("#app");
createApp(App).mount(rootContainer);
</script>
</body>
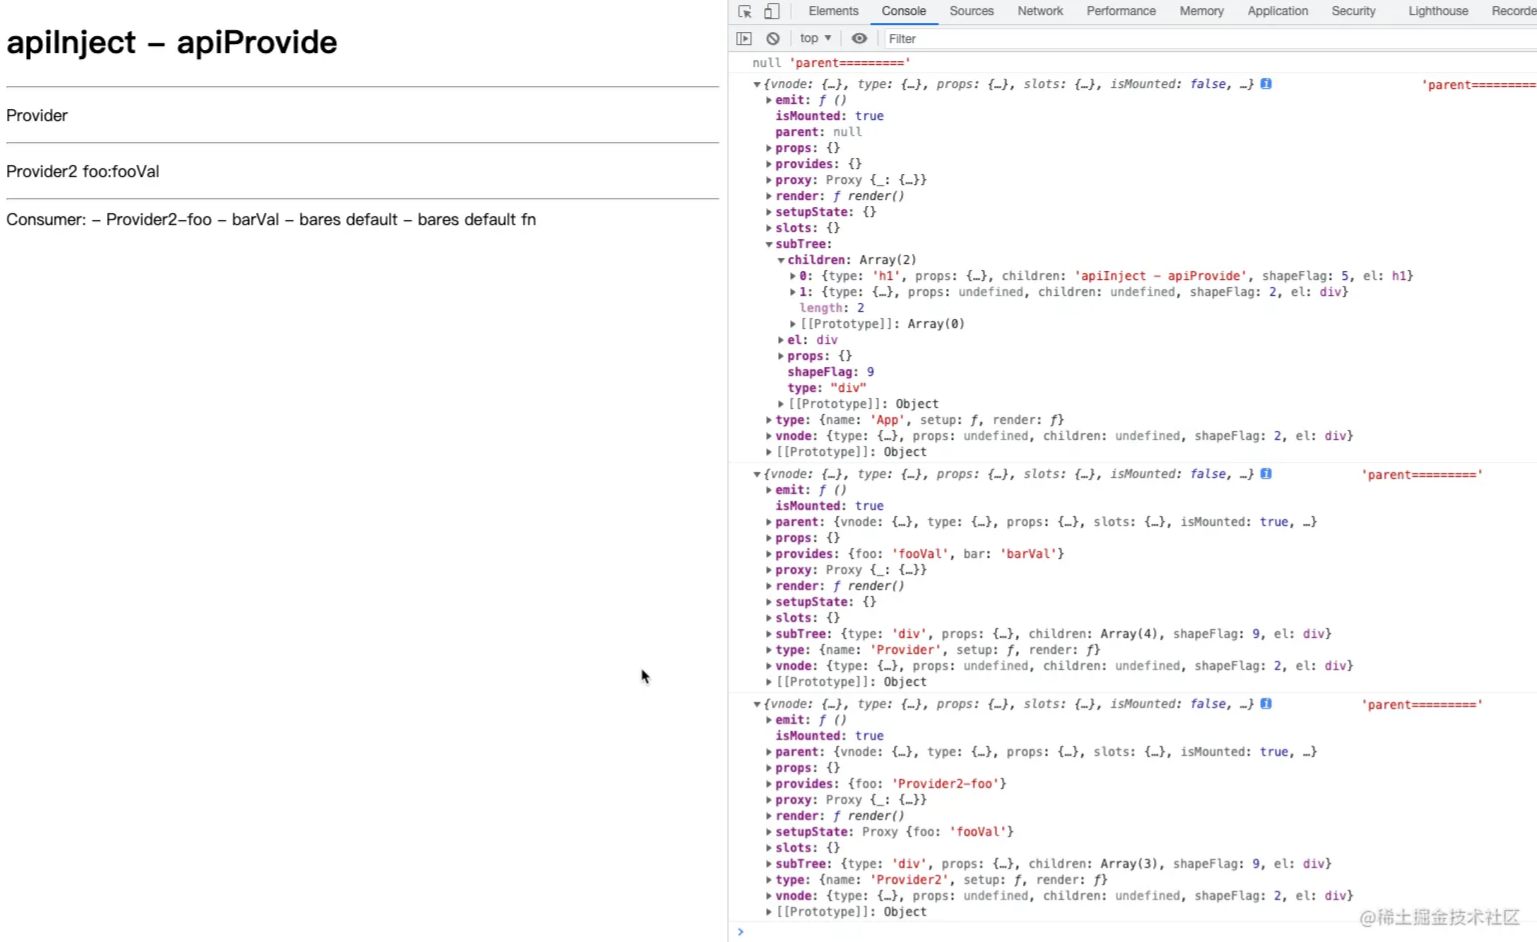
</html>渲染结果

步骤解析
当调用provide的时候需要将provide中的key/value挂载到组件实例的provides属性上,当子组件调用Inject的时候,通过获取到子组件的实例进而通过parent得到父组件实例,然后通过父组件实例上的provides对象获取到相应key对应的value
1.实现getCurrentInstance函数
用于获取组件实例实例,父组件挂载provide到实例上的provides属性对象上,子组件获取到自身和父组件实例,然后获取对应的属性值
2.给组件实例拓展provides属性,类型是对象类型
- 保存父组件提供的
provide数据 - 供子组件获取指定数据
3.给组件实例拓展parent属性,用于获取父组件实例
子组件获取父组件实例,然后获取对应数据
4.创建并实现provide/Inject函数
源码实现
步骤解析
拓展实现getCurrentInstance,用于获取组件实例
let currentInstance = null
export function getCurrentInstance(){
  return currentInstance
}

export function setCurrentInstance(instance){
  // 方便后续跟踪 currentInstance 被谁更改  - 断点调试  中间层概念
  currentInstance = instance
}

export function setupComponent(instance) {
  // 处理setup的信息 初始化props  初始化Slots等
  initProps(instance,instance.vnode.props),
  initSlots(instance,instance.vnode.children),
  setupStatefulComponent(instance);
}

// 调用创建组件实例
function setupStatefulComponent(instance: any) {
  // 调用组件的setup
  // const Component = instance.vNode.type
  const Component = instance.type;
  instance.proxy = new Proxy(
    { _: instance },
    PublicInstanceProxyHandlers
    // {
    //     get(target,key){
    //         const { setupState } = instance
    //         if(key in setupState){
    //             return setupState[key]
    //         }

    //         if(key === '$el'){
    //             return instance.vnode.el
    //         }
    //     }
    // }
  );
  const { setup } = Component;

  if (setup) {
    // currentInstance = instance
    setCurrentInstance(instance)
    // setup可以返回函数或对象 函数-是组件的render函数 对象-将对象返回的对象注入到这个组件上下文中
    const setupResult = setup(shallowReadonly(instance.props),{
      emit: instance.emit
    });

    // currentInstance = null
    setCurrentInstance(null)
    // setup返回当前组件的数据
    handleSetupResult(instance, setupResult);
  }
}
组件实例拓展provides和parent属性
export function createComponentInstance(vnode,parent) {
  const component = {
    vnode,
    type: vnode.type,
    props: {},
    slots: {},
    isMounted: false, // 标识是否是初次加载还是后续依赖数据的更新操作
    subTree: null,
    emit: ()=>{},
    provides:{}, //常规的provide 无法实现跨级的父子组件provide和inject
    parent, //子组件获取到父组件实例 取得父组件中 provide 的数据
    render: vnode.render,
    setupState: {},
  };
  component.emit = emit.bind(null,component) as any
  return component;
}
按照createComponentInstance的新添属性parent进行旧逻辑兼容
function processComponent(vnode: any, container: any, parentComponent) {
  // 挂载组件
  mountComponent(vnode, container, parentComponent);
}
function mountComponent(initialVNode: any, container, parentComponent) {
  // 通过虚拟节点创建组件实例
  const insatnce = createComponentInstance(initialVNode,parentComponent);
  const { data } = insatnce.type

  // 通过data函数获取原始数据,并调用reactive函数将其包装成响应式数据
  // const state = reactive(data())

  // 为了使得自身状态值发生变化时组件可以实现更新操作,需要将整个渲染任务放入到Effect中进行收集
  effect(() => {
    setupComponent(insatnce); //处理setup的信息 初始化props  初始化Slots等
    setupRenderEffect(insatnce, initialVNode, container); // 首次调用App组件时会执行  并将render函数的this绑定为创建的代理对象

  })
}
// ...
export function render(vnode, container) {
  // 调用patch函数 方便进行后续递归处理
  patch(vnode, container, null);
}
// ...
// 省略其他兼容逻辑,如patch、mountElement、processElement、mountChildren等
检测parent是否配置成功
export function createComponentInstance(vnode,parent) {
  console.log(parent,'parent=========')
  // ...
}
实现provide和Inject
import { getCurrentInstance } from "./component";

export function provide (key,value){
    const currentInstance:any = getCurrentInstance(); //在在setup中
    if(currentInstance){
        let { provides } = currentInstance
        provides[key] = value
    }
}

export function inject (key,defaultValue){
    const currentInstance:any = getCurrentInstance(); //在在setup中  获取当前组件的实例
    if(currentInstance){

        // 获取到父组件的实例上的provides 然后根据inject的key值进行查找对应的值并返回
        const parentProvides = currentInstance.parent.provides
        return parentProvides[key]

    }
}
跨级组件数据传递
在进行provides提供时,优先读取父组件的provide数据
export function createComponentInstance(vnode,parent) {
  console.log(parent,'parent=========')
  const component = {
    vnode,
    type: vnode.type,
    props: {},
    slots: {},
    isMounted: false, // 标识是否是初次加载还是后续依赖数据的更新操作
    subTree: null,
    emit: ()=>{},
    // provides:{}, //常规的provide 无法实现跨级的父子组件provide和inject
    provides:parent?parent.provides:{},
    // 实现跨级父子组件之间的provide和inject
    //相当于是一个容器 当调用 provide 的时候会往这个容器里存入数据 供子组件的数据读取
    parent, //子组件获取到父组件实例 取得父组件中 provide 的数据
    render: vnode.render,
    setupState: {},
  };
  component.emit = emit.bind(null,component) as any
  return component;
}利用原型链思想解决父组件和爷爷组件都provide相同key值的数据时的覆盖问题 -> 只会读到最上层
父组件没有自己维护的provides对象,导致只保存做外部的组件provides数据,so每个组件都应该维护一个专属于自己的provides属性供子组件使用,当父组件中有值则直接返回,没有则继续向父组件的父组件进行循环查找,直到到达顶层组件,顶层组件也没有时则采用Inject配置的默认值进行渲染
在进行组件专属provides维护
export function provide (key,value){
    const currentInstance:any = getCurrentInstance(); //在在setup中
    if(currentInstance){
        let { provides } = currentInstance
        const parentProvides = currentInstance.parent.provides

        // 让当前组件实例的provides指向一个空对象 且该对象以父组件的 provides 为原型
        // currentInstance.provides = Object.create(parentProvides)
        // 上述注释的逻辑存在的问题是每次调用provide时都会将组件实例的provides置为空对象,导致以前提供的数据被清空
        // 所以清空逻辑只适合在首次加载时进行调用 而首次加载即是组件实例的provides是初始化父组件实例的provides 此时可以进行初始化
        if(provides === parentProvides){
            provides = currentInstance.provides = Object.create(parentProvides)
            // Object.create可以理解为继承一个对象,添加的属性是在原型下 此处是将父组件的provides属性设置到当前组件实例对象的provides属性的原型对象上
        }
        provides[key] = value
    }
}
Inject默认值问题
Inject函数的第二参数即为默认值
默认值可以是函数或者普通值
export function inject (key,defaultValue){
    const currentInstance:any = getCurrentInstance(); //在在setup中  获取当前组件的实例
    if(currentInstance){

        // 获取到父组件的实例上的provides 然后根据inject的key值进行查找对应的值并返回
        const parentProvides = currentInstance.parent.provides
        if(key in parentProvides){
            return parentProvides[key]
        } else if(defaultValue){
            // 支持inject的默认值 当父组件中没有提供数据时进行采取默认值  默认值可以是一个函数或者普通值
            if(typeof defaultValue === 'function'){
                return defaultValue()
            }
            return defaultValue
        }

    }
}
测试用例
// 省略父组件逻辑...
const Consumer = {
    name: "Consumer",
    setup() {
        const foo = inject("foo");
        const bar = inject("bar");
        const bars = inject("bars",'bares default');
        const barfn = inject("barss",() => 'bares default fn');

        return {
            foo,
            bar,
            bars,
            barfn
        }
    },
    render(){
        return h("div",{},`Consumer: - ${this.foo} - ${this.bar} - ${this.bars} - ${this.barfn}`)
    }
}
拓展
实现原理是利用了原型和原型链来进行数据的继承和获取
原型和原型链
prototype和__proto__
prototype一般是显式原型,__proto__一般称为隐式原型,一个函数在创建之后,就会拥有一个名为prototype的属性,这个属性表示函数的原型对象;
原型链
当访问一个JS对象属性的时候,JS会先在这个对象定义的属性上查找,找不到会沿着这个对象的__proto__这个隐式原型关联起来的链条向上一个对象查找,这个链条就叫做原型链;
原型链在某种意义上是让一个引用类型继承另一个引用类型的属性和方法
以上就是Vue3实现provide/inject的示例详解的详细内容,更多关于Vue3 provide inject的资料请关注脚本之家其它相关文章!
相关文章

vue中created、watch和computed的执行顺序详解
由于vue的双向数据绑定,自动更新数据的机制,在数据变化后,对此数据依赖 的所有数据,watch事件都会被更新、触发,下面这篇文章主要给大家介绍了关于vue中created、watch和computed的执行顺序,需要的朋友可以参考下2022-11-11


最新评论