解读torch.nn.GRU的输入及输出示例
我们有时会看到GRU中输入的参数有时是一个,但是有时又有两个。这难免会让人们感到疑惑,那么这些参数到底是什么呢。
一、输入到GRU的参数
输入的参数有两个,分别是input和h_0。
Inputs: input, h_0
①input的shape
The shape of input:(seq_len, batch, input_size) : tensor containing the feature of the input sequence. The input can also be a packed variable length sequence。
See functorch.nn.utils.rnn.pack_padded_sequencefor details.
②h_0的shape
从下面的解释中也可以看出,这个参数可以不提供,那么就默认为0.
The shape of h_0:(num_layers * num_directions, batch, hidden_size): tensor containing the initial hidden state for each element in the batch.
Defaults to zero if not provided. If the RNN is bidirectional num_directions should be 2, else it should be 1.
综上,可以只输入一个参数。当输入两个参数的时候,那么第二个参数相当于是一个隐含层的输出。
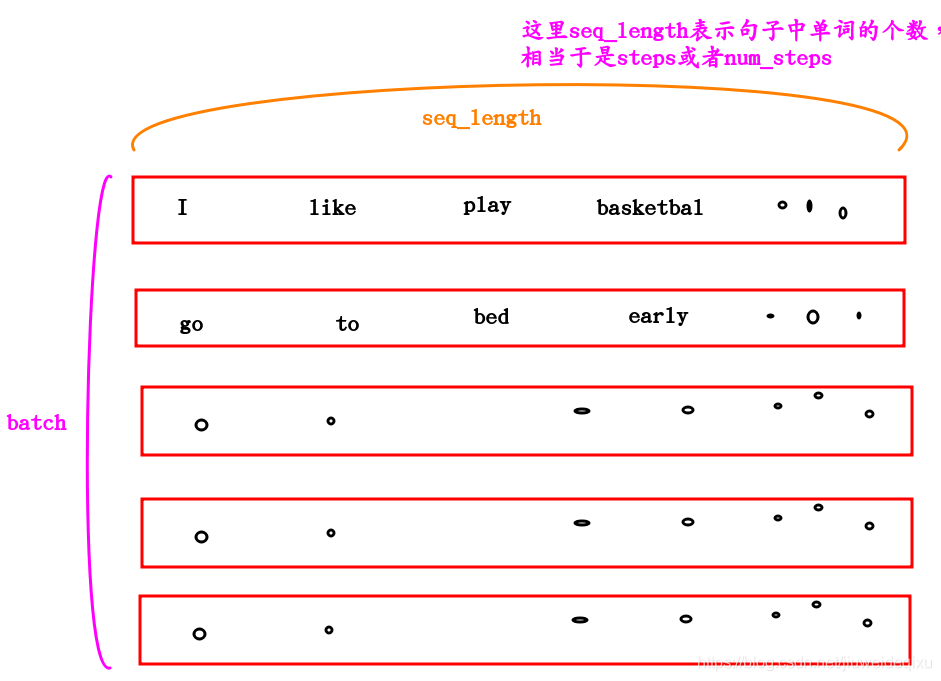
为了便于理解,下面是一幅图:

二、GRU返回的数据
输出有两个,分别是output和h_n
①output
output 的shape是:(seq_len, batch, num_directions * hidden_size): tensor containing the output features h_t from the last layer of the GRU, for each t.
If a class:torch.nn.utils.rnn.PackedSequence has been given as the input, the output will also be a packed sequence.
For the unpacked case, the directions can be separated using output.view(seq_len, batch, num_directions, hidden_size), with forward and backward being direction 0 and 1 respectively.
Similarly, the directions can be separated in the packed case.
②h_n
h_n的shape是:(num_layers * num_directions, batch, hidden_size): tensor containing the hidden state for t = seq_len
Like output, the layers can be separated using
h_n.view(num_layers, num_directions, batch, hidden_size).
三、代码示例
数据的shape是[batch,seq_len,emb_dim]
RNN接收输入的数据的shape是[seq_len,batch,emb_dim]
即前两个维度调换就行了。

可以知道,加入批处理的时候一次处理128个句子,每个句子中有5个单词,那么上图中展示的input_data的shape是:[128,5,emb_dim]。
结合代码分析,本例子将演示有1个句子和5个句子的情况。假设每个句子中有9个单词,所以seq_len=9,并且每个单词对应的emb_dim=3,所以对应数据的shape是: [batch,9,3],由于输入到RNN中数据格式的格式,所以为[9,batch,3]
import torch
import torch.nn as nn

emb_dim = 3
hidden_dim = 2
rnn = nn.GRU(emb_dim,hidden_dim)
#rnn = nn.GRU(9,1,3)
print(type(rnn))

tensor1 = torch.tensor([[-0.5502, -0.1920, 1.1845],
[-0.8003, 2.0783, 0.0175],
[ 0.6761, 0.7183, -1.0084],
[ 0.9514, 1.4772, -0.2271],
[-1.0146, 0.7912, 0.2003],
[-0.5502, -0.1920, 1.1845],
[-0.8003, 2.0783, 0.0175],
[ 0.1718, 0.1070, 0.4255],
[-2.6727, -1.5680, -0.8369]])

tensor2 = torch.tensor([[-0.5502, -0.1920]])

# 假设input只有一个句子,那么batch为1
print('--------------batch=1时------------')
data = tensor1.unsqueeze(0)
h_0 = tensor2[0].unsqueeze(0).unsqueeze(0)
print('data.shape: [batch,seq_len,emb_dim]',data.shape)
print('')
input = data.transpose(0,1)
print('input.shape: [seq_len,batch,emb_dim]',input.shape)
print('h_0.shape: [1,batch,hidden_dim]',h_0.shape)
print('')
# 输入到rnn中
output,h_n = rnn(input,h_0)
print('output.shape: [seq_len,batch,hidden_dim]',output.shape)
print('h_n.shape: [1,batch,hidden_dim]',h_n.shape)

# 假设input中有5个句子,所以,batch = 5
print('\n--------------batch=5时------------')
data = tensor1.unsqueeze(0).repeat(5,1,1) # 由于batch为5
h_0 = tensor2[0].unsqueeze(0).repeat(1,5,1) # 由于batch为5
print('data.shape: [batch,seq_len,emb_dim]',data.shape)
print('')
input = data.transpose(0,1)

print('input.shape: [seq_len,batch,emb_dim]',input.shape)
print('h_0.shape: [1,batch,hidden_dim]',h_0.shape)
print('')
# 输入到rnn中
output,h_n = rnn(input,h_0)
print('output.shape: [seq_len,batch,hidden_dim]',output.shape)
print('h_n.shape: [1,batch,hidden_dim]',h_n.shape)
四、输出
<class ‘torch.nn.modules.rnn.GRU’>
--------------batch=1时------------
data.shape: [batch,seq_len,emb_dim] torch.Size([1, 9, 3])input.shape: [seq_len,batch,emb_dim] torch.Size([9, 1, 3])
h_0.shape: [1,batch,hidden_dim] torch.Size([1, 1, 2])output.shape: [seq_len,batch,hidden_dim] torch.Size([9, 1, 2])
h_n.shape: [1,batch,hidden_dim] torch.Size([1, 1, 2])--------------batch=5时------------
data.shape: [batch,seq_len,emb_dim] torch.Size([5, 9, 3])input.shape: [seq_len,batch,emb_dim] torch.Size([9, 5, 3])
h_0.shape: [1,batch,hidden_dim] torch.Size([1, 5, 2])output.shape: [seq_len,batch,hidden_dim] torch.Size([9, 5, 2])
h_n.shape: [1,batch,hidden_dim] torch.Size([1, 5, 2])
总结
以上为个人经验,希望能给大家一个参考,也希望大家多多支持脚本之家。
相关文章

Python环境搭建以及Python与PyCharm安装详细图文教程
PyCharm是一种PythonIDE,带有一整套可以帮助用户在使用Python语言开发时提高其效率的工具,这篇文章主要给大家介绍了关于Python环境搭建以及Python与PyCharm安装的详细图文教程,需要的朋友可以参考下2024-03-03
python 解决动态的定义变量名,并给其赋值的方法(大数据处理)
今天小编就为大家分享一篇python 解决动态的定义变量名,并给其赋值的方法(大数据处理),具有很好的参考价值,希望对大家有所帮助。一起跟随小编过来看看吧2018-11-11


最新评论