vue中el-table合并列的具体实现
更新时间:2023年04月20日 09:42:45 作者:水冗水孚
本文主要介绍了vue中el-table合并列的具体实现,文中通过示例代码介绍的非常详细,对大家的学习或者工作具有一定的参考学习价值,需要的朋友们下面随着小编来一起学习学习吧
问题描述
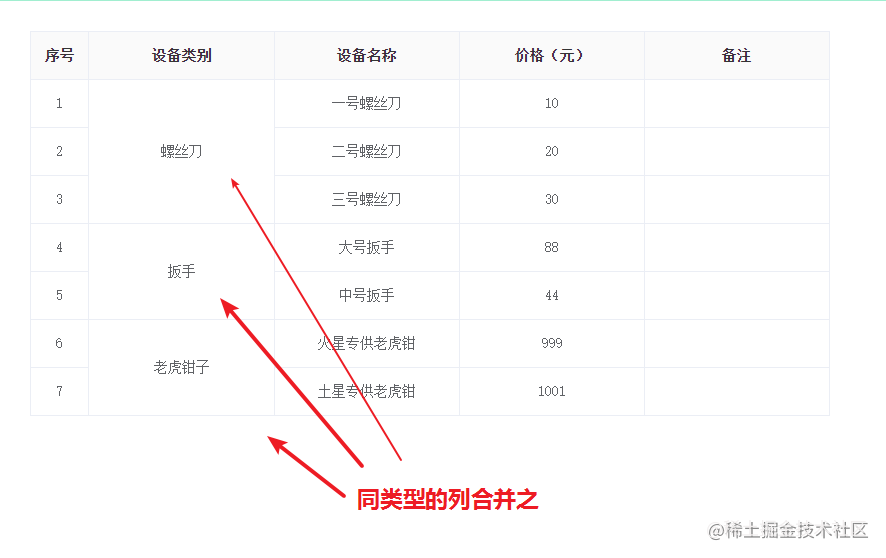
有时候,产品让我们做的表格,会有合并列的功能,但是官方的demo略有不清晰,本文举个例子简述之。我们先看下效果图:

假设产品的需求是这样的:设备类别那一列,同类的,做成分堆形式,也就是合并列形式
分析
分析写在代码注释中里面哦
方式一 计算以后再合并
<template>
  <div class="vueWrap">
    <el-table
      :span-method="objectSpanMethod"
      style="width: 800px"
      :data="tableBody"
      border
      :header-cell-style="{
        background: '#FAFAFA',
        color: '#333333',
        fontWeight: 'bold',
        fontSize: '14px',
      }"
    >
      <el-table-column
        type="index"
        label="序号"
        width="58"
        align="center"
      ></el-table-column>
      <el-table-column
        prop="toolsKinds"
        label="设备类别"
        align="center"
      ></el-table-column>
      <el-table-column prop="toolsName" label="设备名称" align="center"></el-table-column>
      <el-table-column prop="price" label="价格(元)" align="center"></el-table-column>
      <el-table-column prop="remark" label="备注" align="center"></el-table-column>
    </el-table>
  </div>
</template>

<script>
export default {
  data() {
    return {
      // 表体数据
      tableBody: [
        {
          toolsKinds: "螺丝刀",
          toolsName: "一号螺丝刀",
          price: 10,
          remark: "",
        },
        {
          toolsKinds: "螺丝刀",
          toolsName: "二号螺丝刀",
          price: 20,
          remark: "",
        },
        {
          toolsKinds: "螺丝刀",
          toolsName: "三号螺丝刀",
          price: 30,
          remark: "",
        },
        {
          toolsKinds: "扳手",
          toolsName: "大号扳手",
          price: 88,
          remark: "",
        },
        {
          toolsKinds: "扳手",
          toolsName: "中号扳手",
          price: 44,
          remark: "",
        },
        {
          toolsKinds: "老虎钳子",
          toolsName: "火星专供老虎钳",
          price: 999,
          remark: "",
        },
        {
          toolsKinds: "老虎钳子",
          toolsName: "土星专供老虎钳",
          price: 1001,
          remark: "",
        },
      ],
      cellList: [], // 单元格数组
      count: null, // 计数
    };
  },
  mounted() {
    // 第1步,根据表体信息,计算合并单元格的信息
    this.computeCell(this.tableBody);
  },
  methods: {
    computeCell(tableBody) {
      // 循环遍历表体数据
      for (let i = 0; i < tableBody.length; i++) {
        if (i == 0) {
          // 先设置第一项
          this.cellList.push(1); // 初为1,若下一项和此项相同,就往cellList数组中追加0
          this.count = 0; // 初始计数为0
          console.log("索引", 0, this.count);
        } else {
          // 判断当前项与上项的设备类别是否相同,因为是合并这一列的单元格
          if (tableBody[i].toolsKinds == tableBody[i - 1].toolsKinds) {
            // 如果相等
            this.cellList[this.count] += 1; // 增加计数
            this.cellList.push(0); // 相等就往cellList数组中追加0
            console.log("索引", i, this.count);
          } else {
            this.cellList.push(1); // 不等就往cellList数组中追加1
            this.count = i; // 将索引赋值为计数
            console.log("索引", i, this.count);
          }
        }
      }
    },
    // 第2步,将计算好的结果返回给el-table,这样的话表格就会根据这个结果做对应合并列渲染
    objectSpanMethod({ row, column, rowIndex, columnIndex }) {
      // 给第二列做单元格合并。0是第一列,1是第二列。
      if (columnIndex === 1) {
        console.log("单元格数组,若下一项为0,则代表合并上一项", this.cellList);
        const rowCell = this.cellList[rowIndex];
        if (rowCell > 0) {
          const colCell = 1;
          console.log(`动态竖向合并单元格, 第${colCell}列,竖向合并${rowCell}个单元格 `);
          return {
            rowspan: rowCell,
            colspan: colCell,
          };
        } else {
          // 清除原有的单元格,必须要加,否则就会出现单元格会被横着挤到后面了!!!
          // 本例中数据是写死的不会出现,数据若是动态后端获取的,就会出现了!!!
          return {
            rowspan: 0,
            colspan: 0,
          };
        }
      }
    },
  },
};
</script>
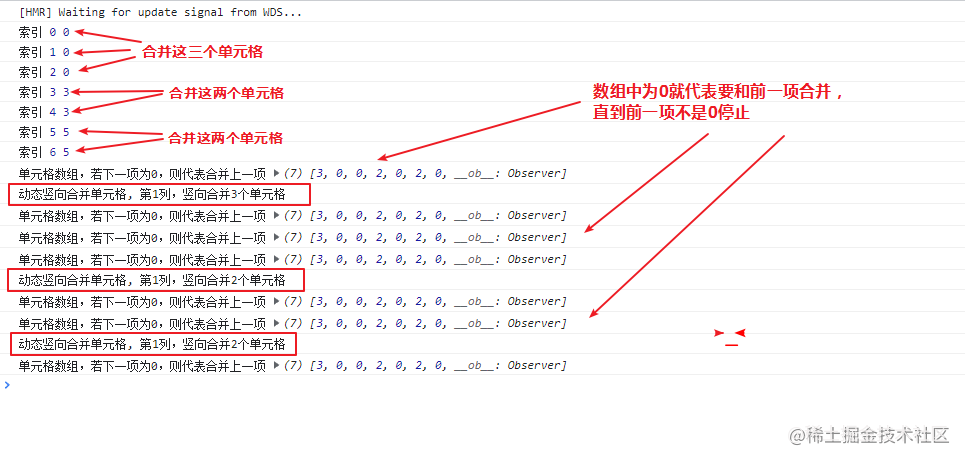
打印截图
注意打印的结果

方式二 直接合并(更直观的做法)
适用于固定的数据,比如年度、季度等...
<template>
  <div id="kkk">
    <el-table
      :data="tableData"
      :span-method="objectSpanMethod"
      border
      style="width: 100%"
    >
      <el-table-column type="index" label="序号" width="50"> </el-table-column>
      <el-table-column prop="type" label="设备类别" align="center">
      </el-table-column>
      <el-table-column prop="mcName" label="设备名称" align="center">
      </el-table-column>
      <el-table-column prop="price" label="价格" align="center">
      </el-table-column>
    </el-table>
  </div>
</template>

<script>
export default {
  data() {
    return {
      tableData: [
        {
          type: "螺丝刀",
          mcName: "一号螺丝刀",
          price: "10",
        },
        {
          type: "螺丝刀",
          mcName: "二号螺丝刀",
          price: "20",
        },
        {
          type: "螺丝刀",
          mcName: "三号螺丝刀",
          price: "30",
        },
        {
          type: "扳手",
          mcName: "大号扳手",
          price: "88",
        },
        {
          type: "扳手",
          mcName: "中号扳手",
          price: "44",
        },
        {
          type: "老虎钳子",
          mcName: "火星专供",
          price: "999",
        },
        {
          type: "老虎钳子",
          mcName: "土星专供",
          price: "1001",
        },
      ],
    };
  },
  methods: {
    /**
     * 1. 若是objectSpanMethod不返回任何东西,表格不会变化
     * 2. 最外层的判断一般是,先从第几列开始合并
     * 3. 这次从第0行合并2个,下次就要从第3行开始合并(0行加俩,就到3行了)
     * 4. 这种方式是有多少条数据,合并多少条数据,比如本案例中有7条数据(从第0条合并到第7条)
     * 5. return { rowspan: 0, colspan: 0 } // 表示不合并
     * */
    objectSpanMethod({ row, column, rowIndex, columnIndex }) {
      console.log("rowIndex", rowIndex);
      // 准备在第二列进行合并操作
      if (columnIndex == 1) {
        // 从第0行进行合并
        if (rowIndex == 0) {
          return {
            rowspan: 3, // 合并3行
            colspan: 1, // 合并1列(当前列)
          };
        }
        if (rowIndex == 3) {
          return {
            rowspan: 2, // 合并2行
            colspan: 1, // 合并1列
          };
        }
        if (rowIndex == 5) {
          return {
            rowspan: 2, // 合并1行
            colspan: 1, // 合并1列
          };
        }
      }
    },
  },
};
</script>
到此这篇关于vue中el-table合并列的具体实现的文章就介绍到这了,更多相关vue el-table合并列内容请搜索脚本之家以前的文章或继续浏览下面的相关文章希望大家以后多多支持脚本之家!
您可能感兴趣的文章:
- Vue3中el-table表格数据不显示的原因和解决方法
- vue el-table实现动态添加行和列具体代码
- Vue+EleMentUI实现el-table-colum表格select下拉框可编辑功能实例
- Vue动态设置el-table操作列的宽度自适应
- vue element-ui实现el-table表格多选以及回显方式
- Vue element el-table-column中对日期进行格式化方式(全局过滤器)
- Vue中如何合并el-table第一列相同数据
- vue element-ui el-table组件自定义合计(summary-method)的坑
- el-table 选择框根据条件设置某项不可选中的操作代码


最新评论