PHP验证码函数代码(简单实用)
更新时间:2013年09月29日 16:44:27 作者:
这篇文章主要分享了php中简单的验证码函数实现代码,代码比较短,但效果却不错,喜欢的朋友可以试试
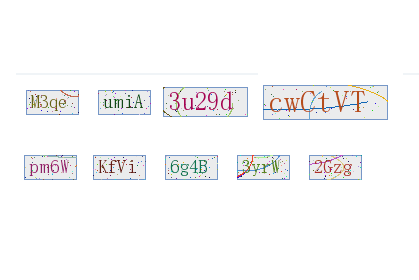
效果图:

<?php
/**
* vCode(m,n,x,y) m个数字 显示大小为n 边宽x 边高y
* micxp
*jb51.net
*/
session_start();
vCode(4, 15); //4个数字,显示大小为15
function vCode($num = 4, $size = 20, $width = 0, $height = 0) {
!$width && $width = $num * $size * 4 / 5 + 5;
!$height && $height = $size + 10;
// 去掉了 0 1 O l 等
$str = "23456789abcdefghijkmnpqrstuvwxyzABCDEFGHIJKLMNPQRSTUVW";
$code = '';
for ($i = 0; $i < $num; $i++) {
$code .= $str[mt_rand(0, strlen($str)-1)];
}
// 画图像
$im = imagecreatetruecolor($width, $height);
// 定义要用到的颜色
$back_color = imagecolorallocate($im, 235, 236, 237);
$boer_color = imagecolorallocate($im, 118, 151, 199);
$text_color = imagecolorallocate($im, mt_rand(0, 200), mt_rand(0, 120), mt_rand(0, 120));
// 画背景
imagefilledrectangle($im, 0, 0, $width, $height, $back_color);
// 画边框
imagerectangle($im, 0, 0, $width-1, $height-1, $boer_color);
// 画干扰线
for($i = 0;$i < 5;$i++) {
$font_color = imagecolorallocate($im, mt_rand(0, 255), mt_rand(0, 255), mt_rand(0, 255));
imagearc($im, mt_rand(- $width, $width), mt_rand(- $height, $height), mt_rand(30, $width * 2), mt_rand(20, $height * 2), mt_rand(0, 360), mt_rand(0, 360), $font_color);
}
// 画干扰点
for($i = 0;$i < 50;$i++) {
$font_color = imagecolorallocate($im, mt_rand(0, 255), mt_rand(0, 255), mt_rand(0, 255));
imagesetpixel($im, mt_rand(0, $width), mt_rand(0, $height), $font_color);
}
// 画验证码
@imagefttext($im, $size , 0, 5, $size + 3, $text_color, 'c:\\WINDOWS\\Fonts\\simsun.ttc', $code);
$_SESSION["VerifyCode"]=$code;
header("Cache-Control: max-age=1, s-maxage=1, no-cache, must-revalidate");
header("Content-type: image/png;charset=gb2312");
imagepng($im);
imagedestroy($im);
}
?>

复制代码 代码如下:
<?php
/**
* vCode(m,n,x,y) m个数字 显示大小为n 边宽x 边高y
* micxp
*jb51.net
*/
session_start();
vCode(4, 15); //4个数字,显示大小为15
function vCode($num = 4, $size = 20, $width = 0, $height = 0) {
!$width && $width = $num * $size * 4 / 5 + 5;
!$height && $height = $size + 10;
// 去掉了 0 1 O l 等
$str = "23456789abcdefghijkmnpqrstuvwxyzABCDEFGHIJKLMNPQRSTUVW";
$code = '';
for ($i = 0; $i < $num; $i++) {
$code .= $str[mt_rand(0, strlen($str)-1)];
}
// 画图像
$im = imagecreatetruecolor($width, $height);
// 定义要用到的颜色
$back_color = imagecolorallocate($im, 235, 236, 237);
$boer_color = imagecolorallocate($im, 118, 151, 199);
$text_color = imagecolorallocate($im, mt_rand(0, 200), mt_rand(0, 120), mt_rand(0, 120));
// 画背景
imagefilledrectangle($im, 0, 0, $width, $height, $back_color);
// 画边框
imagerectangle($im, 0, 0, $width-1, $height-1, $boer_color);
// 画干扰线
for($i = 0;$i < 5;$i++) {
$font_color = imagecolorallocate($im, mt_rand(0, 255), mt_rand(0, 255), mt_rand(0, 255));
imagearc($im, mt_rand(- $width, $width), mt_rand(- $height, $height), mt_rand(30, $width * 2), mt_rand(20, $height * 2), mt_rand(0, 360), mt_rand(0, 360), $font_color);
}
// 画干扰点
for($i = 0;$i < 50;$i++) {
$font_color = imagecolorallocate($im, mt_rand(0, 255), mt_rand(0, 255), mt_rand(0, 255));
imagesetpixel($im, mt_rand(0, $width), mt_rand(0, $height), $font_color);
}
// 画验证码
@imagefttext($im, $size , 0, 5, $size + 3, $text_color, 'c:\\WINDOWS\\Fonts\\simsun.ttc', $code);
$_SESSION["VerifyCode"]=$code;
header("Cache-Control: max-age=1, s-maxage=1, no-cache, must-revalidate");
header("Content-type: image/png;charset=gb2312");
imagepng($im);
imagedestroy($im);
}
?>
相关文章

windows环境下使用Composer安装ThinkPHP5
本文给大家分享的是在windows环境下使用Composer安装ThinkPHP5的具体步骤和方法,非常的简单实用,有需要的小伙伴可以参考下2018-05-05
Laravel框架实现简单的学生信息管理平台案例【附源码下载】
这篇文章主要介绍了Laravel框架实现简单的学生信息管理平台,结合具体案例形式较为详细的分析了基于Laravel框架的学生信息管理平台路由与控制器相关操作技巧,并附带完整源码供读者下载参考,需要的朋友可以参考下2019-05-05


最新评论