android自定义进度条渐变圆形
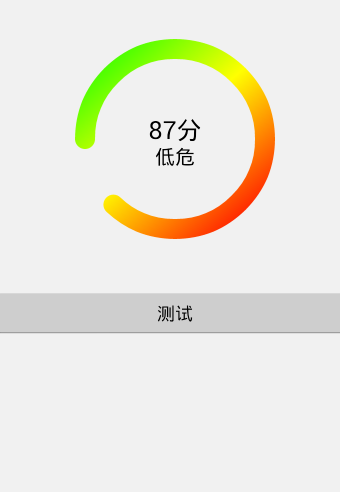
在安全卫生上,经常看到有圆形的进度条在转动,效果非常好看,于是就尝试去实现一下,具体实现过程不多说了,直接上效果图,先炫耀下。
效果图:

分析:比较常见于扫描结果、进度条等场景
利用canvas.drawArc(RectF oval, float startAngle, float sweepAngle, boolean useCenter, Paint paint)绘制圆弧
Paint的一些属性定义粗细、颜色、样式等
LinearGradient实现颜色的线型渐变
同样的道理,可以画出长条进度条,扇图饼图等,感兴趣可以试下..
package com.liujing.progressviewdemo;
/***
 * 自定义圆弧进度条
 *
 * @author liujing
 */
public class ProgressView extends View {
 //分段颜色
 private static final int[] SECTION_COLORS = { Color.GREEN, Color.YELLOW,
 Color.RED };
 private static final String[] ALARM_LEVEL = { "安全", "低危", "中危", "高危" };
 private float maxCount;
 private float currentCount;
 private int score;
 private String crrentLevel;
 private Paint mPaint;
 private Paint mTextPaint;
 private int mWidth, mHeight;
 public ProgressView(Context context, AttributeSet attrs, int defStyleAttr) {
 super(context, attrs, defStyleAttr);
 init(context);
 }
 public ProgressView(Context context, AttributeSet attrs) {
 this(context, attrs, 0);
 }
 public ProgressView(Context context) {
 this(context, null);
 }
 private void init(Context context) {
 mPaint = new Paint();
 mTextPaint = new Paint();
 }
 @Override
 protected void onDraw(Canvas canvas) {
 super.onDraw(canvas);
 initPaint();
 RectF rectBlackBg = new RectF(20, 20, mWidth - 20, mHeight - 20);
 canvas.drawArc(rectBlackBg, 0, 360, false, mPaint);
 mPaint.setColor(Color.BLACK);
 canvas.drawText(score + "分", mWidth / 2, mHeight / 2, mTextPaint);
 mTextPaint.setTextSize(40);
 if (crrentLevel != null) {
 canvas.drawText(crrentLevel, mWidth / 2, mHeight / 2 + 50,
  mTextPaint);
 }
 float section = currentCount / maxCount;
 if (section <= 1.0f / 3.0f) {
 if (section != 0.0f) {
 mPaint.setColor(SECTION_COLORS[0]);
 } else {
 mPaint.setColor(Color.TRANSPARENT);
 }
 } else {
 int count = (section <= 1.0f / 3.0f * 2) ? 2 : 3;
 int[] colors = new int[count];
 System.arraycopy(SECTION_COLORS, 0, colors, 0, count);
 float[] positions = new float[count];
 if (count == 2) {
 positions[0] = 0.0f;
 positions[1] = 1.0f - positions[0];
 } else {
 positions[0] = 0.0f;
 positions[1] = (maxCount / 3) / currentCount;
 positions[2] = 1.0f - positions[0] * 2;
 }
 positions[positions.length - 1] = 1.0f;
 LinearGradient shader = new LinearGradient(3, 3, (mWidth - 3)
  * section, mHeight - 3, colors, null,
  Shader.TileMode.MIRROR);
 mPaint.setShader(shader);
 }
 canvas.drawArc(rectBlackBg, 180, section * 360, false, mPaint);
 }
 private void initPaint() {
 mPaint.setAntiAlias(true);
 mPaint.setStrokeWidth((float) 40.0);
 mPaint.setStyle(Style.STROKE);
 mPaint.setStrokeCap(Cap.ROUND);
 mPaint.setColor(Color.TRANSPARENT);
 mTextPaint.setAntiAlias(true);
 mTextPaint.setStrokeWidth((float) 3.0);
 mTextPaint.setTextAlign(Paint.Align.CENTER);
 mTextPaint.setTextSize(50);
 mTextPaint.setColor(Color.BLACK);
 }
 private int dipToPx(int dip) {
 float scale = getContext().getResources().getDisplayMetrics().density;
 return (int) (dip * scale + 0.5f * (dip >= 0 ? 1 : -1));
 }
 public int getScore() {
 return score;
 }
 public String getCrrentLevel() {
 return crrentLevel;
 }
 public void setCrrentLevel(String crrentLevel) {
 this.crrentLevel = crrentLevel;
 }
 public float getMaxCount() {
 return maxCount;
 }
 public float getCurrentCount() {
 return currentCount;
 }
 public void setScore(int score) {
 this.score = score;
 if (score == 100) {
 this.crrentLevel = ALARM_LEVEL[0];
 } else if (score >= 70 && score < 100) {
 this.crrentLevel = ALARM_LEVEL[1];
 } else if (score >= 30 && score < 70) {
 this.crrentLevel = ALARM_LEVEL[2];
 } else {
 this.crrentLevel = ALARM_LEVEL[3];
 }
 invalidate();
 }
 /***
 * 设置最大的进度值
 *
 * @param maxCount
 */
 public void setMaxCount(float maxCount) {
 this.maxCount = maxCount;
 }
 /***
 * 设置当前的进度值
 *
 * @param currentCount
 */
 public void setCurrentCount(float currentCount) {
 this.currentCount = currentCount > maxCount ? maxCount : currentCount;
 invalidate();
 }
 @Override
 protected void onMeasure(int widthMeasureSpec, int heightMeasureSpec) {
 int widthSpecMode = MeasureSpec.getMode(widthMeasureSpec);
 int widthSpecSize = MeasureSpec.getSize(widthMeasureSpec);
 int heightSpecMode = MeasureSpec.getMode(heightMeasureSpec);
 int heightSpecSize = MeasureSpec.getSize(heightMeasureSpec);
 if (widthSpecMode == MeasureSpec.EXACTLY
 || widthSpecMode == MeasureSpec.AT_MOST) {
 mWidth = widthSpecSize;
 } else {
 mWidth = 0;
 }
 if (heightSpecMode == MeasureSpec.AT_MOST
 || heightSpecMode == MeasureSpec.UNSPECIFIED) {
 mHeight = dipToPx(15);
 } else {
 mHeight = heightSpecSize;
 }
 setMeasuredDimension(mWidth, mHeight);
 }
}
Demo:http://xiazai.jb51.net/201507/yuanma/ProgressViewDemo(jb51.net).rar
以上内容就是实现android自定义进度条渐变圆形的代码,希望对大家有所帮助。
相关文章

Android实战教程第四十篇之Chronometer实现倒计时
这篇文章主要介绍了Android实战教程第四十篇之Chronometer实现倒计时,具有一定的参考价值,感兴趣的小伙伴们可以参考一下2016-11-11
Android利用ContentProvider读取短信内容
这篇文章主要为大家详细介绍了Android利用ContentProvider读取短信内容,文中示例代码介绍的非常详细,具有一定的参考价值,感兴趣的小伙伴们可以参考一下2021-11-11


最新评论