Ajax读取XML实现动态下拉导航
更新时间:2007年02月28日 00:00:00 作者:
根据客户的需要做一个产品的分类的导航菜单,以前使用ASP递归读取的。速度慢,而且消耗大量服务器资源。干脆改成AJAX+XML。共享出来和大家交流。希望各位能帮忙改进。
产品分类的XML文件
//id为自身id,pid为父级分类ID
<?xml version="1.0" encoding="UTF-8" ?>
<Proot>
<Item id="1" pid="0">1321系列</Item>
<Item id="2" pid="1">43223系列</Item>
</Proot>
js代码
var root;
//FireFox不支持selectNodes方法,在网上找到这段代码解决了这个问题。兼容了IE和FireFox.
//创建selectNodes方法
if( document.implementation.hasFeature("XPath", "3.0") )
{
// prototying the XMLDocument
XMLDocument.prototype.selectNodes = function(cXPathString, xNode)
{
if( !xNode ) { xNode = this; }
var oNSResolver = this.createNSResolver(this.documentElement)
var aItems = this.evaluate(cXPathString, xNode, oNSResolver,
XPathResult.ORDERED_NODE_SNAPSHOT_TYPE, null)
var aResult = [];
for( var i = 0; i < aItems.snapshotLength; i++)
{
aResult[i] = aItems.snapshotItem(i);
}
return aResult;
}
// prototying the Element
Element.prototype.selectNodes = function(cXPathString)
{
if(this.ownerDocument.selectNodes)
{
return this.ownerDocument.selectNodes(cXPathString, this);
}
else{throw "For XML Elements Only";}
}
}
function createXMLHttpRequest() {
if (window.ActiveXObject) {
oXmlHttp = new ActiveXObject("Microsoft.XMLHTTP");
}
else if (window.XMLHttpRequest) {
oXmlHttp = new XMLHttpRequest();
}
}
function CreateXMLDOM()
{
createXMLHttpRequest();
oXmlHttp.open( "GET", "XML路径", false ) ;
oXmlHttp.send(null) ;
root = oXmlHttp.responseXML.documentElement;
}
CreateXMLDOM()
function funCreatePullMenu(passPid,ChildId)
{
var currentItems = root.selectNodes("//Proot/Item[@pid = " + passPid + "]");
var iItems = currentItems.length;
var k=0;
if(iItems > 0)
{
var pdiv = document.createElement("DIV");
pdiv.id="piv" + passPid;
pdiv.className = "piv" + ChildId;
pdiv.name = "piv" + passPid;
if(passPid>0)
{
pdiv.style.display="none";
document.getElementById("div" + passPid).appendChild(pdiv);
}
else
{
document.getElementById("odiv").appendChild(pdiv);
}
for(var i = 0; i < iItems; i++)
{
var _id = currentItems[i].attributes[0].value;
var newChild = document.createElement("DIV");
newChild.id="div" + _id;
newChild.className = "div" + ChildId;
newChild.name = "div" + _id;
var _v ;
if(CheckPullMenu(_id))
{
_1= _id
_v = "<a href='javascript:showsubmenu(" + _1 + ")'> " +currentItems[i].firstChild.data + "</a>";
}
else
{
_v = "<a href='ProductList.aspx?type=" + _id + "'>"+ currentItems[i].firstChild.data +"</a>";
}
newChild.innerHTML=_v;
document.getElementById("piv" + passPid).appendChild(newChild);
if(CheckPullMenu(_id))
{
funCreatePullMenu(_id,ChildId+1)
}
}
}
}
//检测是否有下级
function CheckPullMenu(passPid)
{
var currentItems = root.selectNodes("//Proot/Item[@pid = " + passPid + "]");
var iItems = currentItems.length;
if(iItems > 0)
{
return true;
}
else
{
return false;
}
}
//显示隐藏层
function showsubmenu(sid)
{
var whichEl = document.getElementById( "piv" +sid);
if (whichEl.style.display == "none")
{
whichEl.style.display="block";
}
else
{
whichEl.style.display="none";
}
}
使用方法:在网页中加入"<div id="odiv"></div>"。在body加入onload="funCreatePullMenu(0,0)"
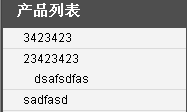
最终效果:

可以在代码中增加定义CSS。达到更好的效果。
原发于:http://www.23mo.com/blog/article.asp?id=16
使用方法:在网页中加入"<div id="odiv"></div>"。在body加入onload="funCreatePullMenu(0,0)"
最终效果:

可以在代码中增加定义CSS。达到更好的效果。
原发于:http://www.23mo.com/blog/article.asp?id=16
产品分类的XML文件
复制代码 代码如下:
//id为自身id,pid为父级分类ID
<?xml version="1.0" encoding="UTF-8" ?>
<Proot>
<Item id="1" pid="0">1321系列</Item>
<Item id="2" pid="1">43223系列</Item>
</Proot>
js代码
复制代码 代码如下:
var root;
//FireFox不支持selectNodes方法,在网上找到这段代码解决了这个问题。兼容了IE和FireFox.
//创建selectNodes方法
if( document.implementation.hasFeature("XPath", "3.0") )
{
// prototying the XMLDocument
XMLDocument.prototype.selectNodes = function(cXPathString, xNode)
{
if( !xNode ) { xNode = this; }
var oNSResolver = this.createNSResolver(this.documentElement)
var aItems = this.evaluate(cXPathString, xNode, oNSResolver,
XPathResult.ORDERED_NODE_SNAPSHOT_TYPE, null)
var aResult = [];
for( var i = 0; i < aItems.snapshotLength; i++)
{
aResult[i] = aItems.snapshotItem(i);
}
return aResult;
}
// prototying the Element
Element.prototype.selectNodes = function(cXPathString)
{
if(this.ownerDocument.selectNodes)
{
return this.ownerDocument.selectNodes(cXPathString, this);
}
else{throw "For XML Elements Only";}
}
}
function createXMLHttpRequest() {
if (window.ActiveXObject) {
oXmlHttp = new ActiveXObject("Microsoft.XMLHTTP");
}
else if (window.XMLHttpRequest) {
oXmlHttp = new XMLHttpRequest();
}
}
function CreateXMLDOM()
{
createXMLHttpRequest();
oXmlHttp.open( "GET", "XML路径", false ) ;
oXmlHttp.send(null) ;
root = oXmlHttp.responseXML.documentElement;
}
CreateXMLDOM()
function funCreatePullMenu(passPid,ChildId)
{
var currentItems = root.selectNodes("//Proot/Item[@pid = " + passPid + "]");
var iItems = currentItems.length;
var k=0;
if(iItems > 0)
{
var pdiv = document.createElement("DIV");
pdiv.id="piv" + passPid;
pdiv.className = "piv" + ChildId;
pdiv.name = "piv" + passPid;
if(passPid>0)
{
pdiv.style.display="none";
document.getElementById("div" + passPid).appendChild(pdiv);
}
else
{
document.getElementById("odiv").appendChild(pdiv);
}
for(var i = 0; i < iItems; i++)
{
var _id = currentItems[i].attributes[0].value;
var newChild = document.createElement("DIV");
newChild.id="div" + _id;
newChild.className = "div" + ChildId;
newChild.name = "div" + _id;
var _v ;
if(CheckPullMenu(_id))
{
_1= _id
_v = "<a href='javascript:showsubmenu(" + _1 + ")'> " +currentItems[i].firstChild.data + "</a>";
}
else
{
_v = "<a href='ProductList.aspx?type=" + _id + "'>"+ currentItems[i].firstChild.data +"</a>";
}
newChild.innerHTML=_v;
document.getElementById("piv" + passPid).appendChild(newChild);
if(CheckPullMenu(_id))
{
funCreatePullMenu(_id,ChildId+1)
}
}
}
}
//检测是否有下级
function CheckPullMenu(passPid)
{
var currentItems = root.selectNodes("//Proot/Item[@pid = " + passPid + "]");
var iItems = currentItems.length;
if(iItems > 0)
{
return true;
}
else
{
return false;
}
}
//显示隐藏层
function showsubmenu(sid)
{
var whichEl = document.getElementById( "piv" +sid);
if (whichEl.style.display == "none")
{
whichEl.style.display="block";
}
else
{
whichEl.style.display="none";
}
}
使用方法:在网页中加入"<div id="odiv"></div>"。在body加入onload="funCreatePullMenu(0,0)"
最终效果:

可以在代码中增加定义CSS。达到更好的效果。
原发于:http://www.23mo.com/blog/article.asp?id=16
使用方法:在网页中加入"<div id="odiv"></div>"。在body加入onload="funCreatePullMenu(0,0)"
最终效果:

可以在代码中增加定义CSS。达到更好的效果。
原发于:http://www.23mo.com/blog/article.asp?id=16
相关文章

Ajax请求响应中用window.open打开新窗口被拦截的解决方法
ajax 异步请求成功后需要新开窗口打开 url,使用的是 window.open() 方法,但是会被浏览器给拦截,怎么解决呢,下面小编给大家解答下2016-08-08


最新评论