CentOS系统上安装配置Oracle数据库的详细教程
一.基本配置
1.硬盘剩余空间:10G以上
虽然Oracle 10g的安装文件只有800多MB,但安装后的oracle+oraInventory目录会用差不多4G空间,再加上安装时Oracle生成的临时文件(/tmp目录需要至少400MB)。
2.内存1.5G以上
官方文档说512M内存也可以安装。为了避免不必要的麻烦,请把内存加多一些。
3.Swap交换区2G
二.CenOS6 上安装Oracle 10g
1.准备安装
在安装Oracle之前执行以下命令:
yum install yum-fastestmirror -y
yum install compat-db*
yum install compat-libc*
yum install compat-gcc*
yum install libXp.so.6
yum install libc-*
yum install libaio*
yum install openmotif
yum install glibc-devel*
yum install libgcc*
yum install gnome-lib*
2.安装包解压
[root@localhost ~]# cpio -idmv > 10201_database_linux_x86_64.cpio
3.创建 Oracle 组和用户帐户
创建用于安装和维护Oracle 10g 软件的账户。用户帐户将称为oracle,而组将称为oracleinstall和oracle。以root用户身份执行以下命令:
[root@localhost ~]# groupadd oracleinstall
[root@localhost ~]# groupadd oracle
[root@localhost ~]# useradd -m -g oracleinstall-G oracle oracle
[root@localhost ~]# id oracle
uid=501(oracle) gid=501(oracleinstall) groups=501(oracleinstall),502(oracle)
设置oracle帐户的口令
[root@localhost ~]# passwd oracle
Changing password for user oracle.
New password:
Retype new password:passwd:all authentication tokens updated successfully.
4.创建目录
创建Oracle 10g及其数据库文件的目录,以root用户身份执行以下命令:
[root@localhost ~]# mkdir -p /oracledata/oracle
[root@localhost ~]# mkdir -p /oracledata/oradata
[root@localhost ~]# chown -R oracle:oracleinstall /oracledata/oracle /oracledata/oradata
[root@localhost ~]# chmod -R 775 /oracledata/oracle /oracledata/oradata
5.修改内核参数
安装Oracle 10g需修改内核参数,否则安装检测时会报Failed,甚至导致安装时出现Error。以root身份执行以下命令:
cat >> /etc/sysctl.conf <<EOF
kernel.shmall = 2097152
kernel.shmmax = 2147483648
kernel.shmmni = 4096
kernel.sem = 250 32000 100 128
fs.file-max = 65536
net.ipv4.ip_local_port_range = 1024 65000
net.core.rmem_default = 262144
net.core.rmem_max = 262144
net.core.wmem_default = 262144
net.core.wmem_max = 262144
EOF
如果检查没有问题后,即可以开始装Oralce 10g。
6.安装Oracle 10g
(1)先以oracle用户身份登陆XWindow。因为oracle安装会弹出界面让你配置,如果使用putty登陆安装的话,你是没有办法操作弹出框的,所以一定要登录XWindow,然后在Terminal里启动安装程序。
(2)如果你的系统语言为中文,请把他设置为英文,否则安装的时候会出现乱码。
(3)Terminal中启动Oracle 10g安装程序:
[oracle@www/]$ ./Oracle/database/runInstaller
如果一切正常,界面会弹出如下对话框:
如果在Terminal启动runInstaller时遇到“Checking operating system version: must be redhat-2.1, redhat-3, SuSE-9, SuSE-8 or UnitedLinux-1.0 Failed ”这种问题,表明oracle不能识别你的系统内核,这个问题可以通过修改内核配置文件解决,如下:
cat > /etc/redhat-release << EOF
Red Hat Enterprise Linux AS release 3 (Taroon)
EOF
7.Oracle 10g安装配置
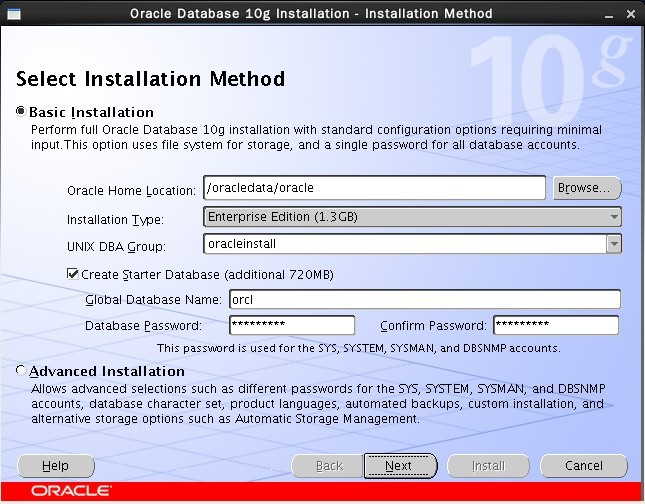
修改Oralce Home Localtion,填写database password后,按“Next”。如图:
8.数据库配置
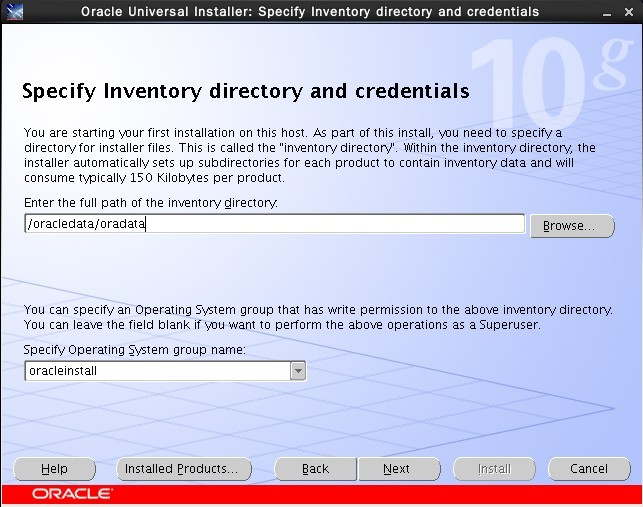
修改Inventory directory,Specify Operating System group name选:oracleinstall,然后“Next”,如图:
9.Oracle安装前检查
检查一下有什么不符合安装要求,看是否需要修改配置,如果按照上面步骤下来,这里的warning应该为0,然后“Next”。如果有警告可以搜下是什么问题。
10.Install Oracle 10g
直接按“Install”。在软件安装完成之后,会自动进行Configuration Assistant的配置。
11.以root权限运行脚本
当iSQL*Plus Configuration Assistant配置完成时,会弹出一下框,里面有两个Srcipt需要你用root权限运行。
在Terminel中以root权限执行以上两个脚本:
[root@www oradata]# ./orainstRoot.sh
Changing permissions of /oracledata/oradata to 770.
Changing groupname of /oracledata/oradata to oracleinstall.
The execution of the script is complete
[root@www oracle]# ./root.sh
Running Oracle10 root.sh script...

The following environment variables are set as:
 ORACLE_OWNER= oracle
 ORACLE_HOME= /oracledata/oracle

Enter the full pathname of the local bin directory: [/usr/local/bin]:
 Copying dbhome to /usr/local/bin ...
 Copying oraenv to /usr/local/bin ...
 Copying coraenv to /usr/local/bin ...


Creating /etc/oratab file...
Entries will be added to the /etc/oratab file as needed by
Database Configuration Assistant when a database is created
Finished running generic part of root.sh script.
Now product-specific root actions will be performed.
然后按界面中的“OK”。
至此Oracle 10g安装完成。按“Exit”退出安装。
三、一些常见的错误
1.[INS-06101] IP address of localhost could not be determined
图如下:
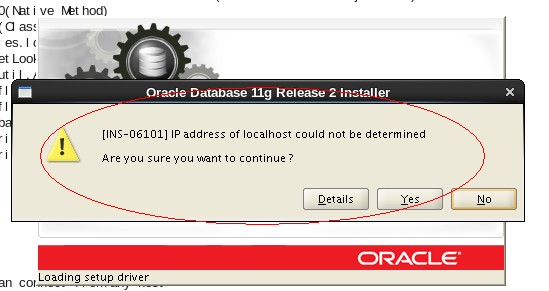
解决方法:是因为你的主机名与IP地址不一至,在/etc/hosts文件对应就行了
    vim /etc/hosts
     IP地址 主机名
2.at Oracle.install.ivwdb.dirver.DBinstaller.main(DBinstaller.java:132)
图如下:
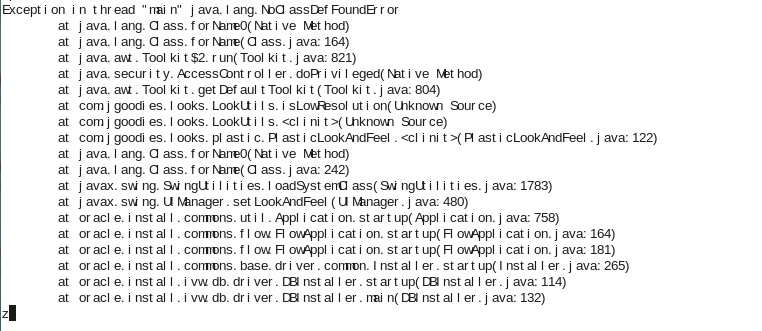
解决方法:在root用户终端下执行xhost +就行了
3.Error in invoking target 'client_sharedlib' of makefile '/oracle/u01/app/oracle/product/10.2.0/db_1/network/lib/ins_net_client.mk'
图如下:
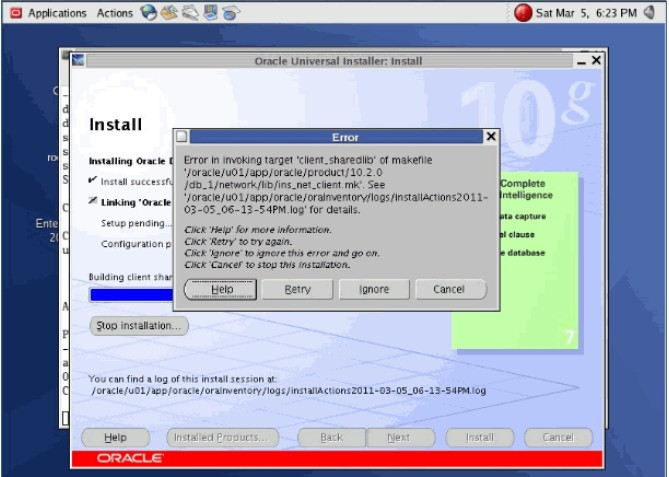
解决方法:查看oracle是多少位的系统,一般32位系统装32位oracle软件,64位系统可以装32位和64位的oracle。打开下载oracle的软件包,里面有一个网页,打开那个网页就可以看到。
4.查看监听(lsnrctl)或者是命令(sqlplus)提示:
-bash: lsnrctl: command not found
图如下:

解决方法:查找oracle的命令安装目录,我的是(/home/oracle/app/oracle/product/11.2.0/dbhome_1/bin)添加到环境变量中。
vim ~/.bash_profile
--是oracle用户根目录的文件,修改这一行
export PATH=$PATH:/home/oracle/app/oracle/product/11.2.0/dbhome_1/bin
source ~/.bash_profile
--配置文件生效
- centos7下安装oracle11gR2的详细步骤
- centos 6.5下安装oracle 11gR2与Oracle自动启动的配置
- Linux下安装Oracle(CentOS-Oracle 12c)的方法
- CentOS命令行下装oracle 12c的方法(命令行模式安装)
- CentOS下PHP安装Oracle扩展
- CentOS6.2上安装Oracle10g报ins_emdb.mk错误处理方法
- CentOS 6.3下安装部署Oracle服务器图文教程
- Linux+php+apache+oracle环境搭建之CentOS下安装Oracle数据库
- Linux+php+apache+oracle环境搭建之CentOS下源码编译安装PHP
- centos下Oracle11G图文安装教程
相关文章

如何解决Oracle EBS R12 - 以Excel查看输出格式为“文本”的请求时乱码
这篇文章主要介绍了如何解决Oracle EBS R12 - 以Excel查看输出格式为“文本”的请求时乱码的相关资料,需要的朋友可以参考下2015-09-09
Oracle密码过期如何取消密码180天限制及密码180天过期,账号锁住的问题
这篇文章主要介绍了Oracle密码过期如何取消密码180天限制及密码180天过期,账号锁住的问题,需要的朋友可以参考下2018-12-12


最新评论