Android开发方式之Java+html+javascript混合开发
android开发,除了使用原生态的开发方式之外,还可以使用java+html+javascript混合开发的方式来开发,这样可以节省大量的开发时间,同时还可以使不同设备的用户获得相同的用户体验。好了,废话不多说,先来看看今天要做什么。
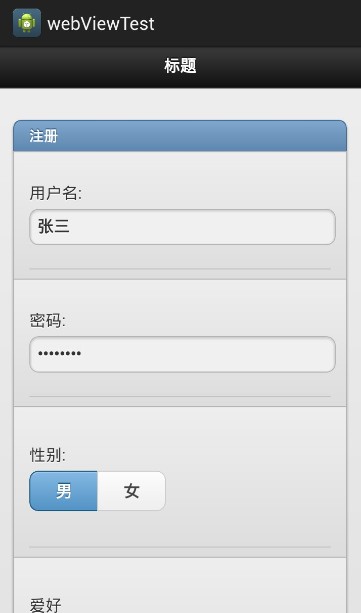
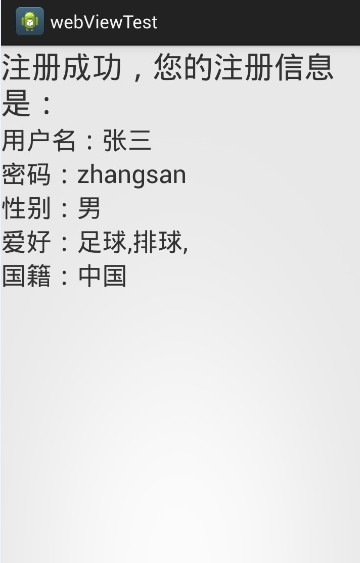
主要是实现一个简单的注册功能,先用jquery mobile的方式写一个简单的注册页面,点击提交按钮之后跳转到一个新的activity中,同时把用户的注册信息显示出来,整体效果如下图:

这个页面完全用html+jquery写成,它的最下面有一个提交按钮,点击提交按钮之后该页面的所有注册信息传递到下一个activity中。

这个界面是完全用android原生态的方式来开发。ok,下面一步一步来说。
新建一个名叫webViewTest的工程,在assets文件夹中新建一个文件叫做index.html,index.html文件代码如下:
<!doctype html>
<html>
<head>
<meta charset="utf-8">
<title>无标题文档</title>
<link href="http://code.jquery.com/mobile/1.0/jquery.mobile-1.0.min.css" rel="stylesheet" type="text/css">
<script src="http://code.jquery.com/jquery-1.6.4.min.js" type="text/javascript"></script>
<script src="http://code.jquery.com/mobile/1.0/jquery.mobile-1.0.min.js" type="text/javascript"></script>
</head>

<body>
<script>
 $(function(){
  $("#commit").click(function(){
   var result = "{";
   result +="\"username\":\"";
   result +=$("#username").val();

   result +="\",\"password\":\"";
   result +=$("#password").val();

   result += "\",\"gender\":\"";
   result += $('input[name="radio1"]:checked').val();

   result += "\",\"interest\":\"";
   $('input[name="checkbox1"]:checked').each(function() {
    result += $(this).val()+",";
   });

   result += "\",\"country\":\"";
   result += $("#selectmenu option:selected").text()+"\"}";
   register_js.register(result);
   });

  });
</script>
<div data-role="page" id="page">
 <div data-role="header">
 <h1>标题</h1>
 </div>
 <div data-role="content">
 <ul data-role="listview" data-inset="true">
  <li data-role="list-divider">
  注册
  </li>
  <li>
   <div data-role="fieldcontain">
   <label for="username">用户名:</label>
   <input type="text" name="textinput" id="username" value="张三" />
   </div></li><li>
   <div data-role="fieldcontain">
   <label for="password">密码:</label>
   <input type="password" name="textinput" id="password" value="zhangsan" />
   </div></li><li>
   <div data-role="fieldcontain">
   <fieldset data-role="controlgroup" data-type="horizontal">
    <legend>性别:</legend>
    <input type="radio" name="radio1" id="man" value="0" />
    <label for="man">男</label>
    <input type="radio" name="radio1" id="woman" value="1" />
    <label for="woman">女</label>
   </fieldset>
   </div></li><li>
   <div data-role="fieldcontain">
   <fieldset data-role="controlgroup" data-type="horizontal">
    <legend>爱好</legend>
    <input type="checkbox" name="checkbox1" id="football" class="custom" value="0" />
    <label for="football">足球</label>
    <input type="checkbox" name="checkbox1" id="basketball" class="custom" value="1" />
    <label for="basketball">篮球</label>
    <input type="checkbox" name="checkbox1" id="vollyball" class="custom" value="2" />
    <label for="vollyball">排球</label>
   </fieldset>
   </div>
  </li>
  <li>
   <div data-role="fieldcontain">
   <label for="selectmenu" class="select">国籍:</label>
   <select name="selectmenu" id="selectmenu">
    <option value="China">中国</option>
    <option value="America">美国</option>
    <option value="Japan">小日本</option>
   </select>
   </div>

  </li>
  <li>
   <button id="commit">提交</button>

  </li>
 </ul>
 </div>
 <div data-role="footer" data-position="fixed">
 <h4>脚注</h4>
 </div>
</div>
</body>
</html>
这里全部都是jquerymobile的知识,前面三行是引用jquery和jquerymobile的js文件以及jqueryMobile的css样式文件。当点击button时,执行js代码,js代码获取每一项的值,同时拼凑成一个json字符串,然后执行register_js.register(result);方法,这是一个什么方法呢?这是一会加载这个html的activity中的一个名叫register的方法,result是这个方法的参数,至于前面为什么是register_js,我们一会再说。
再看看加载这个html的activity长什么样子,先看看它的布局文件:
<LinearLayout xmlns:android="http://schemas.android.com/apk/res/android"
 xmlns:tools="http://schemas.android.com/tools"
 android:layout_width="match_parent"
 android:layout_height="match_parent"
 android:orientation="vertical"
 tools:context="com.example.webviewtest.MainActivity" >

 <WebView
  android:id="@+id/wv1"
  android:layout_width="match_parent"
  android:layout_height="wrap_content"
  />

</LinearLayout>
它的布局文件中就一个控件,webView.
再来看看Java代码:
package com.example.webviewtest;

import android.app.Activity;
import android.content.Intent;
import android.os.Bundle;
import android.webkit.WebView;

public class MainActivity extends Activity {

 private WebView wv;
 @Override
 protected void onCreate(Bundle savedInstanceState) {
  super.onCreate(savedInstanceState);
  setContentView(R.layout.activity_main);

  wv = (WebView) this.findViewById(R.id.wv1);
  wv.getSettings().setJavaScriptEnabled(true);
  wv.loadUrl("file:///android_asset/index.html");
  wv.addJavascriptInterface(this, "register_js");
 }

 public void register(String userInfo){
  Intent intent = new Intent(MainActivity.this,RegisterActivity.class);
  intent.putExtra("userinfo", userInfo);
  this.startActivity(intent);
 }
}
先拿到一个webview,然后wv.getSettings().setJavaScriptEnabled(true);表示允许执行js代码,wv.loadUrl("file:///android_asset/index.html");表示把刚才的html文件加载进来,注意文件路径,项目中是assets文件夹,并不是android_assets,wv.addJavascriptInterface(this, "register_js");表示创建一个对象传递给webview,作为js对象,这里把这个activity传递给webview,名称叫做register_js,所以在js中执行这个activity中的方法时前面要加上register_js,当然,你可以传递任何一个类的实例作为js对象,这样就可以在js中调用该类的方法了。public void register(String userInfo)方法就是点击html中的提交按钮时执行的方法了,该方法跳转将执行跳转到另一个activity中,并携带用户注册数据。
再来看看registerActivity的布局文件:
<LinearLayout xmlns:android="http://schemas.android.com/apk/res/android"
 xmlns:tools="http://schemas.android.com/tools"
 android:layout_width="match_parent"
 android:layout_height="match_parent"
 android:orientation="vertical"
 tools:context="com.example.webviewtest.MainActivity" >

 <TextView
  android:layout_width="match_parent"
  android:layout_height="wrap_content"
  android:text="注册成功,您的注册信息是:"
  android:textSize="30dp"
  />
 <LinearLayout
  android:layout_width="match_parent"
  android:layout_height="wrap_content"
  android:orientation="horizontal" >

  <TextView
   android:layout_width="wrap_content"
   android:layout_height="wrap_content"
   android:text="用户名:"
   android:textSize="25sp" />

  <TextView
   android:id="@+id/username"
   android:layout_width="wrap_content"
   android:layout_height="wrap_content"
   android:textSize="25sp" />
 </LinearLayout>

 <LinearLayout
  android:layout_width="match_parent"
  android:layout_height="wrap_content"
  android:orientation="horizontal" >

  <TextView
   android:layout_width="wrap_content"
   android:layout_height="wrap_content"
   android:text="密码:"
   android:textSize="25sp" />

  <TextView
   android:id="@+id/password"
   android:layout_width="wrap_content"
   android:layout_height="wrap_content"
   android:textSize="25sp" />
 </LinearLayout>

 <LinearLayout
  android:layout_width="match_parent"
  android:layout_height="wrap_content"
  android:orientation="horizontal" >

  <TextView
   android:layout_width="wrap_content"
   android:layout_height="wrap_content"
   android:text="性别:"
   android:textSize="25sp" />

  <TextView
   android:id="@+id/gender"
   android:layout_width="wrap_content"
   android:layout_height="wrap_content"
   android:textSize="25sp" />
 </LinearLayout>

 <LinearLayout
  android:layout_width="match_parent"
  android:layout_height="wrap_content"
  android:orientation="horizontal" >

  <TextView
   android:layout_width="wrap_content"
   android:layout_height="wrap_content"
   android:text="爱好:"
   android:textSize="25sp" />

  <TextView
   android:id="@+id/interest"
   android:layout_width="wrap_content"
   android:layout_height="wrap_content"
   android:textSize="25sp" />
 </LinearLayout>

 <LinearLayout
  android:layout_width="match_parent"
  android:layout_height="wrap_content"
  android:orientation="horizontal" >

  <TextView
   android:layout_width="wrap_content"
   android:layout_height="wrap_content"
   android:text="国籍:"
   android:textSize="25sp" />

  <TextView
   android:id="@+id/country"
   android:layout_width="wrap_content"
   android:layout_height="wrap_content"
   android:textSize="25sp" />
 </LinearLayout>
</LinearLayout>
RegisterActivity的Java代码:
package com.example.webviewtest;

import org.json.JSONException;
import org.json.JSONObject;

import android.app.Activity;
import android.os.Bundle;
import android.widget.TextView;

public class RegisterActivity extends Activity {

 private TextView username, password, interest, country, gender;

 @Override
 protected void onCreate(Bundle savedInstanceState) {
  super.onCreate(savedInstanceState);
  this.setContentView(R.layout.register_activity);
  this.username = (TextView) this.findViewById(R.id.username);
  this.password = (TextView) this.findViewById(R.id.password);
  this.interest = (TextView) this.findViewById(R.id.interest);
  this.country = (TextView) this.findViewById(R.id.country);
  this.gender = (TextView) this.findViewById(R.id.gender);
  String userinfo = this.getIntent().getExtras().getString("userinfo");
  try {
   JSONObject json = new JSONObject(userinfo);
   username.setText(json.getString("username"));
   password.setText(json.getString("password"));
   interest.setText(json.getString("interest").replace("0", "足球")
     .replace("1", "篮球").replace("2", "排球"));
   country.setText(json.getString("country").replace("0", "中国")
     .replace("1", "美国").replace("2", "小日本"));
   gender.setText(json.getString("gender").replace("0", "男")
     .replace("1", "女"));
  } catch (JSONException e) {
   e.printStackTrace();
  }
 }
}
这些都是常规的android开发代码,我就不多解释了。
另外,还要在布局文件中添加以下权限:
<uses-permission android:name="android.permission.CAMERA" />

<uses-permission android:name="android.permission.VIBRATE" />

<uses-permission android:name="android.permission.ACCESS_COARSE_LOCATION" />

<uses-permission android:name="android.permission.ACCESS_FINE_LOCATION" />

<uses-permission android:name="android.permission.ACCESS_LOCATION_EXTRA_COMMANDS" />

<uses-permission android:name="android.permission.READ_PHONE_STATE" />

<uses-permission android:name="android.permission.INTERNET" />

<uses-permission android:name="android.permission.RECEIVE_SMS" />

<uses-permission android:name="android.permission.RECORD_AUDIO" />

<uses-permission android:name="android.permission.MODIFY_AUDIO_SETTINGS" />

<uses-permission android:name="android.permission.READ_CONTACTS" />

<uses-permission android:name="android.permission.WRITE_CONTACTS" />

<uses-permission android:name="android.permission.WRITE_EXTERNAL_STORAGE" />

<uses-permission android:name="android.permission.ACCESS_NETWORK_STATE" />

<uses-permission android:name="android.permission.GET_ACCOUNTS" />
关于混合开发这一块涉及内容太多,我后面会陆续写文介绍。
原文链接:http://blog.csdn.net/u012702547/article/details/45727329
源码下载:http://xiazai.jb51.net/201606/yuanma/webViewTest(jb51.net).rar
以上就是本文的全部内容,希望对大家的学习有所帮助,也希望大家多多支持脚本之家。
- Android webview和js互相调用实现方法
- Android M(6.x)使用OkHttp包解析和发送JSON请求的教程
- Android通过json向MySQL中读写数据的方法详解【读取篇】
- Android通过json向MySQL中读写数据的方法详解【写入篇】
- Android读取本地json文件的方法(解决显示乱码问题)
- Android WebView使用方法详解 附js交互调用方法
- 原生javascript实现分享到朋友圈功能 支持ios和android
- 浅谈Android程序与JavaScript脚本的交互
- Android开发之利用jsoup解析HTML页面的方法
- Android与JS之间跨平台异步调用实例详解
相关文章

Android开发之在程序中时时获取logcat日志信息的方法(附demo源码下载)
这篇文章主要介绍了Android开发之在程序中时时获取logcat日志信息的方法,结合实例形式较为详细的分析了实时获取logcat日志的原理、步骤与相关实现技巧,并附带相应的demo源码供读者下载参考,需要的朋友可以参考下2016-02-02
Android关于BottomNavigationView使用指南
本文主要介绍了Android关于BottomNavigationView使用指南,文中通过示例代码介绍的非常详细,具有一定的参考价值,感兴趣的小伙伴们可以参考一下2022-01-01


最新评论