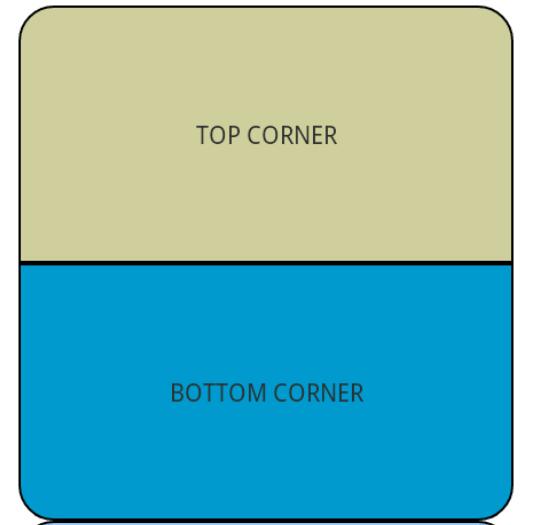
Android布局实现圆角边框效果
首先,在res下面新建一个文件夹drawable,在drawable下面新建三个xml文件:shape_corner_down.xml、shape_corner_up.xml和shape_corner.xml,分别是下面两个角是圆角边框,上面两个角是圆角边框,四个角全部是圆角边框。
shape_corner_down.xml:
<?xml version="1.0" encoding="utf-8"?>

<shape xmlns:android="http://schemas.android.com/apk/res/android">

  <solid android:color="#0099CC" />

  <corners android:bottomRightRadius="20dp"

    android:bottomLeftRadius="20dp"/>

  <stroke android:width="1dp" android:color="#000000"/>

</shape>
shape_corner_up.xml:
<?xml version="1.0" encoding="utf-8"?>
<shape xmlns:android="http://schemas.android.com/apk/res/android">
  <solid android:color="#CCCC99" />
  <corners android:topLeftRadius="20dp"
    android:topRightRadius="20dp" />
  <stroke android:width="1dp" android:color="#000000" />
</shape>
shape_corner.xml:
<?xml version="1.0" encoding="utf-8"?>
<shape xmlns:android="http://schemas.android.com/apk/res/android">
  <solid android:color="#99CCFF" />
  <corners android:topLeftRadius="20dp"
    android:topRightRadius="20dp"
    android:bottomRightRadius="20dp"
    android:bottomLeftRadius="20dp"/>
  <stroke android:width="1dp" android:color="#000000" />
</shape>
<solid android:color>设置了背景颜色。android:topLeftRadius、android:topRightRadius、android:bottomLeftRadius、android:bottomRightRadius分别是左上角、右上角、左下角、右下角的半径值,设置了半径值,相应的角就是圆角,半径值越大,圆角就越大。<stroke>设置边界属性,如边界的宽度、颜色等。
在activity_main.xml上面放置三个LinearLayout,分别设置android:background属性为shape_corner_up.xml、shape_corner_down.xml和shape_corner.xml,运行结果如下:

以上就是本文的全部内容,希望对大家的学习有所帮助,也希望大家多多支持脚本之家。
相关文章

Android LayoutTransiton实现简单的录制按钮
这篇文章主要介绍了Android LayoutTransiton实现简单的录制按钮,主要实现开始,暂停,停止和显示录制时间长度,具有一定的参考价值,感兴趣的小伙伴们可以参考一下2018-06-06
Android列表组件ListView使用详解之动态加载或修改列表数据
今天小编就为大家分享一篇关于Android列表组件ListView使用详解之动态加载或修改列表数据,小编觉得内容挺不错的,现在分享给大家,具有很好的参考价值,需要的朋友一起跟随小编来看看吧2019-03-03
详解Android应用中ListView列表选项栏的编写方法
这篇文章主要介绍了Android应用中ListView列表选项栏的编写方法,讲解了使用安卓自带的ListView与自定义multiple ListView的方法,需要的朋友可以参考下2016-03-03


最新评论