IOS 图文混排(CoreText.framework)详解及实例
更新时间:2016年11月21日 14:40:17 作者:边缘998
这篇文章主要介绍了IOS 图文混排(CoreText.framework)详解及实例的相关资料,这里对IOS 的图文混排进行了详细介绍,并附代码实例,和实现效果图,需要的朋友可以参考下
IOS 图文混排(CoreText.framework)
本文主要介绍了IOS图文混排的资料,这里整理了在网上查找的内容,帮助理解,掌握这部分知识,以下就是整理的内容:
利用CORETEXT进行图文混排。
实现代码:
void RunDelegateDeallocCallback( void* refCon ){

}

CGFloat RunDelegateGetAscentCallback( void *refCon ){
  NSString *imageName = (NSString *)refCon;
  return 80;//[UIImage imageNamed:imageName].size.height;
}

CGFloat RunDelegateGetDescentCallback(void *refCon){
  return 0;
}

CGFloat RunDelegateGetWidthCallback(void *refCon){
  NSString *imageName = (NSString *)refCon;
  return 100;//[UIImage imageNamed:imageName].size.width;
}
先设置一个CTRun的委托,主要是用于指定对象的上行高,宽,或上下文释放时使用。
-(void)drawCharAndPicture
{
  CGContextRef context = UIGraphicsGetCurrentContext();

  CGContextSetTextMatrix(context, CGAffineTransformIdentity);//设置字形变换矩阵为CGAffineTransformIdentity,也就是说每一个字形都不做图形变换

  CGAffineTransform flipVertical = CGAffineTransformMake(1,0,0,-1,0,self.bounds.size.height);
  CGContextConcatCTM(context, flipVertical);//将当前context的坐标系进行flip
  NSLog(@"bh=%f",self.bounds.size.height);

  NSMutableAttributedString *attributedString = [[[NSMutableAttributedString alloc] initWithString:@"请在这里插入一张图片位置"] autorelease];


  //为图片设置CTRunDelegate,delegate决定留给图片的空间大小
  NSString *imgName = @"img.png";
  CTRunDelegateCallbacks imageCallbacks;
  imageCallbacks.version = kCTRunDelegateVersion1;
  imageCallbacks.dealloc = RunDelegateDeallocCallback;
  imageCallbacks.getAscent = RunDelegateGetAscentCallback;
  imageCallbacks.getDescent = RunDelegateGetDescentCallback;
  imageCallbacks.getWidth = RunDelegateGetWidthCallback;
  CTRunDelegateRef runDelegate = CTRunDelegateCreate(&imageCallbacks, imgName);
  NSMutableAttributedString *imageAttributedString = [[NSMutableAttributedString alloc] initWithString:@" "];//空格用于给图片留位置
  [imageAttributedString addAttribute:(NSString *)kCTRunDelegateAttributeName value:(id)runDelegate range:NSMakeRange(0, 1)];
  CFRelease(runDelegate);

  [imageAttributedString addAttribute:@"imageName" value:imgName range:NSMakeRange(0, 1)];

  [attributedString insertAttributedString:imageAttributedString atIndex:4];
 //换行模式
  CTParagraphStyleSetting lineBreakMode;
  CTLineBreakMode lineBreak = kCTLineBreakByCharWrapping;
  lineBreakMode.spec = kCTParagraphStyleSpecifierLineBreakMode;
  lineBreakMode.value = &lineBreak;
  lineBreakMode.valueSize = sizeof(CTLineBreakMode);

  CTParagraphStyleSetting settings[] = {
    lineBreakMode
  };

  CTParagraphStyleRef style = CTParagraphStyleCreate(settings, 1);


  // build attributes
  NSMutableDictionary *attributes = [NSMutableDictionary dictionaryWithObject:(id)style forKey:(id)kCTParagraphStyleAttributeName ];

  // set attributes to attributed string
  [attributedString addAttributes:attributes range:NSMakeRange(0, [attributedString length])];


  CTFramesetterRef ctFramesetter = CTFramesetterCreateWithAttributedString((CFMutableAttributedStringRef)attributedString);

  CGMutablePathRef path = CGPathCreateMutable();
  CGRect bounds = CGRectMake(0.0, 0.0, self.bounds.size.width, self.bounds.size.height);
  CGPathAddRect(path, NULL, bounds);

  CTFrameRef ctFrame = CTFramesetterCreateFrame(ctFramesetter,CFRangeMake(0, 0), path, NULL);
  CTFrameDraw(ctFrame, context);

  CFArrayRef lines = CTFrameGetLines(ctFrame);
  CGPoint lineOrigins[CFArrayGetCount(lines)];
  CTFrameGetLineOrigins(ctFrame, CFRangeMake(0, 0), lineOrigins);
  NSLog(@"line count = %ld",CFArrayGetCount(lines));
  for (int i = 0; i < CFArrayGetCount(lines); i++) {
    CTLineRef line = CFArrayGetValueAtIndex(lines, i);
    CGFloat lineAscent;
    CGFloat lineDescent;
    CGFloat lineLeading;
    CTLineGetTypographicBounds(line, &lineAscent, &lineDescent, &lineLeading);
    NSLog(@"ascent = %f,descent = %f,leading = %f",lineAscent,lineDescent,lineLeading);

    CFArrayRef runs = CTLineGetGlyphRuns(line);
    NSLog(@"run count = %ld",CFArrayGetCount(runs));
    for (int j = 0; j < CFArrayGetCount(runs); j++) {
      CGFloat runAscent;
      CGFloat runDescent;
      CGPoint lineOrigin = lineOrigins[i];
      CTRunRef run = CFArrayGetValueAtIndex(runs, j);
      NSDictionary* attributes = (NSDictionary*)CTRunGetAttributes(run);
      CGRect runRect;
      runRect.size.width = CTRunGetTypographicBounds(run, CFRangeMake(0,0), &runAscent, &runDescent, NULL);
      NSLog(@"width = %f",runRect.size.width);

      runRect=CGRectMake(lineOrigin.x + CTLineGetOffsetForStringIndex(line, CTRunGetStringRange(run).location, NULL), lineOrigin.y - runDescent, runRect.size.width, runAscent + runDescent);

      NSString *imageName = [attributes objectForKey:@"imageName"];
      //图片渲染逻辑
      if (imageName) {
        UIImage *image = [UIImage imageNamed:imageName];
        if (image) {
          CGRect imageDrawRect;
          imageDrawRect.size = image.size;
          imageDrawRect.origin.x = runRect.origin.x + lineOrigin.x;
          imageDrawRect.origin.y = lineOrigin.y;
          CGContextDrawImage(context, imageDrawRect, image.CGImage);
        }
      }
    }
  }

  CFRelease(ctFrame);
  CFRelease(path);
  CFRelease(ctFramesetter);
}
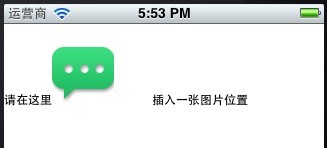
效果:

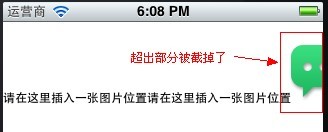
从上面看大家可能没有发现什么问题,当把图片放在字的最左边会是什么样子的?

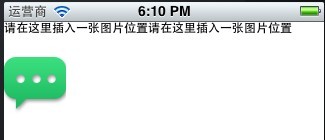
因此为了避免这种情况发生,我在代码中添加了换行模式。添加换行后的效果:

感谢阅读,希望能帮助到大家,谢谢大家对本站的支持!
相关文章

iOS App设计模式开发中对interpreter解释器模式的运用
这篇文章主要介绍了iOS App设计模式开发中对interpreter解释器模式的运用,示例为传统的Objective-C写成,需要的朋友可以参考下2016-04-04
iOS开发之WKWebViewJavascriptBridge Xcode9中导致crash的解决
大家都知道WebViewJavascriptBridge它主要帮助我们优雅的实现OC与JS的交互,下面这篇文章主要给大家介绍了关于iOS开发之WKWebViewJavascriptBridge Xcode9中导致crash的解决方法,需要的朋友可以参考借鉴,下面来一起看看吧。2017-10-10


最新评论