基于Web Components实现一个日历原生组件
接到一个需求,需要在原生的页面实现一个日历功能,正好之前利用闲暇时间用js写了一个万年历在github吃灰, 再用web components封装一下,完美的一个组件就诞生了。
Web Components 基础
Web Components API相对于其他UI框架, 不用加载其他模块, 原装组件更简单,代码量更小.API很多,这里只介绍本次封装组件使用到的
template标签
template标签在页面加载时该标签中的内容不会显示,需要使用js来使其展示在页面上。标签里面可以包含css 和 组件html结构。
日历组件template 内容: 包括日历样式css, 日历组件html结构, 预留可扩充功能的插槽
let template = document.createElement("template");
template.innerHTML = `
<style>
* {
user-select: none;
list-style: none;
margin: 0;
padding: 0;
}
.calendar_wrap {
width: 1280px;
margin: 100px auto;
position: relative;
padding-bottom: 10px;
border-radius: 20px;
box-shadow: 10px 10px 50px 10px #ccc;
}
.pick_year_month {
width: 100%;
height: 80px;
line-height: 80px;
text-align: center;
background: #cdb092;
border-radius: 20px 20px 0 0;
}
.pick_year_item {
margin: 0 20px;
font-size: 24px;
font-weight: 600;
}
.date_action {
cursor: pointer;
display: inline-block;
width: 30px;
height: 30px;
border-radius: 50%;
text-align:center;
line-height: 30px;
background: #d6d4d4;
color: #b1afaa;
font-size: 24px;
margin: 0 4px;
}
.change_num_txt {
color: #000;
}
.weekday,
.month_days {
display: flex;
flex-wrap: wrap;
justify-content: flex-start;
}
.weekday_item,
.days_item {
width: 80px;
margin: 0 50px;
text-align: center;
font-size: 20px;
}
.weekday {
margin-bottom: 20px;
font-weight:600;
}
.days_item {
height: 80px;
margin-bottom: 10px;
padding-top: 5px;
text-align: center;
line-height: 80px;
font-size: 24px;
font-weight: bold;
}
.day_color {
color: #5678FE;
background: #bb7665;
color: #fff;
border-radius: 50%;
}
.gray_color {
color: #acacac;
}
.red_color {
color: #c26228;
}
.blue_color {
color: #c26228;
}
.real_day {
cursor: pointer;
}
.real_day:hover {
outline: 1px solid orange;
border-radius: 5px;
box-shadow: 0 0 2px 2px orange;
}
.select_day_active {
outline: 1px solid orange;
}
</style>
<div class="calendar_wrap" id="calendar_container">
<div class="pick_year_month">
<span class="pick_year_item" id="decrease_year">◀ </span>
<span class="pick_year_item" id="decrease_month">◀ </span>
<span class="pick_year_item"><span class="change_num_txt" id="year_num">2019</span>年<span class="change_num_txt" id="month_num">1</span>月
</span>
<span class="pick_year_item" id="increase_month"> ▶</span>
<span class="pick_year_item" id="increase_year"> ▶</span>
</div>
<ul class="weekday">
<li class="weekday_item blue_color">日</li>
<li class="weekday_item">一</li>
<li class="weekday_item">二</li>
<li class="weekday_item">三</li>
<li class="weekday_item">四</li>
<li class="weekday_item">五</li>
<li class="weekday_item blue_color">六</li>
</ul>
<ul class="month_days" id="getdays">
</ul>
<slot name="customBox"></slot>
</div>自定义元素类
自定义元素CustomCalendar, 继承HTMLElement父类, 因此具有html元素特性
class CustomCalendar extends HTMLElement {
}
接下来需要在自定元素类中加载刚才定义好的template内容
class CustomCalendar extends HTMLElement {
     #shadowDom
    constructor() {
        super();
        this.#shadowDom = this.attachShadow({ mode: "open"});
   this.#shadowDom.appendChild(template.content.cloneNode(true));
    }
}
customElements.define('a-calendar', CustomCalendar);
this.attachShadow() 控制影子DOM 是否可操作。返回一个影子DOM(this.#shadowDom 可以用来操作DOM)。影子DOM表示内部元素与外部隔离,不受外部任何影响。
- mode: "closed" 内部元素可见,外部无法操作DOM
- mode: "open" 内部元素可见,外部可操作DOM
这里使用template.content.cloneNode(true) 克隆一份template内容加载到自定义元素内是因为可能有多个自定义元素的实例,这个模板内容还要留给其他实例使用,所以不能直接移动它的子元素
浏览器原生方法 customElements.define('a-calendar', CustomCalendar) 表示了自定义元素a-calendar 与自定义类CustomCalendar的关联,然后就可以在HTML结构中使用a-calendar标签了,在template中,我们还预留了插槽的功能,还可以使用插槽来自行扩展组件
<a-calendar>
    <div slot="customarea">111</div>
</a-calendar>
父子组件传值
在之前定义了自定义标签,在html中使用,还可以像Vue React组件那样在标签上添加任意属性
<a-calendar config="123"></a-calendar>
父组件向子组件传递值
和其他UI框架组件一样, 父组件传值给子组件也是直接在标签上添加要传递的属性,只是在子组件接收传值这块,web components 处理有些出入。
在自定义类CustomCalendar中,可以通过attributeChangedCallback钩子函数来监听标签上属性值的变化,同时需要observedAttributes来注册需要监听的属性, observedAttributes返回一个数组,只有在数组中填入的属性名字,属性值变化后才会在attributeChangedCallback拿到对应的值
class CustomCalendar extends HTMLElement {
     #shadowDom
    constructor() {
        super();
        this.#shadowDom = this.attachShadow({ mode: "open"});
   this.#shadowDom.appendChild(template.content.cloneNode(true));
    }
      // 监听属性attr 值变化
     attributeChangedCallback(name, olddata, newData) {}
     static get observedAttributes() {return ['config']; }
}
子组件传值给父组件
可以通过自定义事件来实现,在子组件需要传值的时刻,触发自定义事件,父组件监听自定义事件,就能拿到传值
在日历组件中,我们初始化好了当前的日期,需要向父组件传递这个日期,子组件触发一个自定义yearmonthchange事件
class CustomCalendar extends HTMLElement {
     #shadowDom
    constructor() {
        super();
        this.#shadowDom = this.attachShadow({ mode: "open"})
        this.#shadowDom.appendChild(template.content.cloneNode(true));
        this.date = new Date(); //获取当前日期
        this.year = this.date.getFullYear();
        this.curYear = this.year;
        this.month = this.date.getMonth() + 1;
        this.curMonth = this.date.getMonth() + 1; // 当前月份
        this.day = this.date.getDate();
        // 触发自定义事件, 将年月传递给父组件
        this.dispatchEvent(new CustomEvent('yearmonthchange', {detail: {year: this.year, month: this.month}}))
    }
      // 监听属性attr 值变化
     attributeChangedCallback(name, olddata, newData) {}
     static get observedAttributes() {return ['config']; }
}
在父组件监听yearmonthchange事件,获取到传值
<a-calendar id="cal" config="123"></a-calendar>
<script>
 var cal = document.getElementById('cal');
 cal.addEventListener('yearmonthchange', (e) => {
     console.log(e.detail)
  })
</script>
日历功能实现
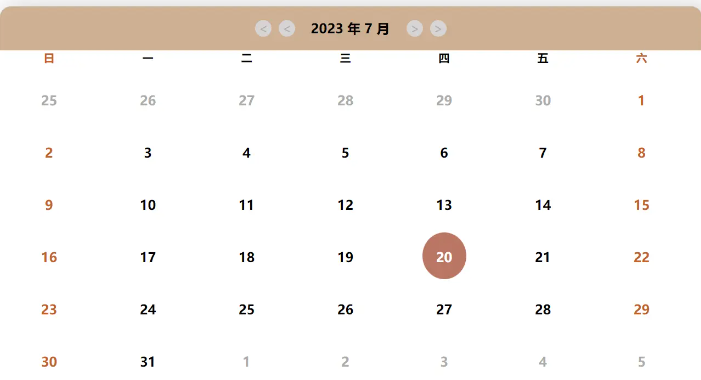
实现好的日历大致是这个样子

以上介绍了基本的Web Components 使用, 搭好了组件的基本框架,接下来只需要把日历的功能代码填入到自定义类中就OK了。
初始化事件
一共五个点击事件:增减年月, 点击日期
 changeCurrentYearMonth(op, type) {
      this.month_days_wrap.innerHTML = '';
      if (op === 'inc') {
        this[type] = this[type] + 1;
        if (type==='month' && this[type] > 12) {
          this[type] = 1
          this.year = this.year + 1;
          this.year_change_txt.innerHTML = this.year;
        }
      } else {
        this[type] = this[type] - 1;
        if (type==='month' && this[type] === 0) {
          this[type] = 12
          this.year = this.year - 1;
          this.year_change_txt.innerHTML = this.year;
        }
      }
      var opEle = type + '_change_txt';
      this[opEle].innerHTML = this[type];
      this.dispatchEvent(new CustomEvent('change', {detail: {year: this.year, month: this.month}}))
      this.getMonthDays(this.year, this.month);
    }
clickDayItem(day) {
      // 子组件向父组件传递值
      this.dispatchEvent(new CustomEvent('dayClick', day))
   }
 addEvent () {
      var container = this.#shadowDom.getElementById('container');
      var self = this;
      container.addEventListener('click', function(e){
        switch (e.target.id) {
          case 'increase_year':
            self.changeCurrentYearMonth('inc', 'year');
            break;
          case 'decrease_year':
            self.changeCurrentYearMonth('dec', 'year');
            break;
          case 'increase_month':
            self.changeCurrentYearMonth('inc', 'month');
            break;
          case 'decrease_month':
            self.changeCurrentYearMonth('dec', 'month');
            break;
        }
        if(e.target.className.includes('real_day')) {
          self.clickDayItem(e.target.innerHTML);
        }
      })
    }
初始化日历
将当前的日期填入到顶部的操作栏中
initDays () {
      this.month_days_wrap = this.#shadowDom.getElementById('getdays');
      this.year_change_txt = this.#shadowDom.getElementById('year_num');
      this.month_change_txt = this.#shadowDom.getElementById('month_num');
      this.year_change_txt.innerHTML = this.year;
      this.month_change_txt.innerHTML = this.month;
      this.getMonthDays(this.year, this.month);
    }
然后开始计算每个月的天数填入到每月的布局中
 getMonthDays(yearNums, monthNums) {
      // 当月最后一天
      var date1 = new Date(yearNums, monthNums, 0);
      // 当月第一天
      var date2 = new Date(yearNums, monthNums - 1, 1);
      // 上个月最后一天
      var date3 = new Date(yearNums, monthNums - 1, 0);
      var last_month_day = date3.getDate(); // 日期
      var insert_before_nums = date2.getDay(); // 当月第一天星期
      var insert_after_nums = date1.getDay(); // 当月最后一天星期
      var days = date1.getDate();
      for (var i = 1; i <= days; i++) {
          let dates = new Date(yearNums, monthNums - 1, i);
          var li = document.createElement('li');
          li.className = 'days_item real_day';
          li.innerHTML = i;
          var isWeekend = dates.getDay();
          if (isWeekend === 0 || isWeekend === 6) { // 周六日
              li.className = 'days_item real_day blue_color';
          }
          this.month_days_wrap.appendChild(li);
      }
      if (monthNums === this.curMonth && yearNums === this.curYear) {  //今日日期显示色
          var today = this.#shadowDom.querySelectorAll('.days_item')[this.day - 1];
          today.className = "days_item real_day day_color"
      }
      for (let i = 0; i < insert_before_nums; i++) { // 上月后几天
          var days_one = this.#shadowDom.querySelectorAll('.days_item')[0];
          var lis = document.createElement('li');
          lis.className = 'days_item gray_color';
          lis.innerHTML = last_month_day--;
          this.#shadowDom.querySelector('.month_days').insertBefore(lis, days_one);
      }
      for (let i = 1; i <= 6 - insert_after_nums; i++) { // 下月前几天
          var lis = document.createElement('li');
          lis.className = 'days_item gray_color';
          lis.innerHTML = i;
          this.#shadowDom.querySelector('.month_days').appendChild(lis);
      }
  }
至此,日历功能就完成了,我们可以把自定义类单独放在一个js文件,这样使用的时候,直接引入js文件就可以在页面上使用组件啦~~
以上就是基于Web Components实现一个日历原生组件的详细内容,更多关于Web Components日历组件的资料请关注脚本之家其它相关文章!


最新评论