springboot+vue+elementsUI实现分角色注册登录界面功能
一、项目简介
一共分为三个角色:管理员、用户、设计师
登录功能:账号+密码+身份选择,登录成功后跳转到各身份对应的页面
注册功能:只允许用户和设计师注册,用户可以直接注册成功,设计师提交材料后注册需要管理员审核成功后方可注册成功。
注册页面要求必填:
账号:用户自定义,注册成功后不可修改,同一个角色下账号不重复,不同角色账号可以重复。
二、注册
1.前端
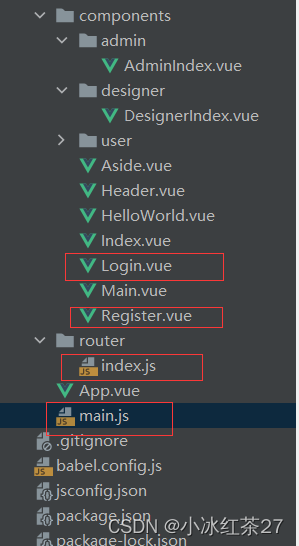
先上目录文件:

(1)register.vue文件
template部分:
<template>
  <div class="register-container">
    <!-- 根标签 -->
    <el-form
        :model="form"
        status-icon
        :rules="rules"
        ref="form"
        label-width="100px"
        class="register-form">
      <h1 class="title">注 册</h1>
      <el-form-item label="账号" prop="useraccount">
        <el-input v-model="form.useraccount"
                  placeholder="账号作为登陆的唯一方式,一旦注册成功不可更改!"
                  maxlength="20"></el-input>
      </el-form-item>
      <el-form-item label="密码" prop="userpsd">
        <el-input
            type="password"
            v-model="form.userpsd"
            placeholder="请输入密码"
            autocomplete="off"
            maxlength="16"
        ></el-input>
      </el-form-item>
      <el-form-item label="确认密码" prop="checkPass">
        <el-input
            type="password"
            v-model="form.checkPass"
            placeholder="请再次输入密码"
            autocomplete="off"
            maxlength="16"
        ></el-input>
      </el-form-item>
      <el-form-item label="姓名" prop="username">
        <el-input v-model="form.username" maxlength="20"></el-input>
      </el-form-item>
      <el-form-item label="性别"  prop="sex" style="text-align:left">
        <el-radio-group v-model="form.sex" >
          <el-radio label="1">男</el-radio>
          <el-radio label="2">女</el-radio>
        </el-radio-group>
        </el-form-item>
      <el-form-item label="年龄"  prop="age" style="text-align: left">
        <el-input v-model="form.age" maxlength="2"></el-input>
      </el-form-item>
      <el-form-item label="电话" prop="phone">
        <el-input v-model="form.phone" maxlength="11" @input="onInput('keyName', $event)"></el-input>
      </el-form-item>
      <el-form-item label="地址" prop="address" style="text-align: left" >
        <v-distpicker :placeholders="placeholders" v-model="form.address"
                      @province="onChangeProv"
                      @city="onChangeCity"
                      @area="onChangeArea"></v-distpicker>
      </el-form-item>
      <el-form-item label="目的" prop="roleId" style="text-align: center">
        <div style="margin-top: 20px">
          <el-radio v-model="form.roleId" label="1" border size="mini">我是客户,我想装修房子</el-radio>
          <el-radio v-model="form.roleId" label="2" border size="mini" >我是设计师,我想设计装修</el-radio>
        </div>
      </el-form-item>
      <div v-if="form.roleId==2">
        <el-form-item v-model="form.file" label="材料证明" prop="file" style="text-align: center">
      <el-upload
          class="upload-demo"
          drag
          action="https://jsonplaceholder.typicode.com/posts/"
          multiple>
        <i class="el-icon-upload"></i>
        <div class="el-upload__text">将文件拖到此处,或<em>点击上传</em></div>
        <div class="el-upload__tip" slot="tip">请上传设计师相关材料验证,只能上传jpg/png文件,且不超过500kb</div>
      </el-upload></el-form-item>
  </div>
      <el-form-item style="text-align: center">
        <el-button type="primary" @click="submit('form')">提交</el-button>
      </el-form-item>
    </el-form>
  </div>
</template>
script部分:包含输入验证 表单提交功能
<script>
import VDistpicker from 'v-distpicker'
export default {
  name: "Register",
  components: {VDistpicker},
  data() {
    return {
      form: {
        useraccount: '',
        userpsd: '',
        sex: '1',
        roleId: '1',
        address: '',
        province: '',
        city:'',
        area: '',
      },
      rules: {
        useraccount: [{required: true, message: "请输入账号", trigger: "blur"},
          {min: 1, max: 20, message: '请勿超过20个字符!', trigger: 'blur'},
          {validator: (rule, value, callback) => {
              const reg = /^[\u4E00-\u9FA5A-Za-z0-9]+$/  //正则表达式 只能输入英文、汉字与数字
              if (!reg.test(value)) {
                callback(new Error('请勿输入特殊字符'))
              } else {
                callback()
              }}}
        ],
        userpsd: [{required: true, message: "请输入密码", trigger: "blur"},
          {min: 6, max: 16, message: '长度在 6 到 16个字符', trigger: 'blur'}
        ],
        checkPass: [{required: true, message: "请再次输入密码", trigger: "blur"},
          {min: 6, max: 16, message: '长度在 6 到 16个字符', trigger: 'blur'},
          {validator: (rule, value, callback) => {
              if (value !== this.form.userpsd) {
                callback(new Error("两次输入密码不一致"));
              } else {
                callback()
              }}}]
      },
         placeholders: {
        province: '请选择省份',
        city: '请选择市',
        area: '请选择区',
      },
    };
  },
  methods: {
    onChangeProv(province) {
    this.province=province.value;
    },
    onChangeCity(city) {
      this.city=city.value;
    },
    onChangeArea(area) {
      this.area=area.value;
    },
    // 首先限制它只能输入整数,最大长度为maxlength="11",其次是当它输入长度达到11位时进行校验
    onInput(key, event) {
      this.form[key] = event.replace(/[^\d]/g, '')
      if (event.length >= 11) {
        const reg = /^[1][3,4,5,6,7,8,9][0-9]{9}$/
        if (!reg.test(event)) {
          console.log('您输入的手机号不正确')
        }
      }
    },
    submit() {
      //校验输入
      this.$refs.form.validate((valid)=>{
        if (valid){
          this.form.address=this.province+this.city+this.area;    //包装地址
         //注册功能
          this.$axios.post(this.$httpUrl + '/login/register', this.form).then(res => res.data).then(res => {
          console.log(res)
        //用户注册成功或设计师成功提交材料后,显示相关信息后自动返回首页
        if (res.code === 200) {
          if (this.form.roleId==1){
            alert("用户注册成功")
            window.location.href = "/Login";
          }else{
            alert("您的注册材料已提交,请等候管理员审批!")
            window.location.href = "/Index";
          }
        } else {
          alert("该账号已注册过!请重新输入")//注册失败,返回注册页面
        }
      })
        }else{
          alert("请按照规范输入账号")
        }
      })
    }
}
}
</script>
style部分:
<style scoped>
.register-container {
  /*position: absolute;*/
  width: 100%;
  height: 100%;
  overflow: hidden;
 background-image: url("../assets/reg_background.jpg");
  background-size: 100% 100%;
  background-repeat: no-repeat;
}
.register-form {
  width: 600px;
  margin: 150px auto;
  background-color: rgb(214, 174, 218);
  padding: 30px;
  border-radius: 20px;
}
.title {
  text-align: center;
  font-family: 幼圆;
}
</style>
(2)main.js文件
import Vue  from 'vue';
import Element from 'element-ui';
import VueRouter from 'vue-router';
import 'element-ui/lib/theme-chalk/index.css';
import 'default-passive-events';
import VDistpicker from 'v-distpicker'
export default{
  component:{ VDistpicker }
}
import App from './App.vue'
import axios from 'axios';
import router from "./router/index.js";
Vue.prototype.$axios=axios;//数据跨域
Vue.prototype.$httpUrl='http://localhost:8090'
Vue.config.devtools=true
Vue.config.productionTip = false
Vue.use(Element);
Vue.use(VueRouter);
new Vue({
  el:'#app',
  router,
  render: h => h(App),
});
(3)index.js文件
主要设置router,实现页面之间的跳转
import VueRouter from 'vue-router'
import Index from "../components/Index.vue";
import DesignShow from "../components/user/DesignShow.vue";
import EnterpriseShow from "@/components/user/EnterpriseShow";
import DesignerShow from "@/components/user/DesignerShow";
import Login from "@/components/Login";
import Register from "@/components/Register";
import AdminIndex from "@/components/admin/AdminIndex";
import DesignerIndex from "@/components/designer/DesignerIndex";
const routes=[
        {   path:'/Index', name:'Index', component:Index},
        {   path:'/DesignShow', name:'DesignShow', component:DesignShow},
        {   path:'/EnterpriseShow', name:'EnterpriseShow', component:EnterpriseShow},
        {   path:'/DesignerShow', name:'DesignerShow', component:DesignerShow},
        {   path:'/Login', name:'Login', component:Login},
        {   path:'/Register', name:'Register', component:Register},
        {   path:'/admin/Index', name:'adminIndex', component:AdminIndex},
        {   path:'/designer/Index', name:'designerIndex', component:DesignerIndex}
    ]
const router = new VueRouter({
    routes,
    mode: "history" //路由模式(默认为hash模式)
})
export default router
最终页面:

2. 后端:
我后端的端口是8090
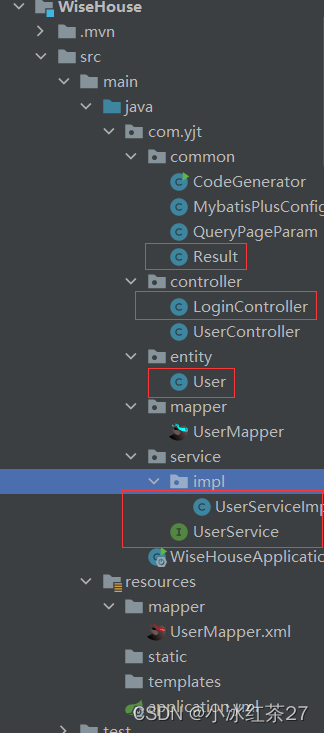
目录结构

(1)LoginController.java文件
我注册和登录后端放在一个controller文件中了
package com.yjt.controller;
import com.yjt.common.Result;
import com.yjt.entity.User;
import com.yjt.service.UserService;
import org.springframework.beans.factory.annotation.Autowired;
import org.springframework.web.bind.annotation.*;
import java.util.List;
@RestController
@CrossOrigin(origins = "*")  //跨域设置
@RequestMapping("/login")
public class LoginController {
    @Autowired
    private UserService userService;
    @PostMapping("/login")
    public Result login (@RequestBody User user){
        List<User> userList1=userService.query().eq("useraccount",user.getUseraccount()).
                eq("role_id",user.getRoleId()).list();  //查找账号是否已注册
        if (!userList1.isEmpty()){  //账号注册过
            //查找账号密码是否匹配
            List<User> userList2=userService.query().eq("useraccount",user.getUseraccount()).
                    eq("userpsd",user.getUserpsd()).eq("role_id",user.getRoleId()).list();
            if(!userList2.isEmpty()){   //账号密码一致
                return Result.suc(user,0L);
            }else{
                return Result.fail(401);  //code:401代表密码错误
            }
        }else{
            return  Result.fail();   //默认code400:代表账号未注册
        }
    }
    @PostMapping("/register")
    public Result register(@RequestBody User user) {
        int roleId = user.getRoleId();
        String account=user.getUseraccount();
        List<User> userList=userService.query().eq("useraccount", account).
                eq("role_id",roleId).list();
        if (roleId == 1&& userList.isEmpty()) {  //角色为用户且未注册过
                int id=userService.count();
                user.setUserid(id+1);
                userService.save(user);
                return Result.suc("用户注册成功",null,0L);
            } else if (roleId == 2&& userList.isEmpty()) {  //角色为设计师且未注册过
            return Result.suc("您的注册材料已提交,请等候管理员审批!",user,0L);
        } else {
            return Result.fail();
        }
    }
}
(2)user.java文件
package com.yjt.entity;
import com.baomidou.mybatisplus.annotation.TableId;
import com.baomidou.mybatisplus.annotation.TableField;
import io.swagger.annotations.ApiModel;
import io.swagger.annotations.ApiModelProperty;
import lombok.Data;
import lombok.EqualsAndHashCode;
@Data
@EqualsAndHashCode(callSuper = false)
@ApiModel(value="User对象", description="")
public class User {
    private static final long serialVersionUID = 1L;
    @TableId("Userid")
    private Integer userid;
    @TableField("Username")
    private String username;
    @TableField("Userpsd")
    private String userpsd;
    @TableField("Useraccount")
    private String useraccount;
    private Integer age;
    private Integer sex;
    private String phone;
    @TableField("role_id")
    private Integer roleId;
    @TableField("isValid")
    private String isvalid;
    private String address;
}
(3)Result.java文件
package com.yjt.common;
import lombok.Data;
@Data
public class Result {
    private  int code;
    private String msg;
    private Long total;
    private Object data;
    //失败
    public static Result fail(){
        return result(400,"Fail!",0L,null);
    }
    public static Result fail(int code){
        return result(code,"Fail!",0L,null);
    }
    //成功!
    public static Result suc(){
        return result(200,"成功Win!",0L,null);
    }
    public static Result suc(Object data){
        return result(200,"成功Win!",0L,data);
    }
    public static Result suc(Object data,Long total){
        return result(200,"成功Win!",total,data);
    }
    public static Result suc(String msg,Object data,Long total){
        return result(200,msg,total,data);
    }
    private static Result result(int code,String msg,Long total,Object data){
        Result result=new Result();
        result.setData(data);
        result.setMsg(msg);
        result.setCode(code);
        result.setTotal(total);
        return result;
    }
}
(4)自动生成的usermapper接口
package com.yjt.mapper;
import com.yjt.entity.User;
import com.baomidou.mybatisplus.core.mapper.BaseMapper;
import org.apache.ibatis.annotations.Mapper;
@Mapper
public interface UserMapper extends BaseMapper<User> {
}
与UserMapper.xml
<?xml version="1.0" encoding="UTF-8"?>
<!DOCTYPE mapper PUBLIC "-//mybatis.org//DTD Mapper 3.0//EN" "http://mybatis.org/dtd/mybatis-3-mapper.dtd">
<mapper namespace="com.yjt.mapper.UserMapper">
    <!-- 通用查询映射结果 -->
    <resultMap id="BaseResultMap" type="com.yjt.entity.User">
        <id column="Userid" property="userid" />
        <result column="Username" property="username" />
        <result column="Userpsd" property="userpsd" />
        <result column="Useraccount" property="useraccount" />
        <result column="age" property="age" />
        <result column="sex" property="sex" />
        <result column="phone" property="phone" />
        <result column="role_id" property="roleId" />
        <result column="isValid" property="isvalid" />
        <result column="address" property="address" />
    </resultMap>
    <!-- 通用查询结果列 -->
    <sql id="Base_Column_List">
        Userid, Username, Userpsd, Useraccount, age, sex, phone, role_id, isValid,address
    </sql>
</mapper>
(5)接口userService
package com.yjt.service;
import com.yjt.entity.User;
import com.baomidou.mybatisplus.extension.service.IService;
public interface UserService extends IService<User> {
}
userServiceImpl
package com.yjt.service.impl;
import com.yjt.entity.User;
import com.yjt.mapper.UserMapper;
import com.yjt.service.UserService;
import com.baomidou.mybatisplus.extension.service.impl.ServiceImpl;
import org.springframework.stereotype.Service;
@Service
public class UserServiceImpl extends ServiceImpl<UserMapper, User> implements UserService {
}
(6)application.yml配置
server:
  port: 8090
spring:
  datasource:
    url: jdbc:mysql://localhost:3306/wisehouse?useUnicode=true&characterEncoding=utf-8&useSSL=false&serverTimezone=GMT%2B8
    driver-class-name: com.mysql.cj.jdbc.Driver
    username: root
    password: 123456
(7)CodeGenerate.java文件 这个是跟着老师敲的文件,具体有什么作用还没明白。。。。
package com.yjt.common;
import com.baomidou.mybatisplus.core.exceptions.MybatisPlusException;
import com.baomidou.mybatisplus.core.toolkit.StringPool;
import com.baomidou.mybatisplus.core.toolkit.StringUtils;
import com.baomidou.mybatisplus.generator.AutoGenerator;
import com.baomidou.mybatisplus.generator.InjectionConfig;
import com.baomidou.mybatisplus.generator.config.*;
import com.baomidou.mybatisplus.generator.config.po.TableInfo;
import com.baomidou.mybatisplus.generator.config.rules.NamingStrategy;
import com.baomidou.mybatisplus.generator.engine.FreemarkerTemplateEngine;
import java.util.ArrayList;
import java.util.List;
import java.util.Scanner;
// 演示例子,执行 main 方法控制台输入模块表名回车自动生成对应项目目录中
public class CodeGenerator {
    /**
     * <p>
     * 读取控制台内容
     * </p>
     */
    public static String scanner(String tip) {
        Scanner scanner = new Scanner(System.in);
        StringBuilder help = new StringBuilder();
        help.append("请输入" + tip + ":");
        System.out.println(help.toString());
        if (scanner.hasNext()) {
            String ipt = scanner.next();
            if (StringUtils.isNotBlank(ipt)) {
                return ipt;
            }
        }
        throw new MybatisPlusException("请输入正确的" + tip + "!");
    }
    public static void main(String[] args) {
        // 代码生成器
        AutoGenerator mpg = new AutoGenerator();
        // 全局配置
        GlobalConfig gc = new GlobalConfig();
        String projectPath = System.getProperty("user.dir")+"/WiseHouse";
        gc.setOutputDir(projectPath + "/src/main/java");
        gc.setAuthor("yjt");
        gc.setOpen(false);
        gc.setSwagger2(true); //实体属性 Swagger2 注解
        gc.setBaseResultMap(true);//XML ResultMap
        gc.setBaseColumnList(true);//XML columList
        //去掉service接口首字母的I,如DO为User则叫UserService
        gc.setServiceName("%sService");
        mpg.setGlobalConfig(gc);
        // 数据源配置
        DataSourceConfig dsc = new DataSourceConfig();
        dsc.setUrl("jdbc:mysql://localhost:3306/wisehouse?useUnicode=true&characterEncoding=utf-8&useSSL=false&serverTimezone=GMT%2B8");
        // dsc.setSchemaName("public");
        dsc.setDriverName("com.mysql.jdbc.Driver");
        dsc.setUsername("root");
        dsc.setPassword("123456");
        mpg.setDataSource(dsc);
        // 包配置
        PackageConfig pc = new PackageConfig();
      //  pc.setModuleName(scanner("模块名"));
        //二、模块配置
        pc.setParent("com.yjt")
                        .setEntity("entity")
                                .setMapper("mapper")
                                        .setService("service")
                                                .setServiceImpl("service.impl")
                                                        .setController("controller");
        mpg.setPackageInfo(pc);
        // 自定义配置
        InjectionConfig cfg = new InjectionConfig() {
           @Override
           public void initMap() {
                // to do nothing
            }
        };
        // 如果模板引擎是 freemarker
        String templatePath = "/templates/mapper.xml.ftl";
        // 如果模板引擎是 velocity
        // String templatePath = "/templates/mapper.xml.vm";
        // 自定义输出配置
        List<FileOutConfig> focList = new ArrayList<>();
        // 自定义配置会被优先输出
        focList.add(new FileOutConfig(templatePath) {
            @Override
            public String outputFile(TableInfo tableInfo) {
                // 自定义输出文件名 , 如果你 Entity 设置了前后缀、此处注意 xml 的名称会跟着发生变化!!
                return projectPath + "/src/main/resources/mapper/" + pc.getModuleName()
                        + "/" + tableInfo.getEntityName() + "Mapper" + StringPool.DOT_XML;
            }
        });
        /*
        cfg.setFileCreate(new IFileCreate() {
            @Override
            public boolean isCreate(ConfigBuilder configBuilder, FileType fileType, String filePath) {
                // 判断自定义文件夹是否需要创建
                checkDir("调用默认方法创建的目录,自定义目录用");
                if (fileType == FileType.MAPPER) {
                    // 已经生成 mapper 文件判断存在,不想重新生成返回 false
                    return !new File(filePath).exists();
                }
                // 允许生成模板文件
                return true;
            }
        });
        */
        cfg.setFileOutConfigList(focList);
        mpg.setCfg(cfg);
        // 配置模板
        TemplateConfig templateConfig = new TemplateConfig();
        // 配置自定义输出模板
        //指定自定义模板路径,注意不要带上.ftl/.vm, 会根据使用的模板引擎自动识别
        // templateConfig.setEntity("templates/entity2.java");
        // templateConfig.setService();
        // templateConfig.setController();
        templateConfig.setXml(null);
        mpg.setTemplate(templateConfig);
        // 策略配置
        StrategyConfig strategy = new StrategyConfig();
        strategy.setNaming(NamingStrategy.underline_to_camel);
        strategy.setColumnNaming(NamingStrategy.underline_to_camel);
       // strategy.setSuperEntityClass("你自己的父类实体,没有就不用设置!");
        strategy.setEntityLombokModel(true);
        strategy.setRestControllerStyle(true);
        // 公共父类
        //strategy.setSuperControllerClass("你自己的父类控制器,没有就不用设置!");
        // 写于父类中的公共字段
        strategy.setSuperEntityColumns("id");
        strategy.setInclude(scanner("表名,多个英文逗号分割").split(","));
        strategy.setControllerMappingHyphenStyle(true);
      //  strategy.setTablePrefix(pc.getModuleName() + "_");
        mpg.setStrategy(strategy);
        mpg.setTemplateEngine(new FreemarkerTemplateEngine());
        mpg.execute();
    }
}
三、登录
前端:Login.vue文件
template部分:
<template>
  <el-container class="login-container">
    <el-form
        :model="sizeForm"
        status-icon
        :rules="rules"
        ref="form"
        label-width="100px"
        margin="0 auto"
        class="login-form">
      <div class="LoginMes">登陆页面</div>
    <el-form-item label="账号" size="20px" prop="useraccount" >
      <el-input v-model="sizeForm.useraccount"
                placeholder="请输入账号"
                maxlength="20"></el-input>
    </el-form-item>
    <el-form-item label="密码" size="20px" prop="userpsd">
      <el-input v-model="sizeForm.userpsd"
                type="password"
                placeholder="请输入密码"
                autocomplete="off"
                maxlength="16"></el-input>
    </el-form-item>
    <el-form-item label="身份" prop="roleID">
      <div style="text-align: center">
        <el-radio v-model="sizeForm.roleId"  label="0">管理员</el-radio>
        <el-radio v-model="sizeForm.roleId"  label="1">用户</el-radio>
        <el-radio v-model="sizeForm.roleId"  label="2">设计师</el-radio>
      </div>
    </el-form-item>
    <el-form-item  style="text-align: center">
      <el-button type="primary" @click="onSubmit">登录</el-button>
      <el-button  @click="register">注册</el-button>
    </el-form-item>
  </el-form>
  </el-container>
</template>
script部分:
<script>
export default {
  name: "Login",
  data() {
    return {
      sizeForm: {
        useraccount: '',
        userpsd: '',
        delivery: false,
        roleId:'1',
        type: [],
      },
      rules: {
        useraccount: [{required: true, message: "请输入账号", trigger: "blur"},
          {
            validator: (rule, value, callback) => {
              const reg = /^[\u4E00-\u9FA5A-Za-z0-9]+$/  //正则表达式 只能输入英文、汉字与数字
              if (!reg.test(value)) {
                callback(new Error('请勿输入特殊字符'))
              } else {
                callback()
              }
            }
          }
        ],
        userpsd:[{required: true, message: "请输入密码", trigger: "blur"},
          { min: 6, max: 16, message: '长度在 6 到 16个字符', trigger: 'blur' }
        ]
      }
    };
  },
  methods: {
    onSubmit() {
      //注册功能
      this.$axios.post(this.$httpUrl + '/login/login', this.sizeForm).then(res => res.data).then(res => {
        console.log(res)
        //登陆成功后,跳转到相应页面
        if (res.code === 200) {
          if (this.sizeForm.roleId==0){
            window.location.href = "admin/Index";
          }else if(this.sizeForm.roleId==1) {
            window.location.href = "/Index";
          }else{
            window.location.href = "designer/Index";
          }
        } else if(res.code === 400){
          alert("该账号未注册")//注册失败,返回注册页面
        }else{
          alert("密码错误")
        }
      })
    },
    register () {
      //指定跳转的地址
      this.$router.replace('/Register')
    }
  }
}
</script>
style部分:
<style scoped>
.LoginMes {
  text-align: center;
  color: #f3730a;
  font-family: 幼圆;
  font-size: 30px;
  margin-bottom: 20px;
}
.login-container {
  /*position: absolute;*/
  width: 100%;
  height: 100%;
  overflow: hidden;
  background-image: url("../assets/reg_background.jpg");
  background-size: 100% 100%;
  background-repeat: no-repeat;
}
.login-form {
  width: 480px;
  margin: 150px auto;
  background-color: rgb(143, 180, 229);
  padding: 50px;
  border-radius: 80px;
}
</style>
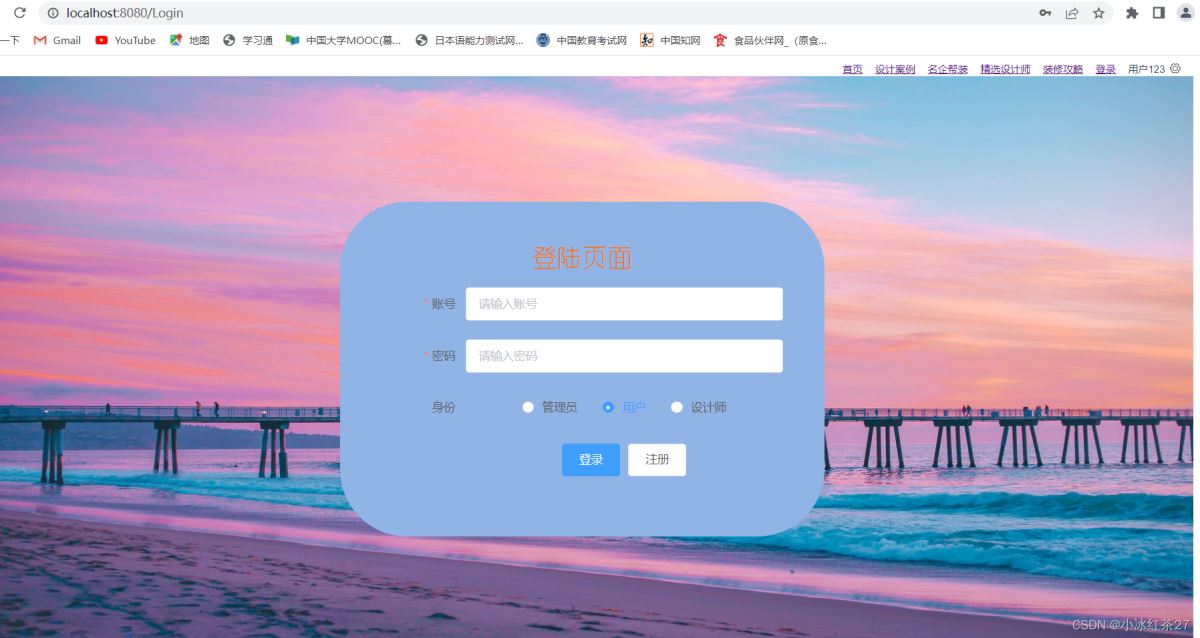
最终页面:

先写到这里,具体方法实现原理等我有空了再继续写
总结
到此这篇关于springboot+vue+elementsUI实现分角色注册登录界面功能的文章就介绍到这了,更多相关springboot分角色注册登录界面内容请搜索脚本之家以前的文章或继续浏览下面的相关文章希望大家以后多多支持脚本之家!
相关文章

关于Jackson的JSON工具类封装 JsonUtils用法
这篇文章主要介绍了关于Jackson的JSON工具类封装 JsonUtils用法,具有很好的参考价值,希望对大家有所帮助。一起跟随小编过来看看吧2020-09-09
解决java.sql.SQLException: validateConnection false问题的方法汇总(最
这篇文章主要给大家介绍了关于解决java.sql.SQLException: validateConnection false问题的方法汇总,文中通过图文介绍的非常详细,需要的朋友可以参考下2023-03-03


最新评论