Mybatis-plus如何开启二级缓存
一、Ehcache、Redis比较
ehcache是直接在jvm虚拟机中缓存,速度快,效率高;但是共享缓存麻烦,在分布式下显得功能弱;
redis是通过socket访问到缓存服务,效率比ehcache低,但是比访问数据库快;在处理分布式下共享缓存很方便,并且机制成熟。
单体应用可以采用ehcache,在大型应用场景下,分布式要求就采用redis。
补充:
ehcache也是有共享缓存的方案,但是是通过RMI或Jgroup多广播方式进行广播缓存和通知刷新,这样缓存复杂,维护不方便,简单缓存还是可以的,但是涉及恢复或数据量大的情况下,显得功能弱,不适合。
二、Ehcache
1.简介
EhCache 是一个纯Java的进程内缓存框架,具有快速、精干等特点,是Hibernate中默认CacheProvider。
Ehcache是一种广泛使用的开源Java分布式缓存。主要面向通用缓存,Java EE和轻量级容器。
它具有内存和磁盘存储,缓存加载器,缓存扩展,缓存异常处理程序,一个gzip缓存servlet过滤器,支持REST和SOAP api等特点。
Spring 提供了对缓存功能的抽象:即允许绑定不同的缓存解决方案(如Ehcache),但本身不直接提供缓存功能的实现。它支持注解方式使用缓存,非常方便。
2.特点
- 快速
- 简单
- 多种缓存策略
- 缓存数据有两级:内存和磁盘,因此无需担心容量问题
- 缓存数据会在虚拟机重启的过程中写入磁盘
- 可以通过RMI、可插入API等方式进行分布式缓存
- 具有缓存和缓存管理器的侦听接口
- 支持多缓存管理器实例,以及一个实例的多个缓存区域
- 提供Hibernate的缓存实现
3.三大元素
- CacheManager : 缓存管理器,可以通过单例或者多例的方式创建,也是Ehcache的入口类;
- Cache : 每个CacheManager可以管理多个Cache,每个Cache可以采用hash的方式管理多个Element;
- Element : 用于存放真正缓存内容的。
4.集成
可以单独使用,ehcache在第三方用的比较多,比如mybatis、shiro中,但是对于分布式架构中,encache显得不是特别强,不能多节点同步,通畅在这种情况下用redis。
5.示例
1.创建springboot项目,在配置文件中配置:mybatis-plus.cache-enabled = true

2.在启动类上添加:@EnableCaching

3.在xml文件中添加标签,并添加相应的sql执行语句
mybatis-plus版本必须低于2.0.9才可以使用二级缓存,否则MP自带的一些方法就算配置了二级缓存也不起作用。
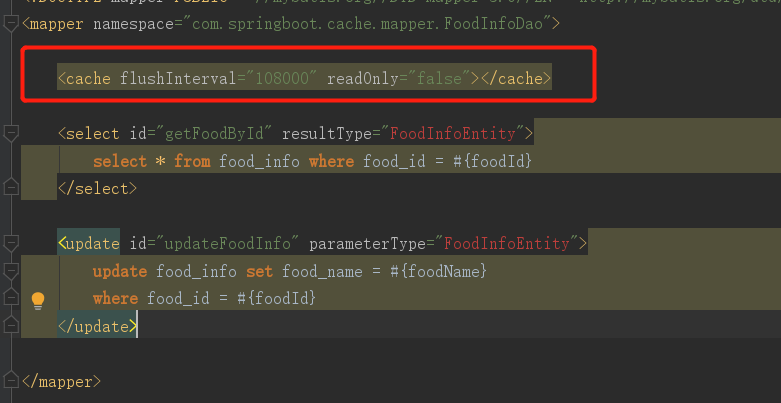
4.在Mapper、Service层添加相应方法之后,在Service的方法上配置缓存,key应该是不同的,不同id的对应不同的数据。

- ①Cacheable:根据方法的请求参数对其结果进行缓存,多用于查询
- ②CachePut:执行方法,并缓存结果
- ③CacheEvict:清空缓存
- ④Caching:能够同时应用多个缓存注解功能
- ⑤CacheConfig:用于抽取缓存的公共配置(类级别)
5.我这里添加了3个接口用来做测试
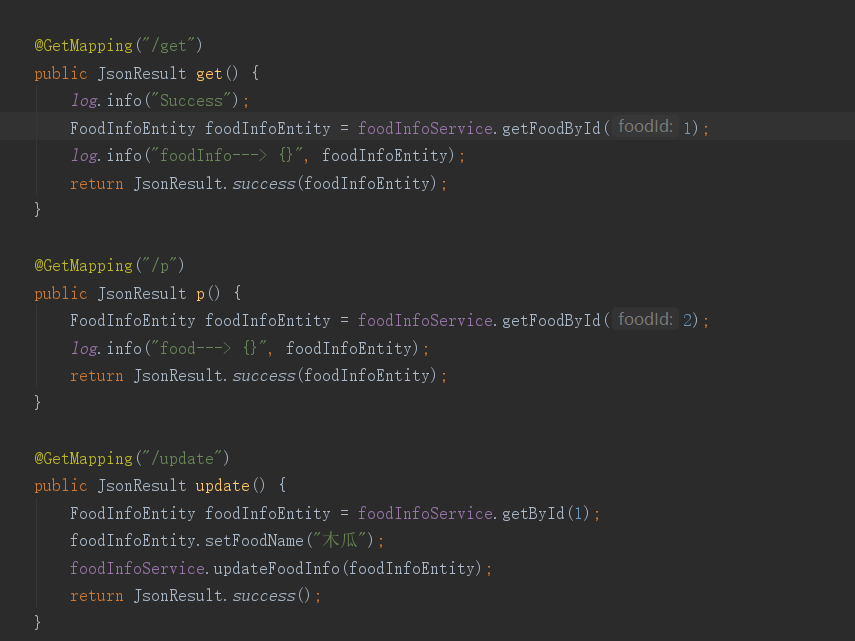
运行第一个接口时,控制台输出只有一次去打开数据库去获取数据,其他几次都是去缓存中获取。

同理第二个接口也是跟第一个接口一样

当我执行更新方法之后,控制台会打印输出:

此时我们再去执行第一个接口时,又会去打开数据库取获取数据,并且数据更新了(key的关键作用就是指定那条数据)

三、Redis
1.简介
Redis 是完全开源免费的,遵守BSD协议,是一个高性能的key-value数据库。
Redis 与其他 key - value 缓存产品有以下三个特点:
- Redis支持数据的持久化,可以将内存中的数据保存在磁盘中,重启的时候可以再次加载进行使用。
- Redis不仅仅支持简单的key-value类型的数据,同时还提供list,set,zset,hash等数据结构的存储。
- Redis支持数据的备份,即master-slave模式的数据备份。
2.优势
- 性能极高 – Redis能读的速度是110000次/s,写的速度是81000次/s 。
- 丰富的数据类型 – Redis支持二进制案例的 Strings, Lists, Hashes, Sets 及 Ordered Sets 数据类型操作。
- 原子 – Redis的所有操作都是原子性的,意思就是要么成功执行要么失败完全不执行。单个操作是原子性的。多个操作也支持事务,即原子性,通过MULTI和EXEC指令包起来。
- 丰富的特性 – Redis还支持 publish/subscribe, 通知, key 过期等等特性。
3.示例
1.引入依赖、配置
<dependency>
	<groupId>org.springframework.boot</groupId>
	<artifactId>spring-boot-starter-data-redis</artifactId>
</dependency>

2.在启动类上添加注解:@EnableCaching
3.添加RedisConfig
package com.springboot.cache.config;

import com.fasterxml.jackson.annotation.JsonAutoDetect;
import com.fasterxml.jackson.annotation.PropertyAccessor;
import com.fasterxml.jackson.databind.ObjectMapper;
import org.springframework.cache.CacheManager;
import org.springframework.cache.annotation.CachingConfigurerSupport;
import org.springframework.cache.annotation.EnableCaching;
import org.springframework.context.annotation.Bean;
import org.springframework.context.annotation.Configuration;
import org.springframework.data.redis.cache.RedisCacheConfiguration;
import org.springframework.data.redis.cache.RedisCacheManager;
import org.springframework.data.redis.connection.RedisConnectionFactory;
import org.springframework.data.redis.core.RedisTemplate;
import org.springframework.data.redis.serializer.Jackson2JsonRedisSerializer;
import org.springframework.data.redis.serializer.StringRedisSerializer;

import java.time.Duration;
import java.util.HashMap;
import java.util.HashSet;
import java.util.Map;
import java.util.Set;

/**
 * @author Csea
 * @title
 * @date 2019/11/26 14:51
 */
@EnableCaching
@Configuration
public class RedisConfig extends CachingConfigurerSupport {
    @Bean
    public RedisTemplate<Object, Object> redisTemplate(RedisConnectionFactory redisConnectionFactory) {
        RedisTemplate<Object, Object> redisTemplate = new RedisTemplate<>();
        redisTemplate.setConnectionFactory(redisConnectionFactory);

        // 使用Jackson2JsonRedisSerialize 替换默认序列化
        @SuppressWarnings("rawtypes")
        Jackson2JsonRedisSerializer jackson2JsonRedisSerializer = new Jackson2JsonRedisSerializer(Object.class);

        ObjectMapper objectMapper = new ObjectMapper();
        objectMapper.setVisibility(PropertyAccessor.ALL, JsonAutoDetect.Visibility.ANY);
        objectMapper.enableDefaultTyping(ObjectMapper.DefaultTyping.NON_FINAL);

        jackson2JsonRedisSerializer.setObjectMapper(objectMapper);

        // 设置value的序列化规则和 key的序列化规则
        redisTemplate.setValueSerializer(jackson2JsonRedisSerializer);
        redisTemplate.setKeySerializer(new StringRedisSerializer());
        redisTemplate.afterPropertiesSet();
        return redisTemplate;
    }

    //缓存管理器
    @Bean
    public CacheManager cacheManager(RedisConnectionFactory lettuceConnectionFactory) {
        RedisCacheConfiguration defaultCacheConfig = RedisCacheConfiguration.defaultCacheConfig();
        // 设置缓存管理器管理的缓存的默认过期时间
        defaultCacheConfig = defaultCacheConfig.entryTtl(Duration.ofMinutes(60))
                // 不缓存空值
                .disableCachingNullValues();

        Set<String> cacheNames = new HashSet<>();
        cacheNames.add("my-redis-cache1");

        // 对每个缓存空间应用不同的配置
        Map<String, RedisCacheConfiguration> configMap = new HashMap<>();
        configMap.put("my-redis-cache1", defaultCacheConfig.entryTtl(Duration.ofMinutes(50)));

        RedisCacheManager cacheManager = RedisCacheManager.builder(lettuceConnectionFactory)
                .cacheDefaults(defaultCacheConfig)
                .initialCacheNames(cacheNames)
                .withInitialCacheConfigurations(configMap)
                .build();
        return cacheManager;
    }
}
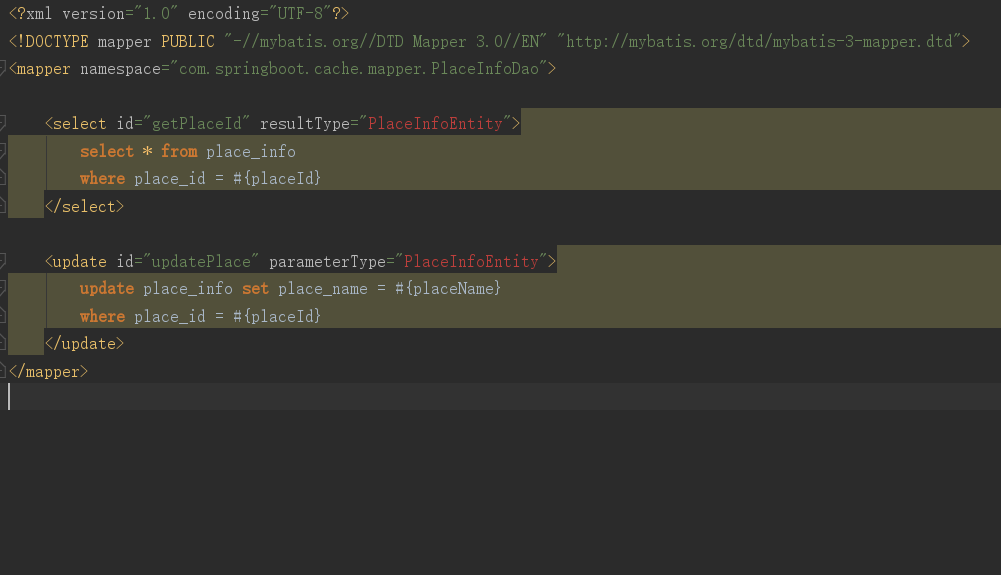
3.Mapper.xml添加执行Sql
4.在service层配置Cache
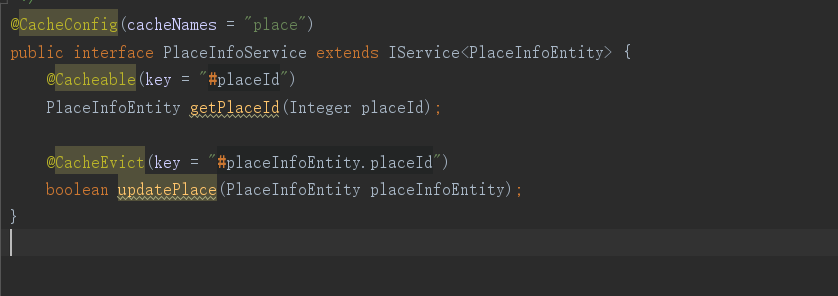
5.controller调试
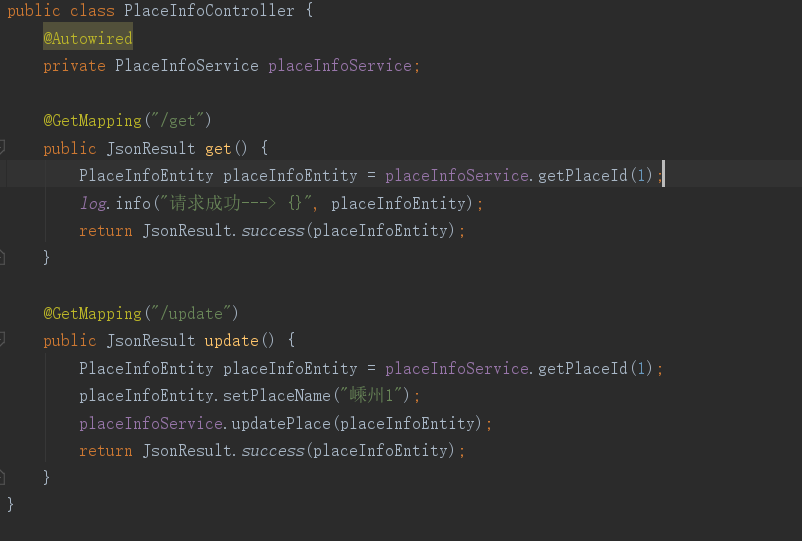
第一次请求时候,因为redis一开始没有数据,所以会从数据库中获取数据并写入到redis中,之后就一直会从缓存中获取数据

当执行了更新操作之后就会去清空redis对应key的数据

在此执行获取数据时,就会再去数据库中获取数据并存入到redis中
4.补充
缓存注解:
@Cacheable、@CacheEvict、@CachePut、@Caching、@CacheConfig
- allEntries属性:boolean类型,表示是否需要清除缓存中的所有元素,默认false,当为true时,Spring Cache将忽略指定的key,这样就可以清除所有的元素缓存。
- beforeInvocation属性:boolean类型,默认false,当为true时,Spring会在调用该方法之前清除缓存中的指定元素。表示的是 是否在方法执行之前就清空缓存,在默认情况下,如果方法执行会抛出异常,就不会清空缓存。
- condition属性:参数的条件,根据设置的条件返回true、false,true时才会去缓存数据。
- unless属性:结果条件,根据结果预先设置的条件判断true、false,true时才存入缓存。
①key的策略:
key属性是用来指定Spring缓存方法的返回结果时对应的key的。该属性支持SpringEL表达式。当我们没有指定该属性时,Spring将使用默认策略生成key。
自定义策略是指我们可以通过Spring的EL表达式来指定我们的key。
这里的EL表达式可以使用方法参数及它们对应的属性。
使用方法参数时我们可以直接使用“#参数名”或者“#p参数index”。
@Cacheable(value="Place",key="#placeId")
PlaceInfoEntity getPlaceId(Integer placeId);

@Cacheable(value="Place",key="#p0")
PlaceInfoEntity getPlaceId(Integer placeId);

@Cacheable(value="Place",key="#p0", condition = "#placeId >0",unless = "#result.placeName!=nullValidator")
PlaceInfoEntity getPlaceId(Integer placeId);

@CacheEvict(value="Place",key = "#placeInfoEntity.placeId")
boolean updatePlace(PlaceInfoEntity placeInfoEntity);

@CacheEvict(value="Place",key = "#p0.placeId")
boolean updatePlace(PlaceInfoEntity placeInfoEntity);

@CacheEvict(value="Place",key = "#p0.placeId" condition = "#placeInfoEntity.placeId > 0", unless = "#result.code != 0")
boolean updatePlace(PlaceInfoEntity placeInfoEntity);
②root对象的使用:
| 属性名称 | 描述 | 示例 |
|---|---|---|
| methodName | 当前方法名 | #root.methodName |
| method | 当前方法 | #root.method.name |
| target | 当前被调用的对象 | #root.target |
| targetClass | 当前被调用的对象的Class | #root.targetClass |
| args | 当前方法参数组成的数组 | #root.args[0] |
| caches | 当前被调用的方法使用的Cache | #root.caches[0].name |
总结
以上为个人经验,希望能给大家一个参考,也希望大家多多支持脚本之家。
相关文章

解决HttpServletRequest 流数据不可重复读的操作
这篇文章主要介绍了解决HttpServletRequest 流数据不可重复读的操作,具有很好的参考价值,希望对大家有所帮助。如有错误或未考虑完全的地方,望不吝赐教2021-08-08


最新评论