python (pyqt) 表格显示图片的实现方式
更新时间:2023年09月06日 09:43:52 作者:qq_278667286
这篇文章主要介绍了python (pyqt) 表格显示图片的实现方式,具有很好的参考价值,希望对大家有所帮助,如有错误或未考虑完全的地方,望不吝赐教
python (pyqt) 表格显示图片
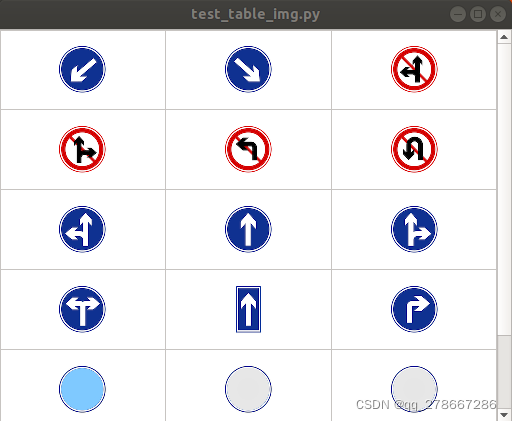
调用接口
激活显示数据所包含的图片:

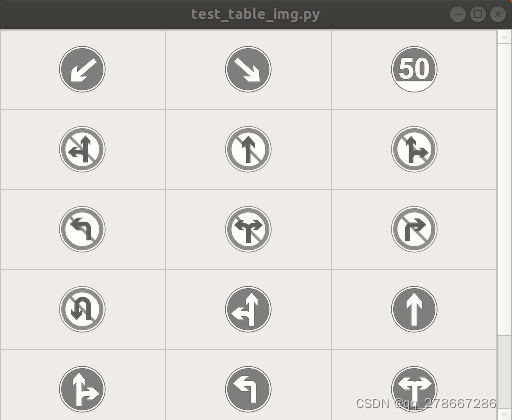
停止调用接口
几秒钟后表格填充固定图片显示为灰色:

代码
#!/usr/bin/env python
# coding=utf-8
# -*- coding: utf-8 -*-
import sys, os
import yaml
from PyQt5.QtWidgets import *
from PyQt5.QtGui import *
from PyQt5.QtCore import *
import random
class IconDelegate(QStyledItemDelegate):
    def initStyleOption(self, option, index):
        super(IconDelegate, self).initStyleOption(option, index)
        if option.features & QStyleOptionViewItem.HasDecoration:
            s = option.decorationSize
            s.setWidth(option.rect.width())
            option.decorationSize = s
class VisionDetectTable(QWidget):
    data_signal = pyqtSignal(list)
    Instance = None
    @classmethod
    def ShowDetectData(cls, list):
        if cls.Instance:
            cls.Instance.data_signal.emit(list)
    def __init__(self, file_path=None):
        super(VisionDetectTable, self).__init__()
        self.columnCount = 3
        self.rowCount = 5
        self.count = 0
        self.detect = []
        # QWidget.__init__()
        self.file_path = sys.path[0] + "/vision_detect/"
        if file_path:
            self.file_path = file_path
        self.loadyaml()
        self.initUI()
        self.data_signal.connect(self.setData)
        VisionDetectTable.Instance = self
        self.freeze()
        self.timer_freeze = QTimer(self)
        self.timer_freeze_flag = 0
        self.timer_freeze.timeout.connect(self.freeze_check)
        self.timer_freeze.start(3000)
        # test
        self.timer = QTimer(self)
        self.timer.timeout.connect(self.showTest)
        self.timer.start(7000)
    def freeze_check(self):
        if self.timer_freeze_flag >= 0:
            self.timer_freeze_flag = self.timer_freeze_flag - 1
        if self.timer_freeze_flag == 0:
            self.freeze()
        pass
    def unfreeze(self):
        self.timer_freeze_flag = 2
        self.setEnabled(True)
        pass
    def freeze(self):
        self.detect = self.vision_detect_list
        self.showData()
        self.setEnabled(False)
        pass
    def loadyaml(self):
        p = os.path.abspath(self.file_path + "info.yaml")  # 加载自动启动进程的配置文件
        f = open(p, 'r')  # 当前python目录/filename
        d = yaml.load(f)
        self.vision_detect_list = d["info"]
        self.vision_detect_list_obj = {}
        # print self.vision_detect_list
        '''
        - id: 0
          label: keep_left
          name: keep_left
          namecn: 靠左
          icon: traffic_sign_icon/keep_left.png
        - id: 1
          label: keep_right
          name: keep_right
          namecn: 靠右
          icon: traffic_sign_icon/keep_right.png
        - id: 2
          label: limit_50
          name: limit_50
          namecn: 限速50
          icon: traffic_sign_icon/limit_50.png
        '''
        f.close()
        for i in self.vision_detect_list:
            self.vision_detect_list_obj[i["label"]] = i
            print
            i["icon"]
        self.vision_detect_list_obj[i["label"]] = i
    def showTest(self):
        self.count = self.count + 1
        print
        self.count
        fakedata = []
        for i in self.vision_detect_list:
            if random.random() > 0.5:
                fakedata.append(i)
        # self.setData(fakedata)
        VisionDetectTable.ShowDetectData(fakedata)
        pass
    def setData(self, lst):
        self.unfreeze()
        self.detect = lst
        self.showData()
        pass
    def showData(self):
        l = len(self.detect)
        # self.table.clear()
        self.table.clearContents()
        mc = self.columnCount * self.rowCount
        empty = mc - l
        for k in range(l):
            i = k / self.columnCount
            j = k % self.columnCount
            item = self.detect[k]
            # self.table.clearCellWidget(i, j)
            tcw = self.tableCellWidget(item)
            self.table.setCellWidget(i, j, tcw)
            # print k
        if empty > 0:
            item = {"label": "empty"}
            while l < mc:
                i = l / self.columnCount
                j = l % self.columnCount
                # item = self.detect[k]
                # self.table.clearCellWidget(i, j)
                tcw = self.tableCellWidget(item)
                self.table.setCellWidget(i, j, tcw)
                l = l + 1
        pass
    def tableCellWidget(self, item):
        nm = item["label"]
        widget = QWidget()
        score=""
        if "score" in item:
            score=str(item["score"])
        widget.setToolTip(nm+":"+score)
        hLayout = QVBoxLayout()
        hLayout.setContentsMargins(0, 0, 0, 0)
        widget.setLayout(hLayout)
        label = QLabel("")
        label.setAlignment(Qt.AlignCenter)  # 水平居中
        if not nm in self.vision_detect_list_obj:
            nm="other_sign"
        #
        imgsrc = self.file_path + self.vision_detect_list_obj[nm]["icon"]
        label.setPixmap(QPixmap(imgsrc).scaled(50, 50))  # 只有图片
        # labeltxt = QLabel(r'0.5 ')
        # labeltxt.setAlignment(Qt.AlignCenter)  # 水平居中
        hLayout.addWidget(label)
        # hLayout.addWidget(labeltxt)
        return widget
        pass
    def initUI(self):
        layout = QHBoxLayout()
        layout.setContentsMargins(0, 0, 0, 0)
        table = QTableWidget()
        table.horizontalHeader().setSectionResizeMode(QHeaderView.Interactive | QHeaderView.Stretch)
        # table.setGeometry(QRect(0, 0, self.geometry().width(), self.geometry().height() - 40))
        table.setColumnCount(self.columnCount)
        table.setRowCount(self.rowCount)
        # table.setEditTriggers(QAbstractItemView.NoEditTriggers)
        table.setSelectionMode(QAbstractItemView.NoSelection)
        table.setFocusPolicy(Qt.NoFocus)
        # for i in QAbstractItemView:
        print
        QAbstractItemView
        self.setStyleSheet("QTableWidget::item:selected{ background-color: rgb(255,0,0);}")  # 或#ffffff
        self.setStyleSheet("QTableWidget::item:focus{ background-color: rgb(0,255,255);}")
        # self.setStyleSheet("QTableView:item:selected {background-color: #FF9900; color: #0000FF}\n"
        #             "QTableView:item:selected:focus {background-color: #ffff00; color: #FFffFF}")
        # table.setHorizontalHeaderLabels(['图片1', '图片2', '图片3'])
        table.verticalHeader().setVisible(False)
        table.horizontalHeader().setVisible(False)
        table.setDragEnabled(False)
        # table.setIconSize(QSize(50, 50))
        # delegate = IconDelegate(table)
        # table.setItemDelegate(delegate)
        for i in range(self.columnCount):  # 让列宽和图片相同
            table.setColumnWidth(i, 100)
        for i in range(self.rowCount):  # 让行高和图片相同
            table.setRowHeight(i, 80)
        layout.addWidget(table)
        self.setLayout(layout)
        self.table = table
        # self.table.setFixedSize(layout.sizeHint())
    def resizeEvent(self, e):
        self.table.resize(self.width(), self.height())
        # self.table.move(10, 20)
if __name__ == '__main__':
    app = QApplication(sys.argv)
    layout = QVBoxLayout()
    layout.setContentsMargins(0, 0, 0, 0)
    widget = QWidget()
    widget.setLayout(layout)
    # widget.setStyleSheet('.QWidget{border-style:solid;border-width:3;margin:1px;padding:10px;border-color: red yellow blue green;}')
    widget.show()
    vdt = VisionDetectTable()
    # vdt.setContentsMargins(0, 0, 0, 0)
    layout.addWidget(vdt)
    # layout.addWidget(vdt,0,Qt.AlignCenter )
    # vdt.show()
    sys.exit(app.exec_())
总结
以上为个人经验,希望能给大家一个参考,也希望大家多多支持脚本之家。
相关文章

python的scipy.stats模块中正态分布常用函数总结
在本篇内容里小编给大家整理的是一篇关于python的scipy.stats模块中正态分布常用函数总结内容,有兴趣的朋友们可以学习参考下。2021-02-02
python版本坑:md5例子(python2与python3中md5区别)
这篇文章主要介绍了python版本坑:md5例子(python2与python3中md5区别),需要的朋友可以参考下2017-06-06


最新评论