docker安装使用xdebug的过程
docker安装使用xdebug
1、需要先安装PHP xdebug扩展
1.1 到https://pecl.php.net/package/xdebug下载tgz文件,下载当前最新稳定版本的文件。然后把这个tgz文件放到php/extensions目录下,记得install.sh中要替换解压的文件名: installExtensionFromTgz xdebug-3.2.2

1.2 php.ini可以提前设置好一些xdebug配置信息:
xdebug.remote_enable = 1
xdebug.remote_handler = "dbgp"
xdebug.mode=debug
xdebug.client_host=host.docker.internal
xdebug.client_port=9003
xdebug.idekey=PHPSTORM
1.3 修改php镜像配置之后,重新构建镜像:docker compose build php。然后重新启动镜像:docker compose up -d1.4 执行phpinfo()之后,查看是否有生成xdebug信息。
2、修改phpstorm debug配置
参考文档:
https://learnku.com/articles/51381
https://www.jetbrains.com/help/phpstorm/2021.3/configuring-xdebug.html
先说自己踩到两个坑:
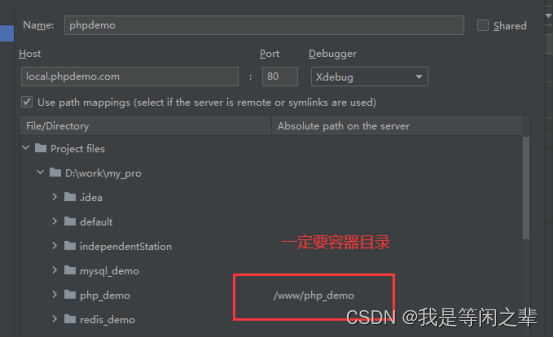
1、配置Servers的时候,填写项目地址,需要填写docker容器里的目录。比如(www/php_demo)

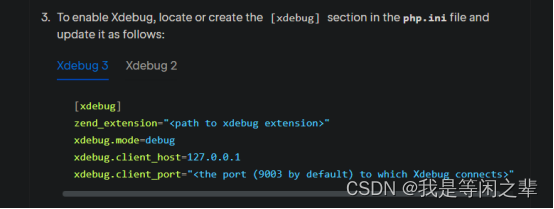
2、安装xdebug不同版本对应填写在php.ini的参数是不一样的。
文档地址:https://www.jetbrains.com/help/phpstorm/2021.3/configuring-xdebug.html

xdebug2版本:
xdebug.remote_enable = 1
xdebug.remote_handler = "dbgp"
xdebug.remote_host=host.docker.internal
xdebug.remote_port = 9003
xdebug.remote_log = /var/log/php/xdebug.log
xdebug.idekey=PHPSTORM
xdebug3版本:
xdebug.remote_enable = 1
xdebug.remote_handler = "dbgp"
xdebug.mode=debug
xdebug.client_host=host.docker.internal
xdebug.client_port=9003
xdebug.idekey=PHPSTORM
接下来详细讲一下PHPSTORM配置过程:
1、配置Server

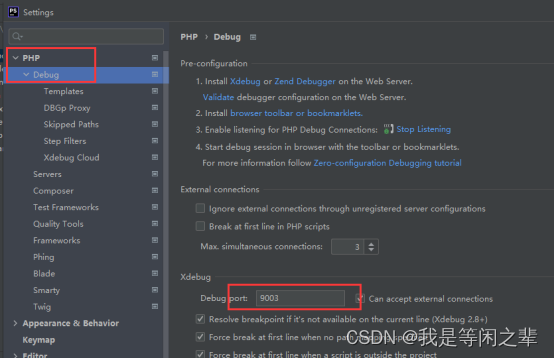
2、配置Debug port

3、编辑项目的debug配置

4、启动debug

5、调试debug
5.1浏览器调试
1、在 Google 浏览器插件市场中下载 Xdebug

2、右键点击 Xdebug 图标选择选项点击进入配置页面将 IDE Key 设置完整保存。

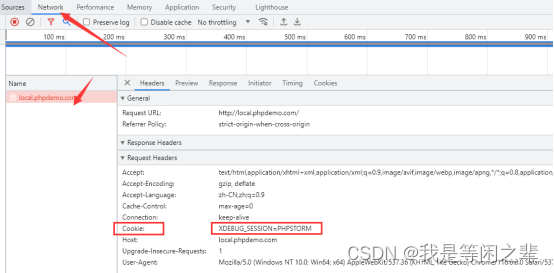
3、设置好就可以请求接口了,可以查看headers头部是否有携带XDEUG_SESSION:

5.2、postman调试

到此这篇关于docker安装使用xdebug的文章就介绍到这了,更多相关docker安装使用xdebug内容请搜索脚本之家以前的文章或继续浏览下面的相关文章希望大家以后多多支持脚本之家!


最新评论