html随意拖动内容位置的两种实现方式
发布时间:2020-03-04 16:03:44 作者:warren  我要评论
我要评论
这篇文章主要介绍了html随意拖动内容位置的两种实现方式,文中通过示例代码介绍的非常详细,对大家的学习或者工作具有一定的参考学习价值,需要的朋友们下面随着小编来一起学习学习吧
GPT4.0+Midjourney绘画+国内大模型 会员永久免费使用!
【 如果你想靠AI翻身,你先需要一个靠谱的工具! 】
测试:chrome v80.0.3987.122 正常
两种方式为:拖拽普通标签位置或拖拽canvas中的文本框位置
1. 实现鼠标拖动标签元素到任意位置
css 代码
1 2 3 4 5 6 7 8 9 10 11 12 13 14 15 16 | #range { position: relative; width: 600px; height: 400px; margin: 10px; background-color: rgb(133, 246, 250);}.icon { position: absolute; height: 100px; width: 100px; cursor: move; background-color: #ff9204; user-select: none;} |
html代码
js代码
1 2 3 4 5 6 7 8 9 10 11 12 13 14 15 16 17 18 19 20 21 22 23 24 25 26 27 28 29 30 31 32 33 34 35 36 37 38 | const main = document.getElementById('range');const icon = document.querySelector('.icon');let move = false;let deltaLeft = 0, deltaTop = 0;// 拖动开始事件,要绑定在被移动元素上icon.addEventListener('mousedown', function (e) { /* * @des deltaLeft 即移动过程中不变的值 */ deltaLeft = e.clientX-e.target.offsetLeft; deltaTop = e.clientY-e.target.offsetTop; move = true;})// 移动触发事件要放在,区域控制元素上main.addEventListener('mousemove', function (e) { if (move) { const cx = e.clientX; const cy = e.clientY; /** 相减即可得到相对于父元素移动的位置 */ let dx = cx - deltaLeft let dy = cy - deltaTop /** 防止超出父元素范围 */ if (dx < 0) dx = 0 if (dy < 0) dy = 0 if (dx > 500) dx = 500 if (dy > 300) dy = 300 icon.setAttribute('style', `left:${dx}px;top:${dy}px`) }})// 拖动结束触发要放在,区域控制元素上main.addEventListener('mouseup', function (e) { move = false; console.log('mouseup');}) |
2. canvas绘制文本框,并实现鼠标将其拖拽移动到任意位置
css 代码
1 2 3 4 5 6 7 8 9 10 11 | .cus-canvas{ background: rgb(50, 204, 243);}.input-ele{ display: none; position: fixed; width: 180px; border: 0; background-color: #fff;} |
html 代码
1 2 3 4 | <div> <canvas id="canvas" class="cus-canvas" width="800" height="600"></canvas> <input id="inputEle" class="input-ele"/></div> |
js代码
实现原理为记录鼠标移动的位置,不断的重绘矩形框和文本内容
1 2 3 4 5 6 7 8 9 10 11 12 13 14 15 16 17 18 19 20 21 22 23 24 25 26 27 28 29 30 31 32 33 34 35 36 37 38 39 40 41 42 43 44 45 46 47 48 49 50 51 52 53 54 55 56 57 58 59 60 61 62 63 64 65 66 67 68 69 70 71 72 73 74 75 76 77 78 79 80 81 82 83 84 85 86 87 | let mouseDown = false;let deltaX = 0;let deltaY = 0;let text = 'hello'const canvas = document.getElementById('canvas');const ctx = canvas.getContext('2d');const cw = canvas.width, ch = canvas.height;const rect = { x: 20, y: 20, width: 150, height: 50}/** 设置文字和边框样式 */ctx.font="16px Arial";ctx.fillStyle = "#fff"; /** 设置为 center 时,文字段的中心会在 fillText的 x 点 */ctx.textAlign = 'center';ctx.lineWidth = '2';ctx.strokeStyle = '#fff';strokeRect()const inputEle = document.getElementById('inputEle');inputEle.onkeyup = function(e) { if(e.keyCode === 13) { text = inputEle.value strokeRect() inputEle.setAttribute('style', `display:none`) }}canvas.ondblclick = function(e){ inputEle.setAttribute('style', `left:${e.clientX}px;top:${e.clientY}px;display:block`); inputEle.focus();}canvas.onmousedown = function(e){ /** 获取视口左边界与canvas左边界的距离 加上 鼠标点击位置与canvas左边界的长度,这个值是相对移动过程中不变的值 */ deltaX=e.clientX - rect.x; deltaY=e.clientY - rect.y; mouseDown = true}; const judgeW = cw-rect.width, judgeH = ch-rect.height;canvas.onmousemove = function(e){ if(mouseDown) { /** 相减即可获得矩形左边界与canvas左边界之间的长度 */ let dx = e.clientX-deltaX; let dy = e.clientY-deltaY; if(dx < 0) { dx = 0; } else if (dx > judgeW) { dx = judgeW; } if(dy < 0) { dy = 0; } else if(dy > judgeH) { dy = judgeH; } rect.x = dx; rect.y = dy; strokeRect() }}; canvas.onmouseup = function(e){ mouseDown = false}; /** 清除指定区域 */function clearRect() { ctx.clearRect(0, 0, cw, ch)}/** 画矩形 */function strokeRect() { clearRect() /** 这里如果不调用 beginPath 历史的矩形会重新被绘制 */ ctx.beginPath() ctx.rect(rect.x, rect.y, rect.width, rect.height) ctx.stroke(); // 设置字体内容,以及在画布上的位置 ctx.fillText(text, rect.x + 70, rect.y + 30);} |
欢迎交流 Github
到此这篇关于html随意拖动内容位置的两种实现方式的文章就介绍到这了,更多相关html随意拖动内容内容请搜索脚本之家以前的文章或继续浏览下面的相关文章,希望大家以后多多支持脚本之家!
相关文章
 这篇文章主要介绍了基于Html5实现的react拖拽排序组件示例,小编觉得挺不错的,现在分享给大家,也给大家做个参考。一起跟随小编过来看看吧2018-08-13
 本文通过实例代码给大家介绍了HTML5拖拽功能实现的拼图游戏,代码简单易懂,非常不错,具有一定的参考借鉴价值,需要的朋友参考下吧2018-07-31
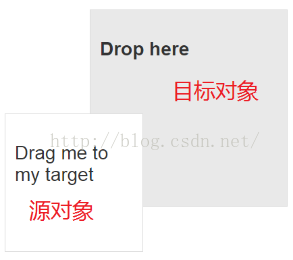 拖拽API是HTML5的新特性,相对于其他新特性来说,重要程度占到6成。这篇文章通过经典案例给大家介绍了HTML5拖拽API的知识要点,需要的朋友参考下吧2018-04-20
 这篇文章主要介绍了HTML5 拖拽批量上传文件的示例代码的相关资料,小编觉得挺不错的,现在分享给大家,也给大家做个参考。一起跟随小编过来看看吧2018-03-28
 这篇文章主要介绍了html5实现多图片预览上传及点击可拖拽控件的相关资料,小编觉得挺不错的,现在分享给大家,也给大家做个参考。一起跟随小编过来看看吧2018-03-15
 本篇文章主要介绍了详解Html5原生拖拽操作,小编觉得挺不错的,现在分享给大家,也给大家做个参考。一起跟随小编过来看看吧2018-01-12
 本篇文章主要介绍了HTML5 拖放(Drag 和 Drop)详解与实例代码,具有一定的参考价值,有兴趣的可以了解一下2017-09-14
- 拖放是一种常见的特性,即抓取对象以后拖到另一个位置,在 HTML5 中,拖放是标准的组成部分。在HTML5中用户可以使用鼠标选择一个可拖动元素,将元素拖动到一个可放置元素,2017-08-23
- 这篇文章主要介绍了html5使用Drag事件编辑器拖拽上传图片的示例代码的相关资料,需要的朋友可以参考下2017-08-22
- 这篇文章主要为大家详细介绍了HTML5拖放功能的相关资料,如何实现HTML5拖放效果,具有一定的参考价值,感兴趣的小伙伴们可以参考一下2017-07-13






最新评论